Microsoft Teams FAQ
What's Microsoft Teams?
Microsoft Teams is a chat-based workspace that lets participants access files, have conversations and schedule online meetings — all in one place. Students, faculty, and staff use Microsoft Teams for online synchronous (live) class sessions and meetings. If your device doesn't have Teams, download and install the software.
Teams Meetings – Audio and Video
Teams Meetings – Content Sharing
Teams Meetings – Meeting Organizers
Teams Meetings – Recordings
Teams Sites and Channels
Other Questions
Teams Meetings – Audio and Video
How do I join a Teams meeting?
While Microsoft offers a Teams web version via Chrome or Edge, the Teams software offers the best meeting experience for audio and video. Learn how to access the "join meeting" link for your Teams meeting.
How do I set a background image or blur my surroundings in a Teams meeting?
You can change your camera background for Teams meetings with a custom image — if supported on your device. Or you can blur your background with a standard blur or portrait blur. See "Change your background in Microsoft Teams meetings."
Can I use my mobile device and its built-in camera for Teams meetings?
Yes, the mobile apps for Microsoft Teams can use your device's camera. Download the Teams app for iOS or the Teams app for Android.
How do I test my microphone, speaker, and camera before joining a Teams meeting?
Use the Microsoft Teams desktop software and try a test call.
For my camera feed in a Teams meeting, I see a mirrored image, including any text I'm showing. What do attendees see?
Other attendees see the non-mirrored view of your camera feed, including any text on physical documents or a Teams background filter. Only you see your Teams camera view as if you are looking in a mirror. If you prefer, you can unmirror your video feed.
How can I customize participant video feeds in a Teams meeting?
Teams offers several video features to control video feeds. For example, you can change the number of participant video feeds. While in a Teams meeting, locate the "Views" icon on the meeting controls toolbar. Click or tap the Views icon. A drop-down menu appears. Click or tap Select Max Gallery Size and then select 4, 9, 16, or 49 people. For other video customizations, see "Participating in Microsoft Teams Meetings."
Can I briefly unmute myself while I'm muted in a Teams meeting?
Yes, you can temporarily unmute in a Teams meeting with a simple keyboard shortcut. Start by muting your microphone in a Teams meeting. From the meeting controls toolbar, click or tap the Mic icon to mute. When you need to speak, you press and hold down Ctrl+Spacebar for Windows or Option+Spacebar for macOS. Your mic is unmuted for as long as you hold. Upon releasing the keys, your mic will return its mute setting.
Can a speaker phone join a Teams meeting?
Yes, see "Join a Microsoft Teams Meeting with a Speaker Phone."
Back to Top
Teams Meetings – Content Sharing
How do I share my screen in a Teams meeting?
If you're a meeting organizer, co-organizer, or presenter in a Teams meeting, you can share content. To share your whole screen, a specific window, a PowerPoint presentation, or a whiteboard, see "Share content in Microsoft Teams meetings." To choose a presenter mode, see "Using Presenter Modes When Sharing in a Teams Meeting."
Should a speaker use PowerPoint Live with Presenter View in a Teams meeting?
When sharing a PowerPoint presentation, a speaker can share their screen (desktop) or use PowerPoint Live, featuring Presenter View. With Presenter View, a speaker can see slide notes and upcoming slides in Teams; meeting participants cannot. Before using Presenter View, consider the number of monitors you will use and whether your online class session/meeting will be completely virtual or hybrid.
Mode
Single Monitor
Dual Monitor
Completely virtual
Use PowerPoint Live's Presenter View in Microsoft Teams.
Use desktop share mode in Teams, using one monitor for PowerPoint and the other for video/participants view.
Hybrid: some people remote; some people in the room
Use desktop share mode in Teams, understanding you will not be able to see meeting chat or raised hands.
Use desktop share mode in Teams, using one monitor for PowerPoint and another for video/participants view.
How do I switch an attendee to a presenter in the Teams meeting?
While in a Teams meeting, locate the "People" icon on the meeting controls toolbar. Select the People icon to reveal the Participants panel on the right side. Click or tap the three-dots menu icon for the attendee participant. From the drop-down menu, select Make a presenter. Teams prompts you to confirm the role change. Select Change. The participant now has the presenter role.
Can I annotate my shared screen in a Teams meeting?
Yes, but note that annotations only work with your shared screen/desktop — not with a shared single window. Also, other attendees can mark up your shared screen, if you allow them. See "Use annotation while sharing your screen in Microsoft Teams."
How can I better focus on shared content in a Teams meeting?
When viewing shared content in a Teams meeting, any participant can click or tap the Pop out icon on the meeting controls toolbar. The Pop-out feature gives the content more space on your screen(s). To pop in the content, click or tap the "x" icon in the upper right. If you go on hold during the meeting, the shared content automatically pops in.
Back to Top
Teams Meetings – Meeting Organizers
What are the different roles in a Teams meeting?
Teams offers several roles for meetings, including organizer, presenter, co-organizer, and attendee. To understand the capabilities with each role, see "Roles in Microsoft Teams meetings."
How do I make a participant into a co-organizer for the Teams meeting?
Meeting organizers can promote up to 10 participants to serve as co-organizers. To assign the co-organizer role to a meeting participant, see "Add co-organizers to a meeting in Microsoft Teams."
How do I copy and send the "Join Teams meeting" link to a participant who needs it?
If someone is missing the "Join meeting" link, the meeting organizer can send it before the meeting or during the meeting.
Can I mute all participants in a Teams meeting?
A meeting organizer or presenter can mute the participants in your Teams meeting. See "Manage attendee audio and video permissions in Microsoft Teams meetings."
What's a Teams webinar meeting?
A Teams webinar gives the meeting owner a form link to allow participants to register. Team Webinars can help deter video-conference bombing — the screen sharing of inappropriate content by an online intruder. See "Get started with Microsoft Teams webinars."
How do I use a poll in my Teams meeting?
Meeting organizers and presenters can create a poll in advance. Then send the poll before, during, or after the meeting. Learn more about polling your meeting attendees.
How can I have participants submit written questions for the Teams meeting?
Meeting organizers can set the Question and Answer (Q&A) option in Meeting Options. See "Q&A in Microsoft Teams meetings."
How do I use Breakout Rooms in a Teams meeting?
Breakout rooms allow a meeting organizer to split attendees into multiple online rooms for discussion and collaboration in Teams. See "Use breakout rooms in Microsoft Teams meetings."
How do I get a Teams meeting attendance report?
Meeting organizers and instructors can download the attendance report. See "Manage meeting attendance reports in Microsoft Teams"
Back to Top
Teams Meetings – Recordings
How do I record Teams meetings?
Only meeting organizers, co-organizers, and presenters can start and stop recording. See "Record a meeting in Microsoft Teams."
Does a shared whiteboard appear in a Teams meeting recording?
No, whiteboards are not captured in Teams meeting recordings. Learn more about whiteboards from Microsoft's "Share a whiteboard in Microsoft Teams" article.
Where are Teams meeting recordings stored?
Teams meeting recordings save in one of two places: OneDrive for Business or a Microsoft Teams site. See "Accessing Your Teams Meeting Video Recordings."
Do Teams meeting recordings expire?
Yes. Teams meeting videos — stored on Teams sites via SharePoint or on OneDrive for Business — expire after one year. If the videos you own need to be retained, you can change their expiration settings. See "Manage the expiration of a meeting recording."
Back to Top
Teams Sites and Channels
How can I change my Teams sites view to switch between grid and list views?
To switch from grid view to list view or vice versa, follow these steps to customize your Teams sites view.
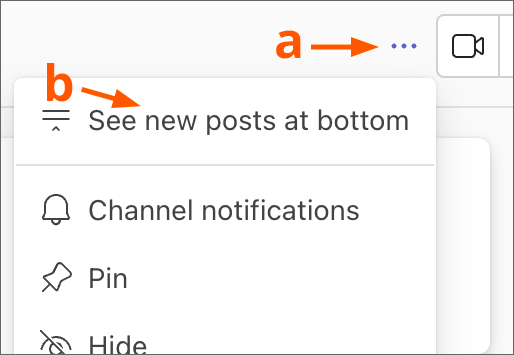
The latest posts are at the top of the channel. Can I reorder new posts to the bottom?
Yes. If new Teams posts appear at the top of the channel, you can reorder them to the bottom.
- In the upper right of the channel, select the three-dots menu icon.
- A drop-down menu appears. Select See new posts at the bottom.
I'm a student. How long do I have access to a Teams site after the course ends?
Enrolled students retain access to Teams course sites until four weeks after the term ends.
I'm an instructor. How do combined D2L course sites affect Teams course sites?
Class sections that are officially combined within CheckMarq will generate a combined Teams site. Class sections that are combined in D2L via CheckMarq Faculty Center or request will generate separate Teams sites per section. Instructors can move students from separate Teams sites into a single Teams site. But note that automatic enrollment updates will only continue for original members of the single Teams site. Additions or drops would no longer be automated for students who are manually moved to the single Teams site.
I'm an instructor. Can I prevent Teams site creation for my courses?
Yes, instructors use CheckMarq's Faculty Center to control creation of Teams sites for their class sections.
Back to Top
Other Questions
Microsoft Teams is frozen on my computer. How can I force Teams to quit?
Is Teams unresponsive? Windows users can force Teams to quit by pressing the Ctrl, Alt, and Delete keys together on your keyboard. A screen appears with a list of actions. Select Task Manager. From the Task Manager window, select Microsoft Teams. Then click or tap End Task. Teams is forced to quit. Relaunch Teams and immediately sign out. Then sign in again.
Mac users can force-quit Teams by pressing the Option, Command, and Esc (Escape) keys together on your keyboard. The "Force Quit Applications" prompt appears. Select Microsoft Teams and click Force Quit. Relaunch Teams and immediately sign out. Then sign in again.
Why do students have a chat icon in Teams and some faculty/staff do not?
IT Services is gradually moving all faculty and staff to both Teams chat and calling. See "For Faculty/Staff: Chat Availability in Microsoft Teams."
What are the Mac requirements for new Teams?
Your Mac must run macOS Monterey (version 12) or newer. Mac users should allow notifications and turn on screen sharing for new Teams. See "New Teams for Mac - Overview and prerequisites."
How do I turn off chat bubbles in a Teams meeting?
During Teams meetings when your chat window is closed, chat bubbles appear to notify you of participant chat messages. Chat bubbles won't show if chat is already open in your meeting window. To turn chat bubbles off during the meeting, locate the "More/three-dots menu" icon on the meeting controls toolbar. Select More/three-dots menu icon > Settings > Don't show chat bubbles.
What's a Loop component?
Loop components serve as starters for composing content, such as an agenda, checklist, table, task list or paragraph. After sending a Loop component via chat or channel post, participants can edit content together in real time. Find out how to "Send a Loop component in a channel" or "Send a Loop component in Microsoft Teams chats."
How can I approve DocuSign forms via Teams?
You'll need to add and enable the Approvals app to access your DocuSign Manage tab from within Microsoft Teams. See "Microsoft Teams Approvals with DocuSign."
How do I enlarge the Teams interface?
You can use keyboard shortcuts or your mouse to increase (or decrease) the size of the Teams interface. See "Zoom in and out in Microsoft Teams." Note that when Teams is zoomed in, icons in the left vertical toolbar may drop away. In the left vertical toolbar, use the three-dots icon to access any hidden left-toolbar icons, such as Calendar and OneDrive.
Where can I find accessibility tips for Teams?
Microsoft Teams includes features to make Teams accessible to persons with disabilities. Learn more at "Accessibility tools for Microsoft Teams."
Back to Top