Voice mail from phone lines that are shared by multiple users will be sent to a single e-mail address. The primary designate can give access to other users. People who have been granted access to a shared mailbox can open the the shared account by using Outlook or Outlook on the Web.
How to Access a Shared Mailbox IF YOU HAVE BEEN GRANTED ACCESS to that mailbox:
How to Share your mailbox if you are the Mailbox Owner
Use Outlook for Windows to access a Shared Mailbox
- After you've been given security access to the Inbox folder, open Outlook using your personal credentials.
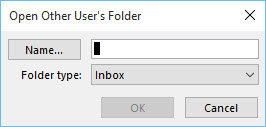
- Click on File > Open & Export > Other User's Folder…

- Enter a username in the Name… text box or choose an account from the Global Address List by clicking Name....
- Click the down arrow to select a folder type. Select Inbox and click OK.
Please note: you will only have access to the Inbox. No additional folders will be accessible.
Use Outlook for Mac to access a Shared Mailbox
-
After you've been given security access to the Inbox folder, open Outlook.
- Click File > Open > Other User's Folder…
- In the search field, enter a name or username.
- Make sure Inbox is selected.
Please note: you will only have access to the Calendar or Inbox. No additional folders will be accessible.
- Click Open.
- If you are prompted to allow autodiscover-s.outlook.com, click Allow.
Use Outlook on the Web to access a Shared Mailbox
- Login to https://portal.office.com/
- Click or tap Outlook.
- In the upper right corner, click the user icon (your initials or your profile image).
- A drop-down menu appears. Click Open another mailbox....
- Enter the username for the shared mailbox. Outlook on the Web will display potential mailboxes for you to select as you type.
- Once you have the right mailbox selected, click Open.
- The shared mailbox will open in a new browser window and can be used just as you would use your personal mailbox.
How to Share your mailbox using Outlook for Windows if you are the Mailbox Owner
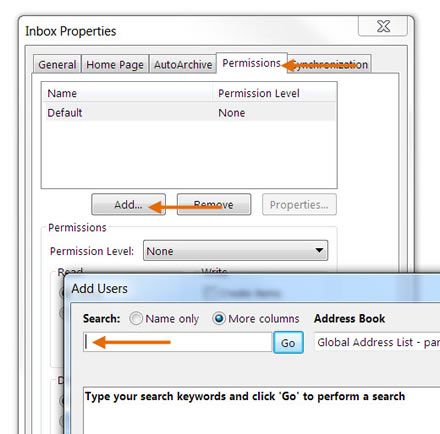
- Open Outlook, right-click the Inbox > Properties > the Permissions tab.
- Click Add to add a user and enter their name and search the Global Address List.
- Click Add. Click OK.

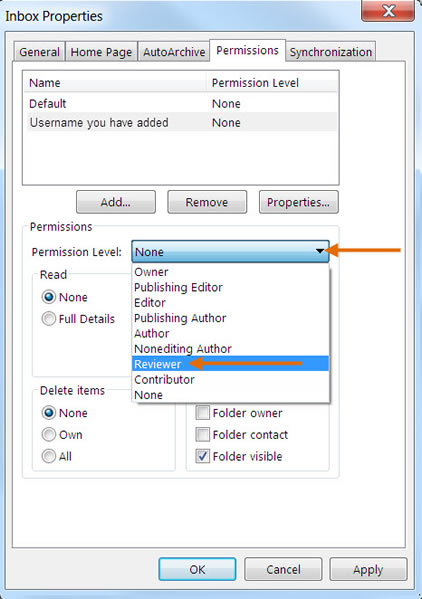
- Select a Permission Level for the user. Click OK.

How to Share your mailbox using Outlook for Mac if you are the Mailbox Owner
- Launch Microsoft Outlook. Click to select the mail folder or mail account that you want to share.
- Click Organize tab > Folder Permissions.
- A properties window appears. Click the Add User... button.
- In the Search box, type the name of the person. When it appears in the list, click it, and then click the Add button.
- Click the user's name, and then in the Permission Level list, select Reviewer from the drop‐down menu for Permission Level.
- Click OK.
If you have further questions, please contact the IT Services TechSquad.
TRAINING & DOCUMENTATION
MORE ABOUT OUR SERVICES
Computer Labs & Smart Classrooms
Help with Computers & Printers


