
-
- Online Course Development
- Online Program Development
- Program Guidelines
- Accessible Technology
- Center for Teaching and Learning
- Contact Us
- For faculty and staff questions about online teaching or course design, submit your questions to the Learning Technologies portal.
Walk-in Consultation Hours for Faculty and Staff
Monday-Friday 9 a.m. - 3 p.m.
Room 326 Raynor Library
For more in-depth questions and course consultations, schedule an appointment with one of our Instructional Design and D2L Specialists
PROBLEM WITH THIS WEBPAGE?Report an accessibility problem
To report another problem, please contact emily.newell@marquette.edu.
D2L Rubrics
Analytic and holistic rubrics are used to assess student performance. Well-written descriptions of the levels for each criterion is important to avoid confusion regarding expectations and to clarify how to approach assignments.
This guide will provide information on the types of rubrics available in D2L along with instruction on how to create, edit, delete rubrics as well as use them for grading dropbox submissions (assignments) and discussion topics. (If you choose to add a rubric to a grade item, do not add it to the dropbox or discussions tool.)
Note: Rubrics cannot be added to quizzes or surveys.
Video Guides
- Rubrics: Creating an Analytic (Points) Rubric
- Rubrics: Creating an Analytic (Custom Points) Rubric
- Rubrics: Creating a Holistic Rubric
Rubrics Walkthrough
Types of Rubrics
There are two types of rubrics in D2L: analytic (the most commonly used) and holistic.
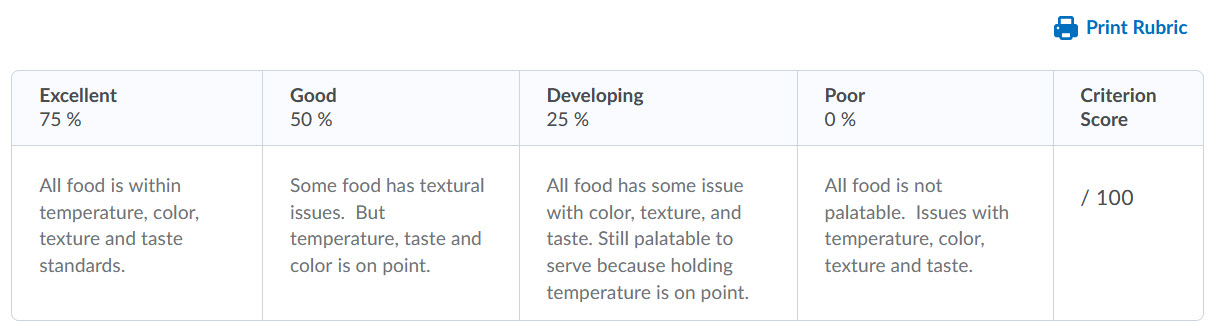
Holistic: (One-dimensional rubric) Student performance is assessed with one single criteria used based on predefined achievement levels. Uses percentage or text scoring method.
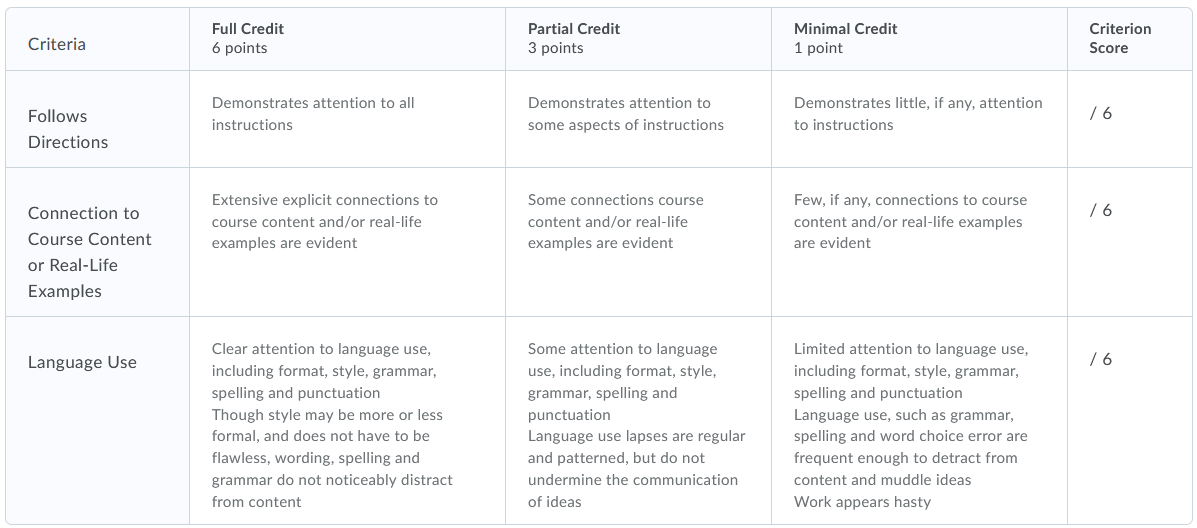
Analytic: (Two-dimensional rubric) Student performance is assessed based on multiple criteria with different levels of achievement. You assess each criterion separately, resulting in an overall assessment score. Analytic rubrics can use points, custom points, and text as a scoring method. If using points or custom points the overall score is calculated based on the total number of points achieved in the rubric. The custom points option is flexible because each row can consist of different point values.
What are Levels and Criteria?
- Criteria: Are categories in which you will evaluate students. For instance, Format, Appropriate Focus, Critical Thinking and Language Use.
- Levels: Represent students’ level of performance in a category (i.e., criterion). A level’s description should reflect what students are required to do to achieve the level. Example of a rubric’s levels: Proficient / Basic / Below average / Unacceptable
Rubric Setup
Rubric Creation
The rubric tool allows for selection of rubric type and scoring method and creation of performance criteria and levels.
- Click Assessments on the Main Navigation Bar.
- Select Rubrics from the drop-down menu.
- Select New Rubric.
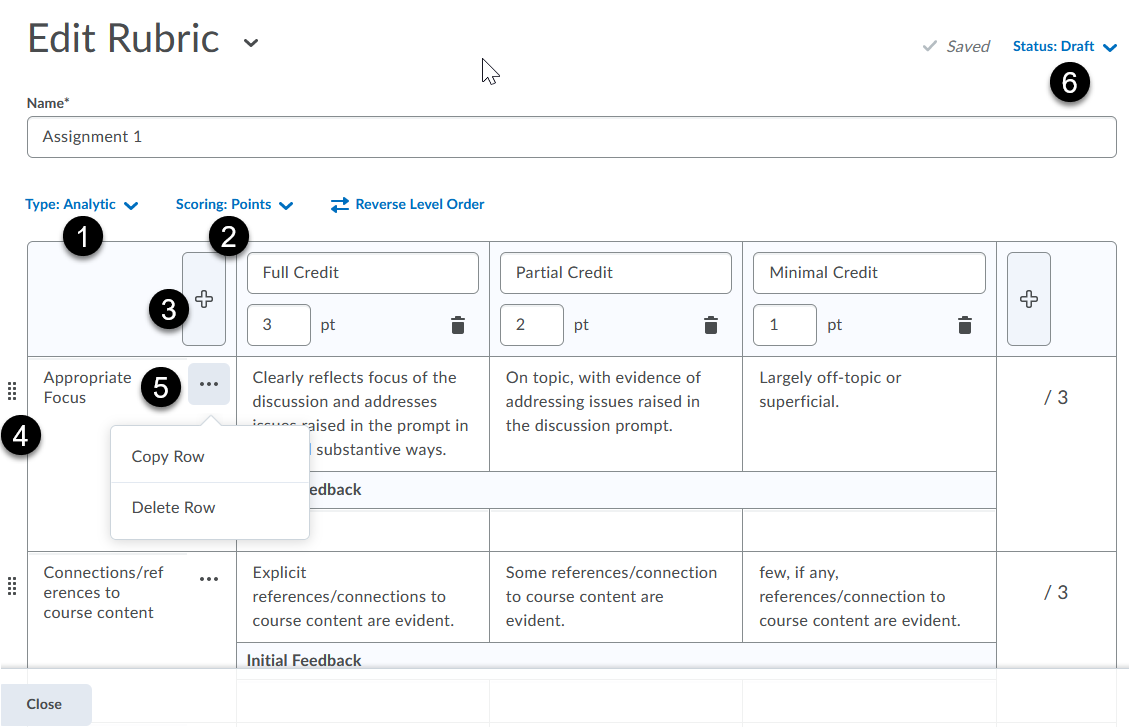
Click the drop-down menu to change the type of rubric – Analytic vs. Holistic [1].
The scoring methods (no score, points, custom points) can be changed during editing [2].
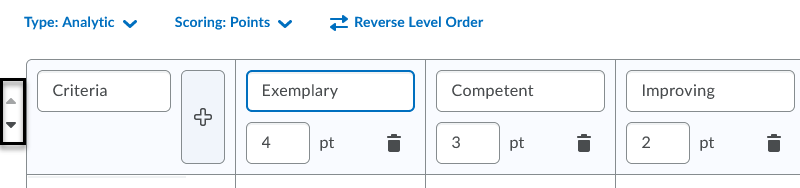
Instructors can add levels with clicking the (+) button [3].
Criteria can be rearranged using drag and drop by clicking and holding the handle to move to a new position [4].
To copy or delete a row, select the ellpsis located in the criteria [5].
Change the rubric status to either draft, published or archived. Only the published mode is visible to students. Archiving a rubric will not make it available for future associations [6].
Brightspace Editor
The Brightspace editor is available in the description and feedback fields. Use the full-screen icon to expand the toolbar.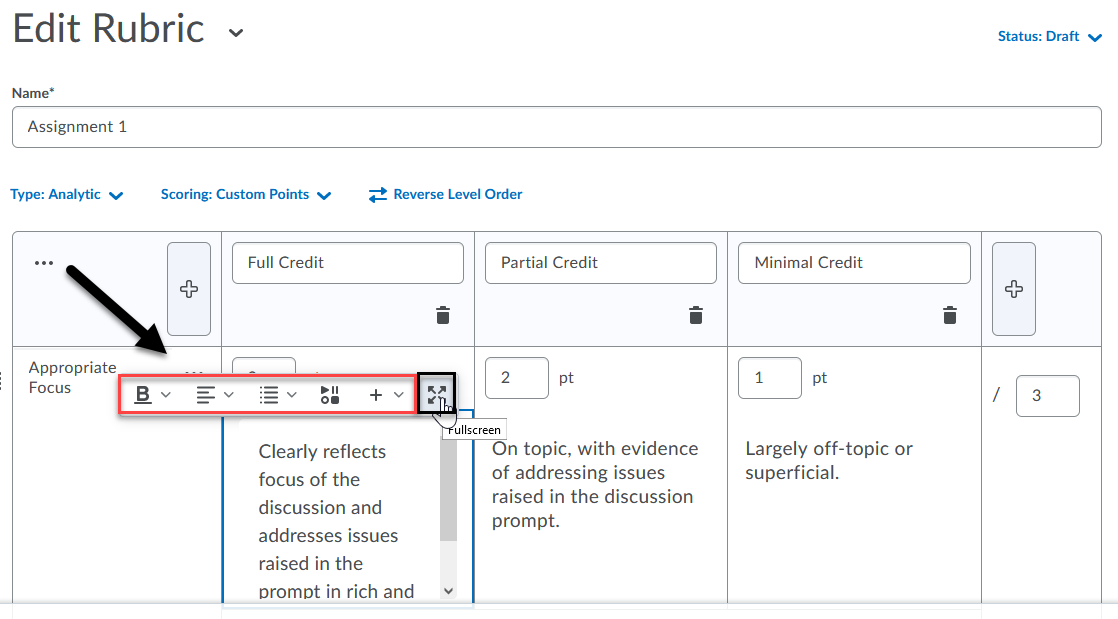
Add a Criteria Group
If you need to create more than one criterion group, select the Add a Criteria Group button located above the Overall Score at the bottom of the page. It is possible to reorder the groups using the directional arrows found to the left of the header.
Copy and Delete a Criteria Group
Use the ellipsis to find the option to either copy or delete a criteria group. 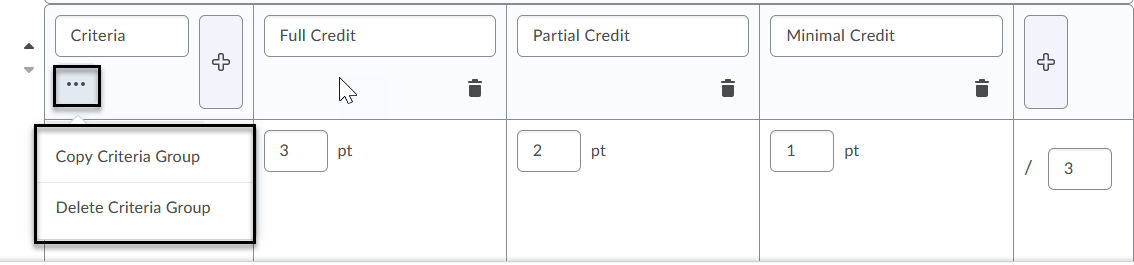 Note: When a rubric is used for evaluation, the rubric is locked and can no longer be edited or deleted.
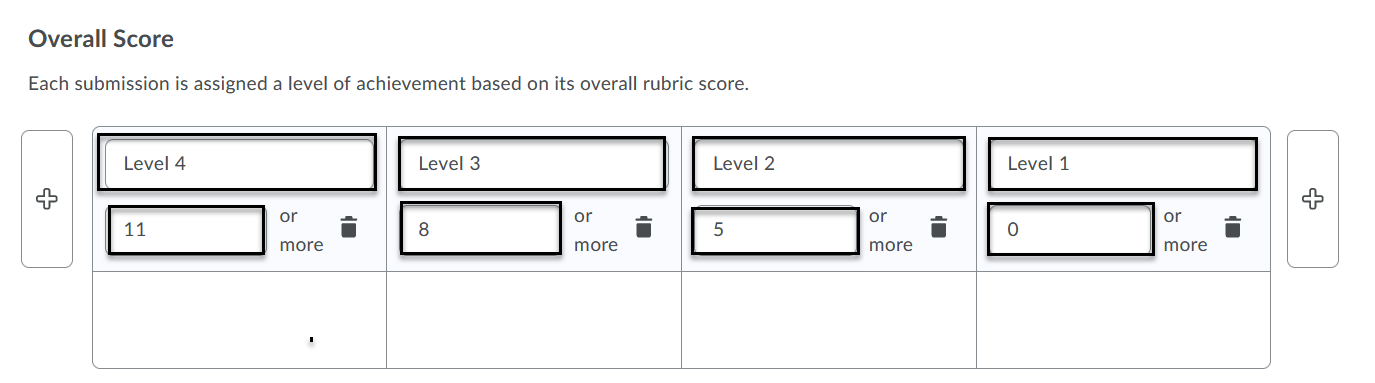
Overall Score
Scroll down the page to edit Overall Score.
Edit the Overall Score levels to align to the total points of the rubric. This step is important when it comes to using the rubric for grading. The system will automatically assign a level of achievement based on the overall score. If you notice one of the levels are not checked, you must select one that closely relates to the total score for students to be able to see the rubric once all scores are published.
Preview and Print Rubric
Select Preview from the drop-down menu next to the name of the rubric (under Assessments > Rubrics).
Click the Print button (upper right-hand of the page). This feature is available for both instructors and students.

Attach a Rubric to Dropbox, Discussions or Grades
Attach to existing Dropbox
- Click Assessments on the main navigation bar.
- Select Dropbox from the drop-down menu.
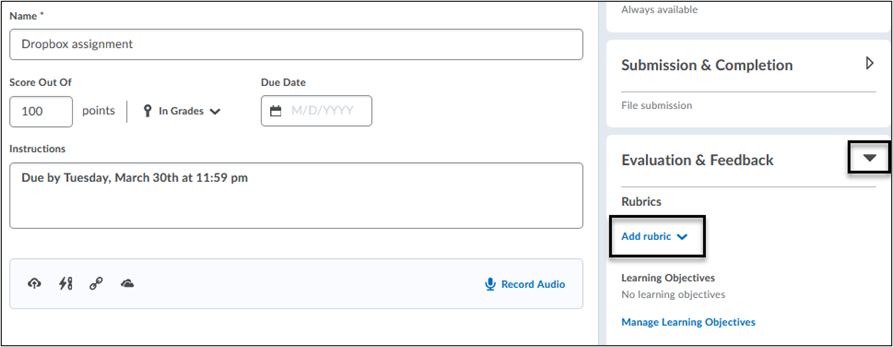
- Expand the arrow for Evaluation & Feedback.
- Click Add rubric to select an existing rubric.
Attach to Discussion Topic
- Click Communications on the main navigation bar.
- Select Discussions from the drop-down menu.
- Click the drop-down menu next to the name of the discussion topic title and select Edit Topic.
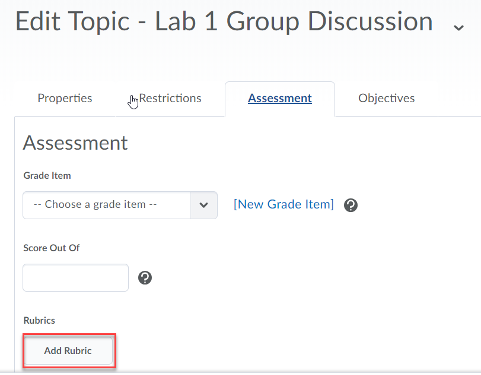
- Click Assessment tab and select Add Rubric.
- Select the rubric by clicking the checkbox [1] next to the desired rubric and click the Add Selected [2] button.
- Click Save and Close.
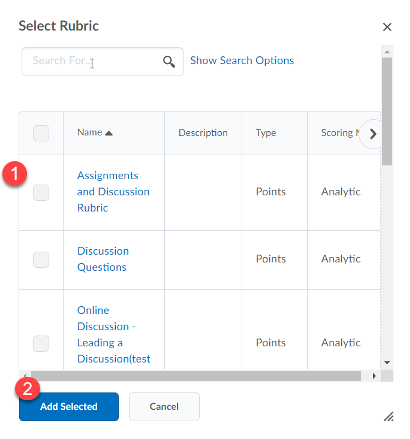
Attach to Grade Item
- Click Assessment on the main navigation bar.
- Select Grades from the drop-down menu and select Manage Grades tab.
- Select Edit from the drop-down menu of a selected grade Item.
- Under the Properties tab, scroll down to click on Add Rubric.
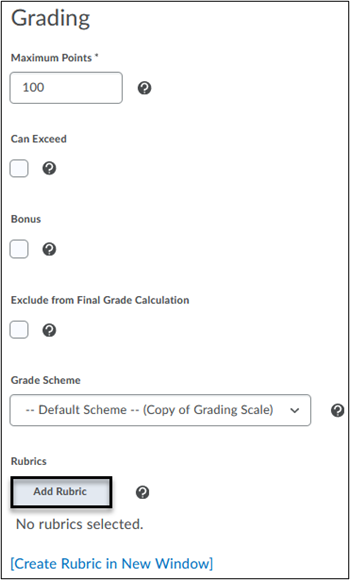
- Select the rubric by clicking the checkbox [1] next to the desired rubric and click the Add Selected [2] button. Save and Close.
- Click Save and Close.
Grading with a Rubric in Dropbox and Discussion Topics
Grading Using a Rubric in Dropbox
- Click Assessments on the main navigation bar.
- Select Dropbox from the drop-down menu.
- The submission will appear automatically without having to click a link to the document.
- Click the rubric icon on the right hand-side to expand and select the levels for each of the criteria for automatic scoring.
Grading Using a Rubric in Discussion Topic
- Click Communication on the main navigation bar.
- Select Discussions from the drop-down menu.
- Select Assess Topic from the drop-down menu of the selected discussion topic.
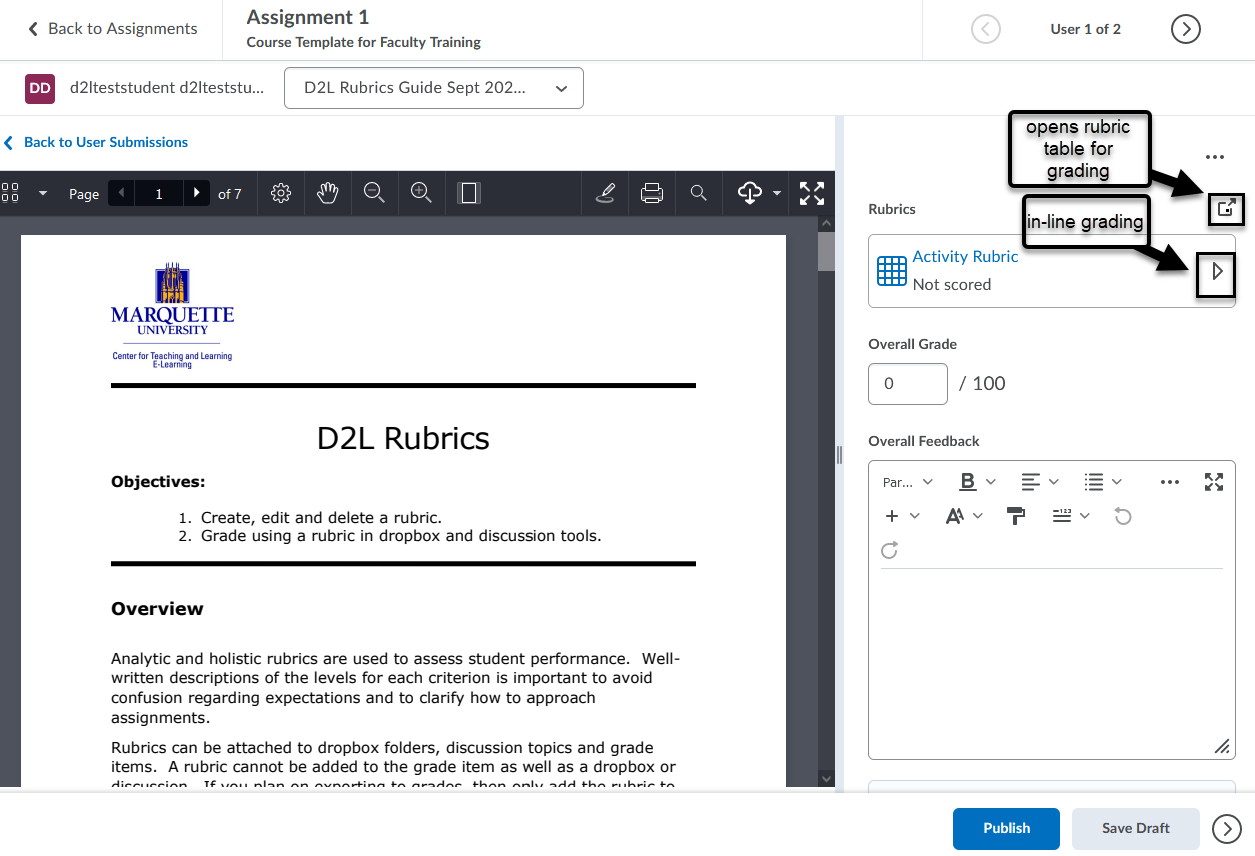
- Select Topic Score link under each student name to access the rubric in the Evaluate page. All posts from the student for that particular topic will be listed to the left of the rubric.
- Use either the in-line grading option (use the arrow to expand) for grading a rubric or open the icon above it to open the rubric table for grading.
- In-line grading rubric tiles displays the overall level of the rubric (i.e., shows the rubric completeness, number unscored criteria appears on the tile when collapsed.)
- Click Save Draft or Publish. It's best practice to Save Draft and then publish all after grading.
- Click Back To Assess Topic.
Note: The Publish All Feedback button is located at the top of the Assess Topic page. 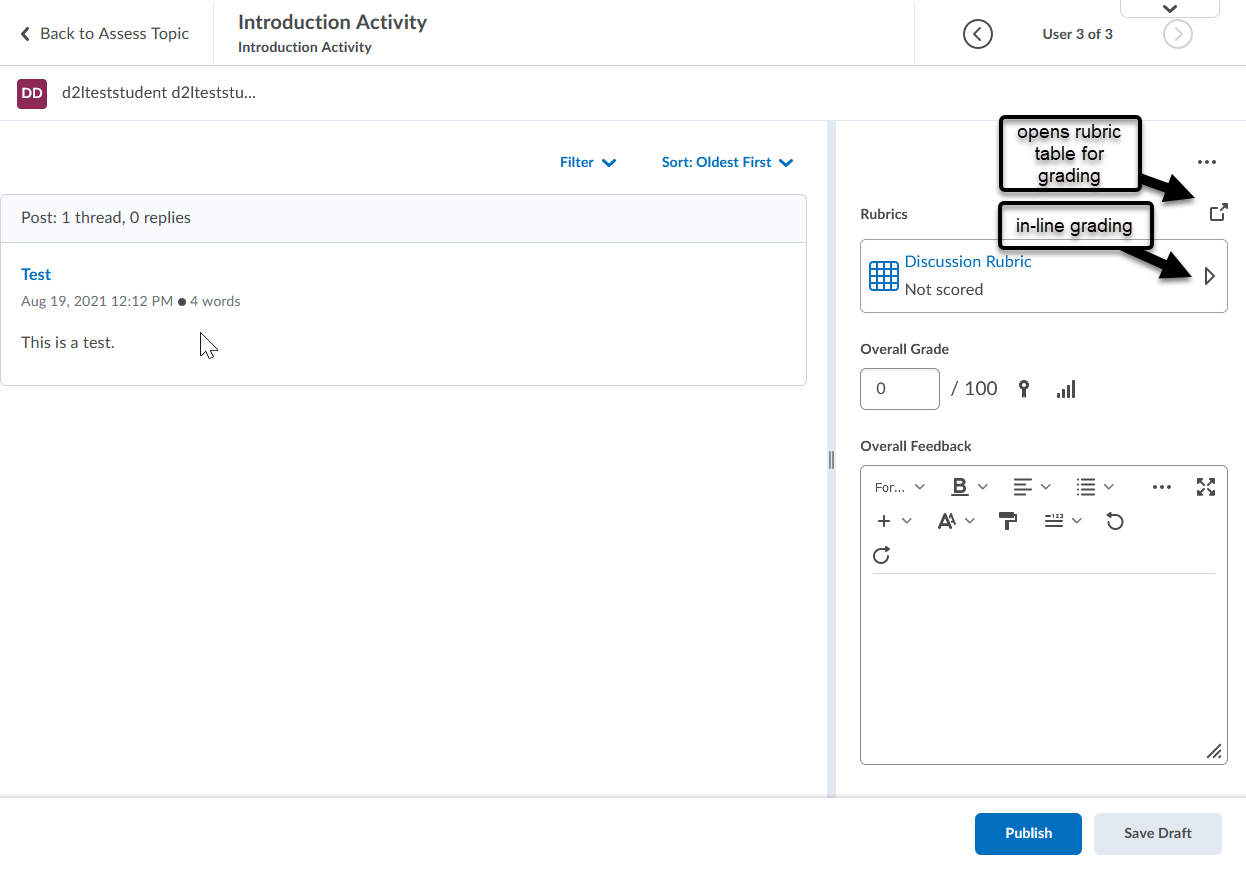
Grading with a Rubric in Grades
If you choose to attach the rubric in Grades, then do not attach to the tool (e.g. Dropbox).
- Click Assessment on the main navigation bar.
- Select Grades from the drop-down menu.
- By default, Enter Grades tab will open.
- Click the drop-down menu next to a grade item to select Enter Grades.
- Click on the rubric icon under the Assessment column.

2. Select Save Draft or Publish if ready for student view. (Publishing all is not possible in the Grades tool.) 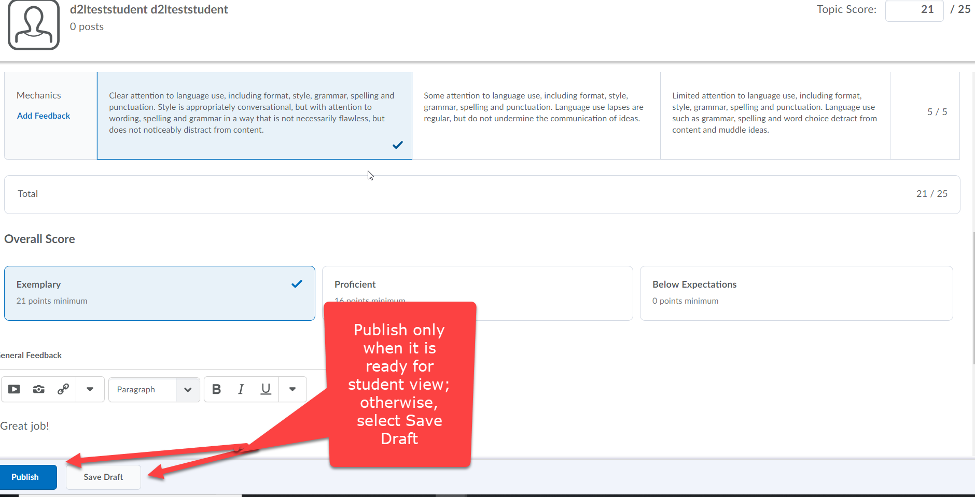 3. Click Retract, if you need to change a student’s grade and remove published feedback and score from the grade book.
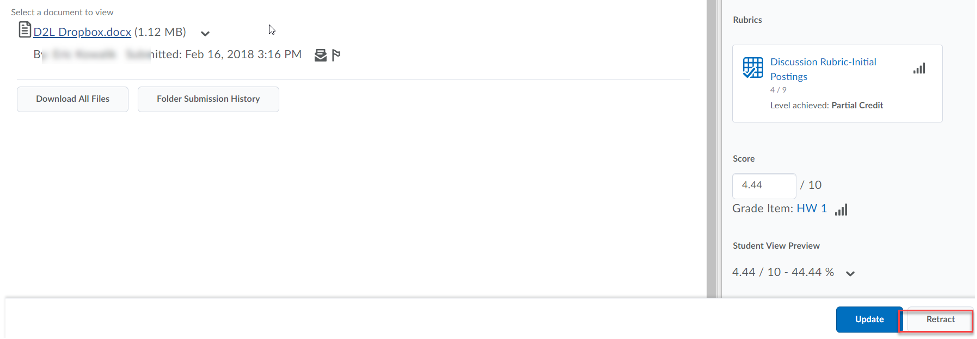 4. Click Yes to confirm you would like to retract feedback and change student’s grade.
5. Publish the new score and feedback.
Note: When you create an association for a rubric, you cannot edit or delete the rubric once it is in use.
Scoring Rubric - Minimum or Maximum
Streamline grading by automatically selecting a minumum or maximum value for ungraded levels in a rubric.
When grading with a rubric, select the ellipsis to access the two options for automatically selecting the maximum or minimum value.
- Set Ungraded Mastery - All ungraded levels are set to maximum using the top level.
- Set Ungraded to Beginning - All ungraded levels are set to minimum using the bottom level.
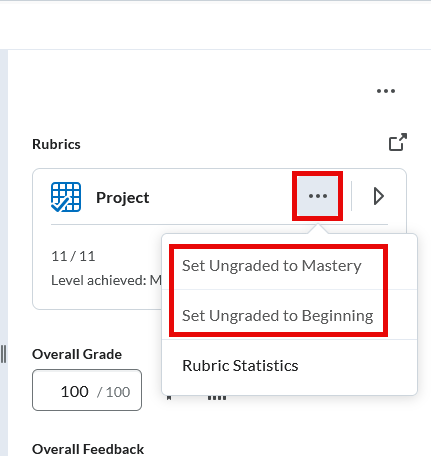
Note:
- If all the levels are scored, the maximum and minimum will not be accessible. Deselect one of the scores in order to reset and choose one of two options.
Edit text fields in assessed rubric
Once a rubric is used in assessing a student submission, the system locks it for editing except for the text fields. Change a misspelled word or rearrange the wording of performance criteria and level descriptions. No other changes can be made.
- Click Assessments on the main navbar.
- Select Rubrics from the drop-down menu.
- Click the caret next to the name of the locked rubric and select Edit Options.
- Select Edit Text.
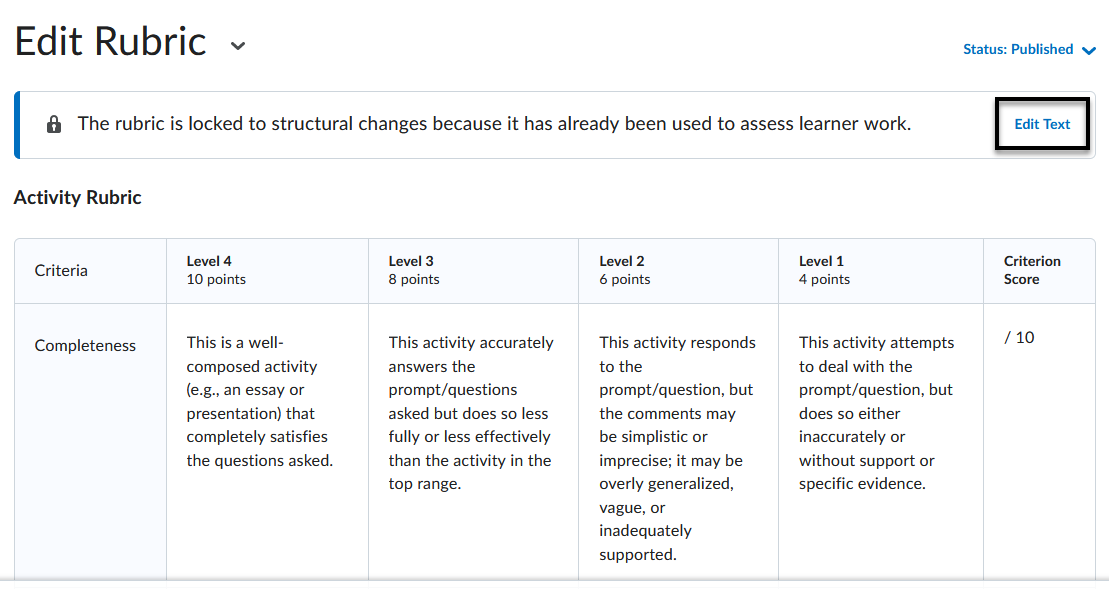
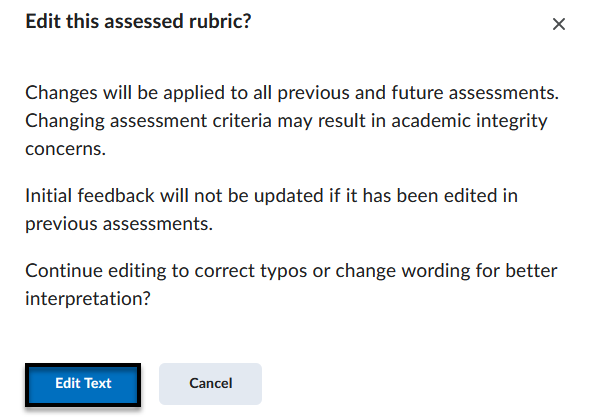
- A pop-up message will appear to confirm you plan on making changes to the text that will apply to all previous and future assessments. Select Edit Text. As you edit, you will temporarily see the text area highlighted blue with the text (Edited) written in the lower right hand corner of the text box. Edit the text fields and select Close. The rubric is automatically saved.
Clear scoring (Not Feedback)
There is an efficient way to clear all scoring without affecting previously entered feedback.
- Navigate to the evaluation page for the tool (e.g., Dropbox, Discussion). If a rubric was attached, you should find it on the right-hand side of the page.
- Select Clear Selections found in the ellipsis to the right of the rubric name.
- Click Clear Selections to confirm clearing all selections in your rubric.
![]()
![]()
Archived Rubrics
To archive a rubric:
Click the drop-down menu next to the name of the rubric and select Set Status > Archived.

Archived Tag
If a rubric that was used for assessment is now archived, an archived tag will be visible to instructor (but not to students). Students will still be able to view the rubric score and feedback if a rubric has been archived. Once rubrics have been archived, it cannot be used for future assessments.