
-
- Online Course Development
- Online Program Development
- Program Guidelines
- Accessible Technology
- Center for Teaching and Learning
- Contact Us
- For faculty and staff questions about online teaching or course design, submit your questions to the Learning Technologies portal.
Walk-in Consultation Hours for Faculty and Staff
Monday-Friday 9 a.m. - 3 p.m.
Room 326 Raynor Library
For more in-depth questions and course consultations, schedule an appointment with one of our Instructional Design and D2L Specialists
PROBLEM WITH THIS WEBPAGE?Report an accessibility problem
To report another problem, please contact emily.newell@marquette.edu.
D2L Discussions
Discussions are your course message boards, organized into forums and topics. Forums provide a collaborative space for student-to-student learning and for you and students to communicate asynchronously. The student posts at the topic level. Multiple topics can be added to a forum. This allows for engagement in higher-level thinking. Images and other media, such as YouTube videos, podcasts, and URL links can be posted besides text.
Discussion Guide
The Discussions tool is found under the Communication main navigation bar. Create a discussion board by first creating a forum clicking the New blue button and selecting New Forum. Then, check the box to create a new topic in this forum with the same title to quickly create a functional discussion board. Edit the topic title by selecting Edit Topic from the dropdown menu of the topic title to change the Topic Title field.
Add a Discussion Topic to a module via Content
Add Existing Activity
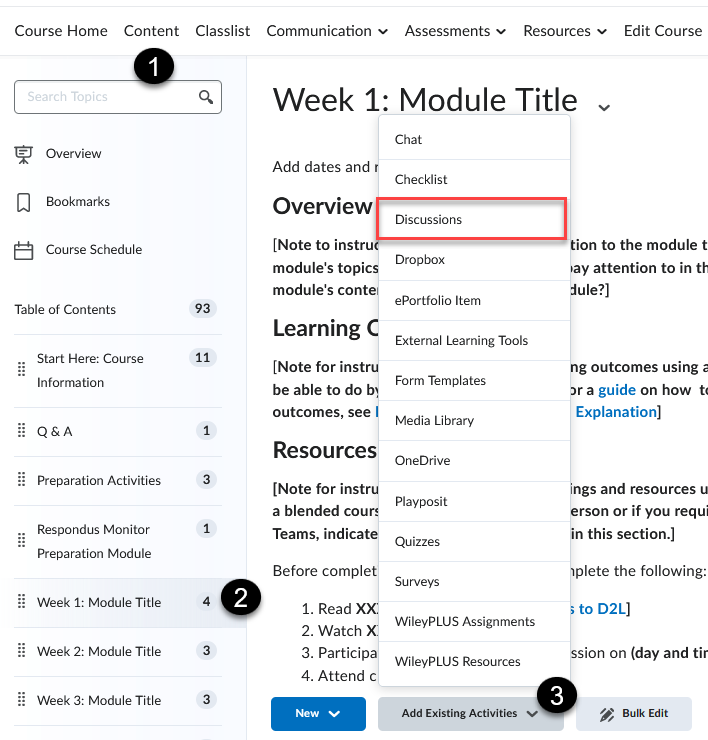
- Click on Content in the main navigation bar.
- Click on the module where you would like to add your discussion topic.
- Click Add Existing Activities and select Discussions [3]. Find the topic to insert.
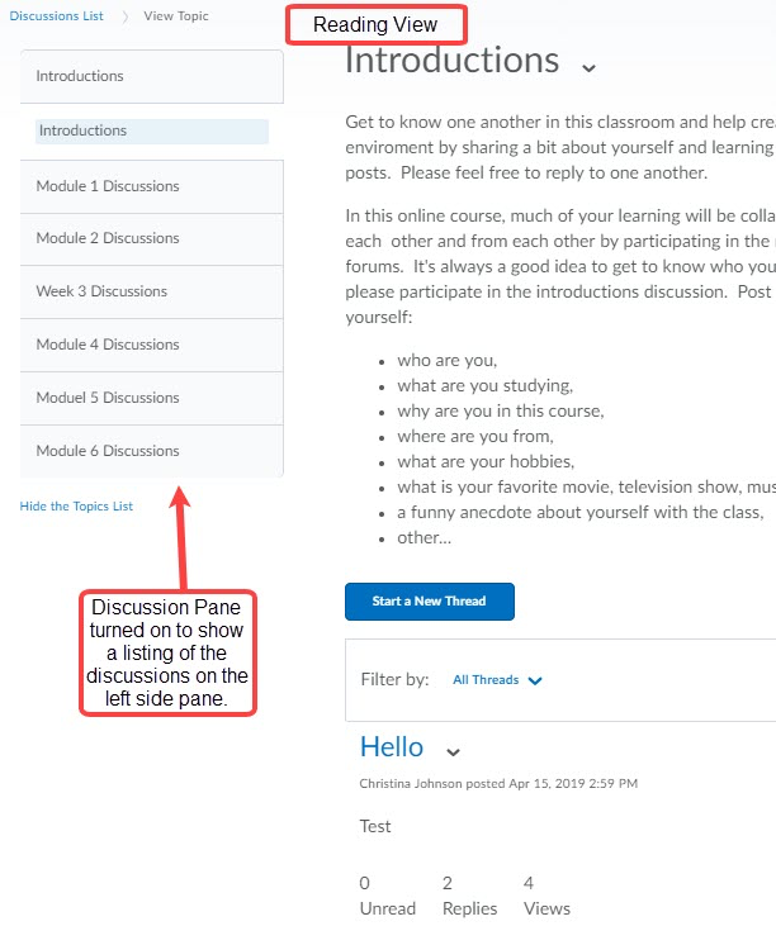
Viewing the Discussion Threads
Reading View vs Grid View
D2L offers two viewing options when you’re looking at your students’ posts in a topic:
- Reading View: It’s the default viewing option. Messages display individually.
- Grid View: Posts and replies are displayed in form of a list (i.e., thread) in a topic. The Printable view is available when you use the Grid View.
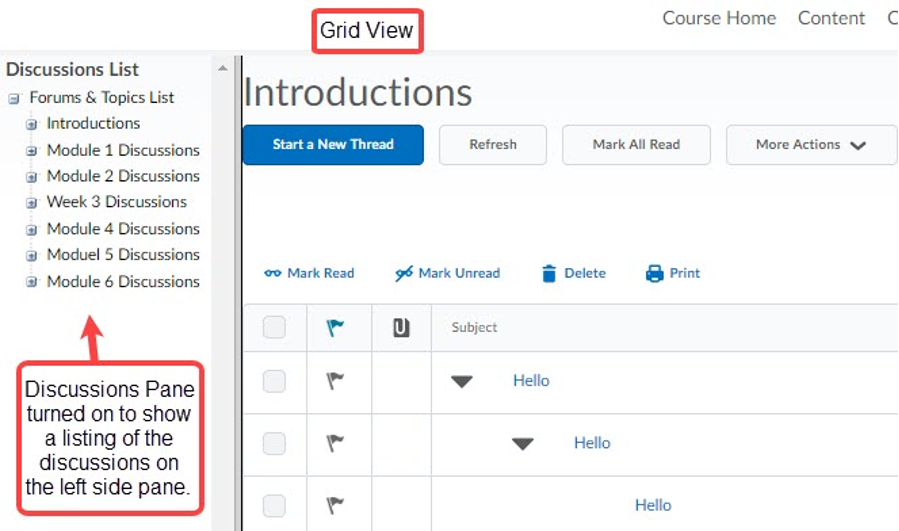
- Note: Students also have the option to change the view, if they wish to do so.
To change from the Reading View to the Grid View:
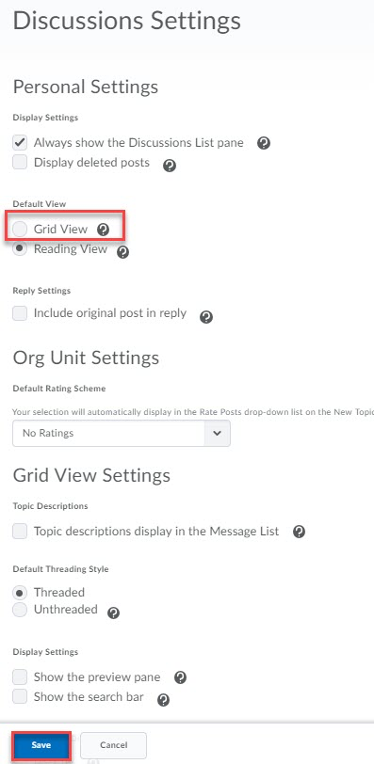 Select Discussions under Communication on the main navigation bar.
- Click on Settings on the right-hand side of the screen.
- Select Grid View radio button under Default View and click Save.
Deleted posts show up in gray and crossed out the Message List.
A list of all the discussion forums and topics appears on the left-hand side of your screen.
- Scroll down the page to edit the Grid View Settings.
Grid View Settings Explained
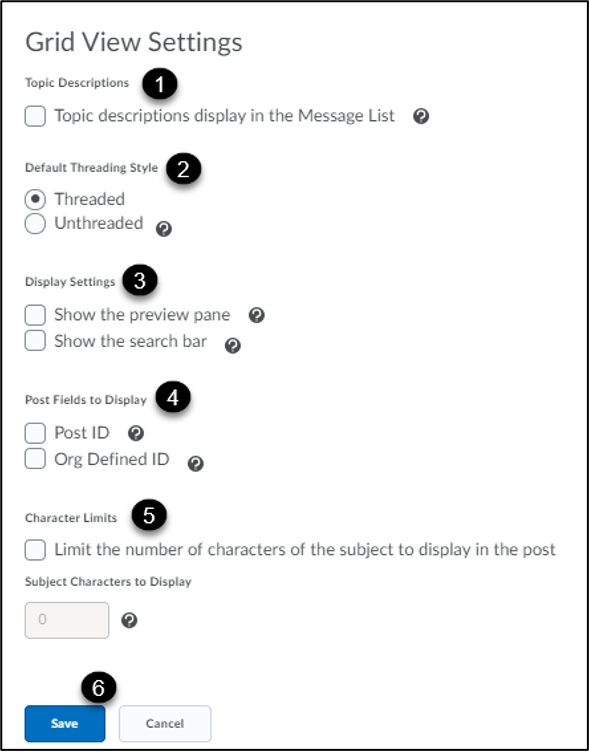
- Check to display a topic’s description in the Message List (i.e., the list of posts under that topic) (optional).
- Threaded posts are grouped together with their replies in the Message List. Unthreaded posts are sorted by author, date, or subject.
- Show the preview pane allows the user to open all posts in a preview pane or clear it to open all posts in pop-up windows. This splits the screen showing the Message List on the top and the selected post at the bottom. Show the search bar option displays a search bar to search for posts (optional).
- Check to display the Post ID with the Message List or Org Defined ID to display the students’ MU ID on the Message List (optional). Character Limit allows you to display a limited number of characters of each post’s subject to save screen space.
- Enter the maximum number of characters to display in the post (optional).
- Click Save after making your selections.
Posting to a Discussion Topic
- Select Discussions under Communication on the main navigation bar. By default, the Discussion List page will open.
- Click on the title of the topic name or select View Topic from the dropdown menu.
- Select Start a New Thread.
- Enter the subject and response in the text box. Attachments can be added. Multimedia can also be inserted using the editor's Insert Stuff, Image or Quicklink. Select Pin thread checkbox if you would like it pinned to the top of the discussion.
- Click Post.

Using @mention to alert users to a specific topic
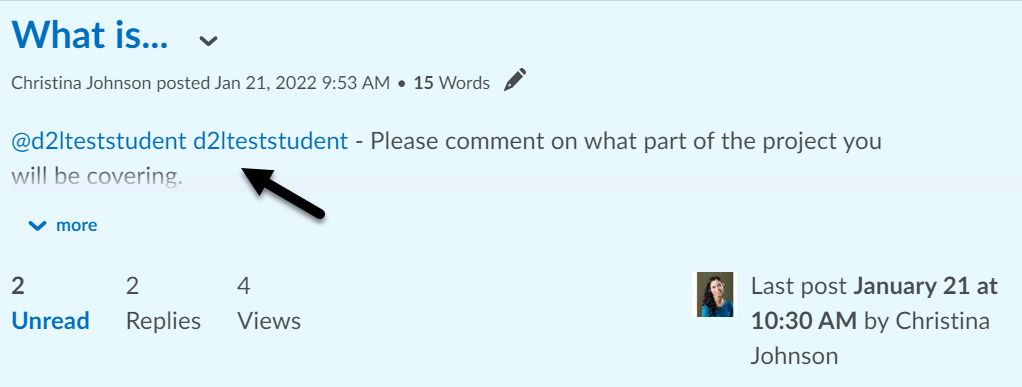
Instructors and students can use the @mention to tag each other in a discussion post. The user must be in the same course and have access to the topic. The individual is notified by an alert (orange dot) on the discussion icon in the minibar. If a user was mentioned in error, editing the discussion post to remove the @mention will not remove it from the alert minibar.
@mention alert
- The @mention alert is tied to the user's access to that discussion topic. An orange dot should appear in the minibar at the top of the page to alert the user.

- Click on the topic name.
- Click the Start a New Thread button or Reply to Thread button or reply to an individual.
- In the text box, type @ and the first few letters of the user's name. The system will bring up a suggestion. Select the name.
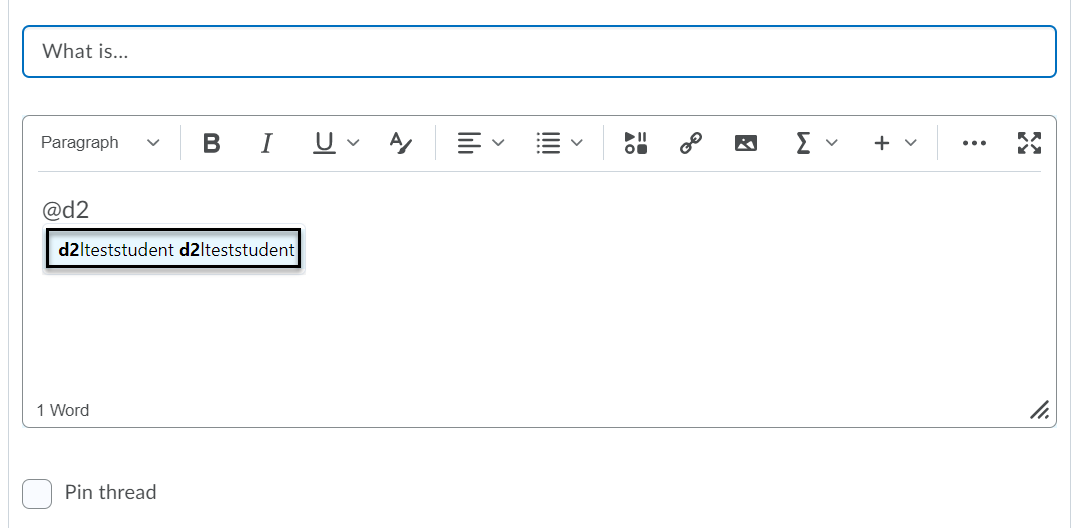
- Type the message in the text box.
- Click Post.
- The @mention name appears as a link. When clicked, the user's profile page will display.
Editing and Deleting Discussion Forums and Topics
Editing a Discussion Forum or Topic:
- Select Discussions under Communication on the main navigation bar. By default, the Discussion List page will open.
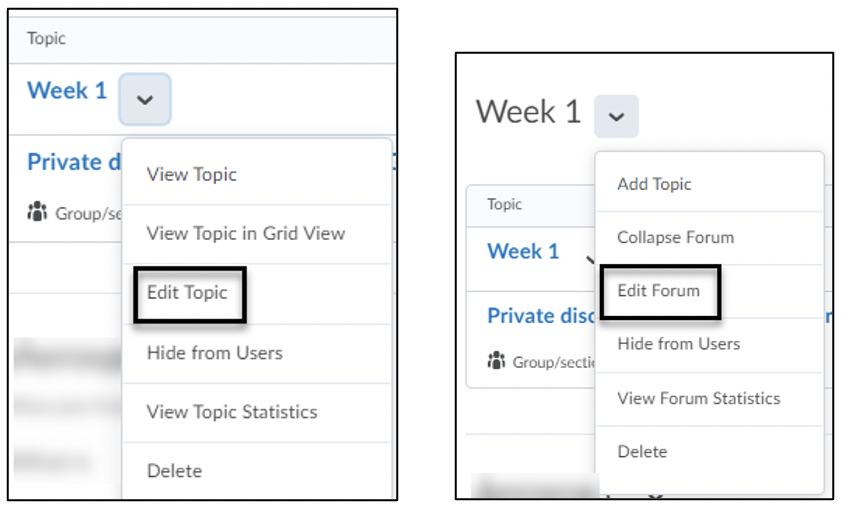
- Click on the dropdown menu next to the name of the Forum or the Topic.
- Select Edit Topic or Edit Forum (depending on which one you’re editing).
- Once you’re done editing, click on Save and Close.
Deleting a Discussion Forum or Topic:
- Click on Discussions on the Main Navigation Bar.
- Discussions List opens by default.
- Click the dropdown menu next to the name of the Forum or the Topic.
- Select Delete.
Deleting a Thread:
- Click on Discussions on the Main Navigation Bar.
- Discussions List opens by default.
- Click on the Topic where the Thread you want to delete is located.
- Click the dropdown menu next to the name of the Thread you want to delete.
- Select Delete Thread from the dropdown menu.
Note: When you delete a Thread, the system also deletes any replies to that Thread. The same happens if you delete a Post within a Thread.
Assessing Topics
Assess Topic
- The discussion topic must be associated to a grade item (in the Assessment tab Edit Topic) for the option to Assess Topic to be displayed in the drop-down menu.
Steps to Assess a Topic
- Select Discussions under Communication on the main navigation bar. By default, the Discussion List page will open.
- Click the dropdown menu next to the name of the Topic and select Assess Topic.
Note: If you enabled a moderator, you must approve individual posts and select Approve Threads before assessing students via Assess Topic.
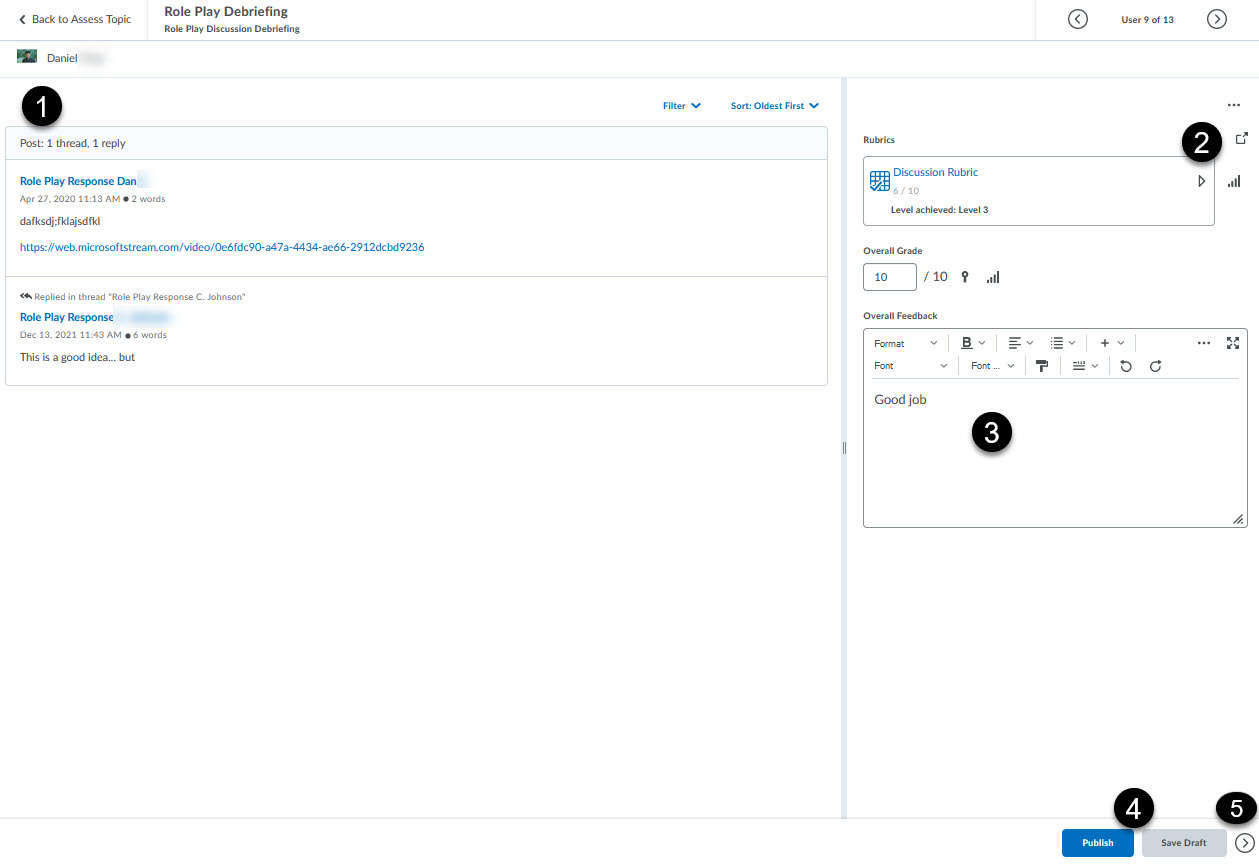
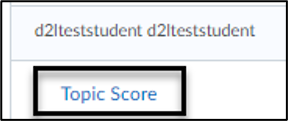 Click on Topic Score beneath each user’s name. This opens a window where you can see the student’s posts at the top of the page [1].
- Assign a score or use a rubric to update score automatically and add any written feedback [2,3].
- Check the box next to Publish to export grade automatically to the grade book or save draft and move on to the next student by clicking on the arrow [5].
- Click Save.
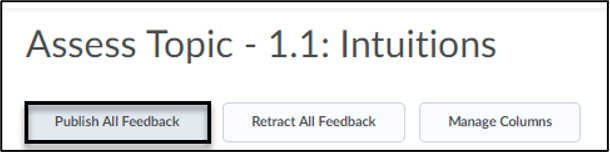 Note: You can choose Publish after scoring each user or you can click on the Publish All Feedback after you’re done scoring all the users. It’s best practice to publish after grading all students.
Creating a Group Discussion