
-
- Online Course Development
- Online Program Development
- Program Guidelines
- Accessible Technology
- Center for Teaching and Learning
- Contact Us
- For faculty and staff questions about online teaching or course design, submit your questions to the Learning Technologies portal.
Walk-in Consultation Hours for Faculty and Staff
Monday-Friday 9 a.m. - 3 p.m.
Room 326 Raynor Library
For more in-depth questions and course consultations, schedule an appointment with one of our Instructional Design and D2L Specialists
PROBLEM WITH THIS WEBPAGE?Report an accessibility problem
To report another problem, please contact emily.newell@marquette.edu.
D2L Gradebook
The D2L Grades tool allows you set up a grade book where you can create grade items for assessments completed by students outside or inside of D2L. The grade book can be connected to the dropbox, discussion boards and quiz tools to evaluate assignments, participation and tests. Student grades in D2L can be transferred to the gradebook automatically. The grade book calculates final grades and allows you to control when grades are released to your students.
D2L grades can sync to CheckMarq. Both midterm and final grades can be retrieved from the D2L grade book. A letter grade scheme is preferred, but the default setting can remain. An extra step of updating the Roster Grade column to the correlating letter grade would need to be completed. When grades are updated in D2L, navigate to CheckMarq to retrieve D2L grades.
Video Guides
- Understanding the Grades Tool - Instructor
- Points-Based Gradebook: Creating Categories
- Points-Based and Weighted Gradebooks: Creating Grade Items
Gradebook Walkthrough
Gradebook Setup
Access Grades Tool and Setup Wizard
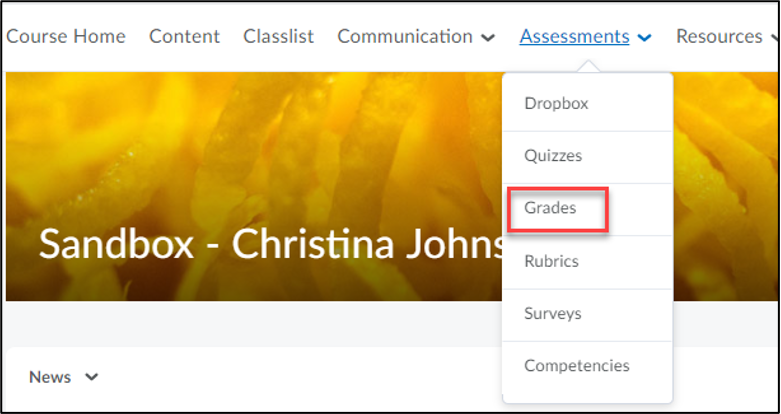
- Select Grades from Assessments on the main navigation bar.
- Click on Setup Wizard and then the Start button to configure the general settings of your Gradebook in seven (7) steps.
Note: The Setup Wizard can be run multiple times; however, you can adjust the settings at any time by clicking the Settings gear.
 Seven steps to setting up your Gradebook
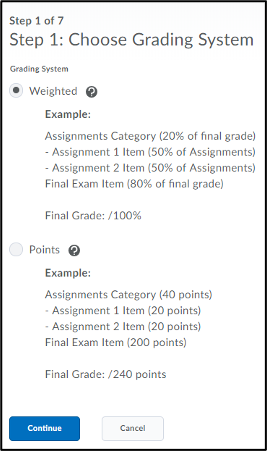
- Choose a Grading System and click Continue. D2L presents two options:
- Weighted: Grade categories and items are calculated as a percentage of a final grade worth 100%. Individual items contribute towards the final grade according to the percentage assigned to their Category.
- Points: Grade categories and items are calculated using a point system, where the sum of the grade items is totaled in the final grade.
- Select a Final Grade Release and click Continue. This option indicates the final grade calculations the students will see in the Gradebook.
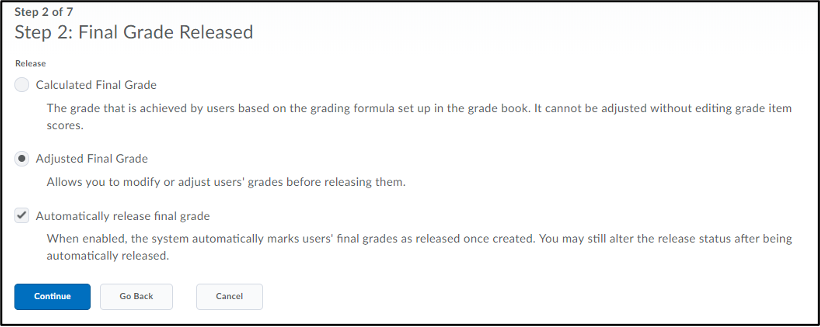
- Calculated Final Grade: Students’ grades will be visible based on the grading formula you used. You cannot adjust the final grade without adjusting grade item scores. If chosen, this will be the grade released to students, not the Final Adjusted Grade. Select the Can Exceed box if allowing bonus questions or exceeding a specific number of points.
- Adjusted Final Grade: The grade can be transferred from the Final Calculated Grade, but you can edit it manually without having to adjust the grade items. If chosen, this will be the grade released to students, not the Final Calculated Grade. Select the Can Exceed box if allowing bonus questions or exceeding a specific number of points.
- Automatically Release Final Grade: Releases the students’ final grade, making it visible for the student. The release status may be changed after being automatically released.
- Decide on Grade Calculations and click Continue. Select how you want to treat ungraded grade items, such as with a value of zero (0). You can also choose grades to be automatically updated every time you make changes to the items in your Gradebook.
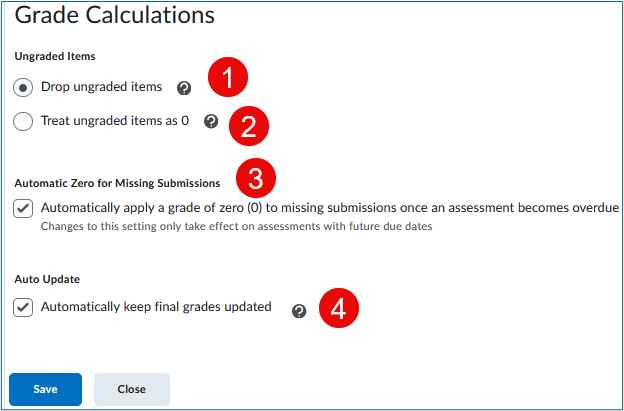
- Ungraded Items: Drop ungraded items [1]: Reflects current grade based on submissions. Items that do not have a grade entered are not counted in the final grade. Treat ungraded items as 0 [2]: Items that do not have a grade entered are counted as 0 in the final grade.
- Automatic Zero for Missing Submissions once an assessment becomes overdue [3]: This setting affects Dropbox and Quizzes. If a student submits late, a 0 will be entered automatically in the Gradebook. In Standard View, when you hover over the 0%, Automatic zero. Missing submission on the due date messaging will appear. (This messaging will not display in Spreadsheet View.)
- Auto Update [4]: Final grades are automatically adjusted when changes are made to grade items or calculation options.
4. Click Continue under Choose Default Grade Scheme. D2L has “Percentage” set as the default grading scheme.
If you prefer a letter grade scheme, click New Scheme under Assessments > Grades > Schemes. Enter Letter Grade for the required name and the letters for the symbols along with the ranges. Click Save and Close. Once created, click the checkmark to set it as your default grading scheme. Learn more about the built-in grade schemes available.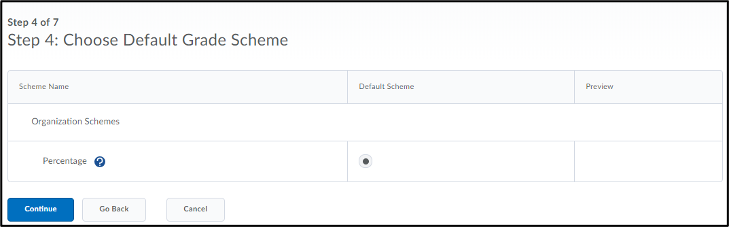 5. Enter the number of decimal places you want displayed in the Gradebook. The default is set to two (2). The value must be an integer between zero (0) and five (5).
6. Manage Student View Display Options. This affects what your students see in the Grade area. Click Continue after selecting Grade Details. .
Note: If you choose a Points Grading System, the option for Weighted grade will not show up on this page.
Points grade shows grade as 8/10 (for example). [1] 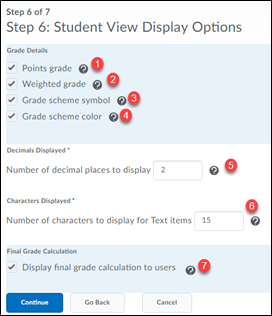
Weighted grade shows grade as 80%(for example). [2]
Grade scheme symbol shows grades as 80% because percentage is the default grade scheme. Note: The grade scheme symbol must be selected for students to see Text items in the Gradebook. [3]
Grade scheme color codes your Gradebook. Blue is 90th percentile, green is 80th percentile, yellow is 70th, orange and red follow in succession. Note: The grade scheme symbol must be selected for the grade scheme color to be displayed. [4]
Number of decimal places to display in the Gradebook. The value must be between 0 and 5. [5]
Number of characters to display for Text items displayed on the user list. Allows you to write comments without contributing to the final calculation. The value must be an integer between 0 and 50. If the Text item is longer than 50 characters, the text will be truncated. [6]
Select Display final grade calculation to users if you would like students to view how the final grade was calculated in the student view of Grades. [7]
7. Grades Setup Summary displays all your selections. Click Finish if you are content or click the Go Back button to make changes. Grade Options display after the Wizard is complete prompting you to start creating grade items and categories.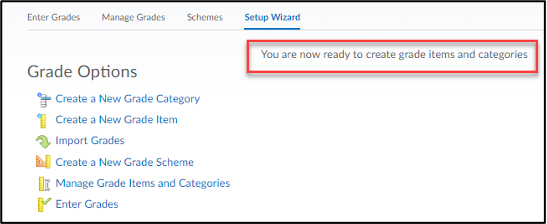
Changing Gradebook settings
To make changes to your grade book settings, click the gear labeled Settings.
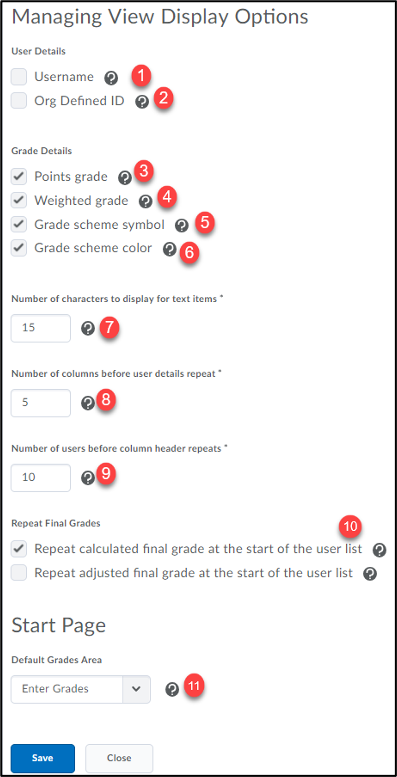 The Personal Display Options tab will list Managing View Display Options and Start Page Default Grades Area drop-down menu. This view is user specific. The Org Unit Display tab options will change student view.
Username shows up on the user list. Not necessary to enable. [1]
Org Defined ID or Marquette ID shows up on the user list. Not necessary to enable. [2]
[3, 4, 5, 6, 7] For details, see step 6 of Seven Steps to setting up your gradebook.
Select your preferred settings. [8, 9, 10]
Number of users before column header repeats. [9]
The calculated final grade column is displayed at the beginning of the user list. [10]
To change the Default Grades Area, select the drop-down menu to select the preferred default page. Currently, Grades is set to Enter Grades. [11]
Drop Ungraded Items
Configure the grade book to drop ungraded items. This way students view a current grade based on their submissions.
Creating Grade Categories
Category: Categories allow you to organize or group Grade Items under one section. For example, you may choose to have an “Essays” Category and another one named “Quizzes”. Each Category will have a point or percentage value assigned, depending on the Grading System selected. Categories are recommended if you’re using a weighted Grading System or if you want to drop the lowest or highest grade item within a Category.
- Click on Manage Grades (the structure of your grade book).

Note: This is the tool you need to access when you need to add, delete or edit Categories or Grade Items.
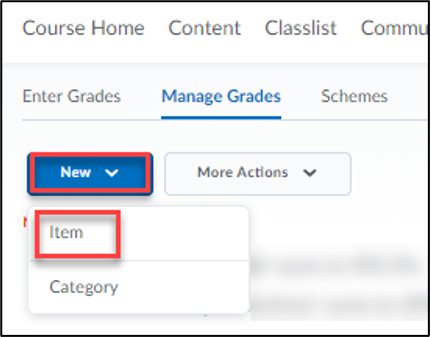
- Click on New and then select Category from the drop-down menu.
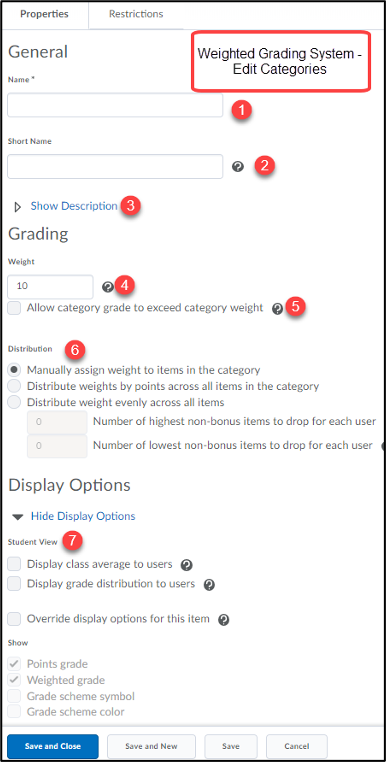 Edit Category: Properties tab
Under the Properties tab, enter the Name for your Category [1] (required) such as “Assignments” or “Exams.” Short Name [2] is not necessary unless the Category is long and will not fit well in the Gradebook spreadsheet.
Show description link expands to add a description that can be hidden or visible to students. Select the checkbox to Allow users to view description [3]. This is optional.
Enter the percentage of the category which contributes to the final grade. Grade items in a category count as a percentage of that category and should combine to a weight of 100%. For example, if the category of “Exams” is worth 30% of the final grade with two (2) grade items, then the weight of each is 50% (the contribution to the category). [4]
Allow category grade to exceed category weight. [5]
Select Distribute weight evenly across all items if you are using a weighted Gradebook and may need to drop the lowest grade. Grade items must be worth the same. [6] The Student View (optional settings) allows for displaying class average or grade distribution to students. [7]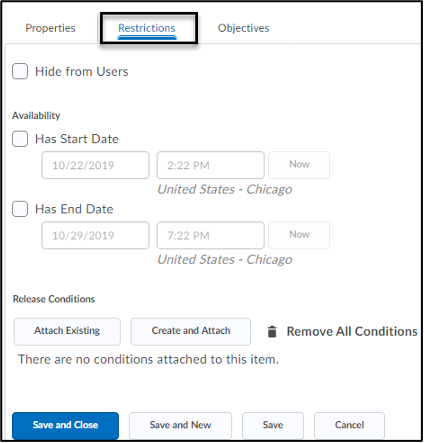 Edit Category: Restrictions Tab
By default, grade items and categories are visible (recommended setting). If you choose to hide it, select the Hide from Users checkbox. It is possible to set release conditions by clicking the link Show Release Conditions (requiring completion of an activity prior to making grades visible). If changes are made, click Save. Note: The Restrictions tab for Grade Items offer the same options.
Weighted vs. Points Grading Systems
Define your grading preferences based on your grading system selection of Weighted versus Points in the Setup Wizard. Options will vary based on your selection.
Weighted Grading System:
- Weight: You can specify how much a category contributes to the final grade. For example, the “Assignments” category is 25% of the final grade.
- Allow category grade to exceed category weight: Allows the total weight of the grade items in the category to exceed the weight assigned to that category.
Example: You create an “Assignments” category that contains two grade items: Assignment 1 and Assignment 2. Both assignments are worth 50% of the category and can exceed the weight specified. A student receives 100% on Assignment 1 and 110% on Assignment 2. By checking this option, the student receives 105% in the Assignments category. If not checked, the student receives 100%. - Distribution: Manually assign weight to items in the category: Allows you to control weighting of individual items in the category.
- Distribute weights by points across all the items in the category: Uses the points of individual, non-bonus grade items to determine the relative weighting of each item out of 100%.
- Distribute weight evenly across all items: All grade items in the category are worth an equal amount, regardless of the number of points of the individual items. For example, if you have two items in the category, one worth 15 and the other one 25, each item will be worth 50% of the category. This option also allows you to drop the highest grade (number of highest non-bonus items to drop for each user) or the lowest grade (number of lowest non-bonus items to drop for each user) in the category for each student. Enter the number of items you want dropped in each option.
Points Grading System:
- Can Exceed: Allows the total points of the grade items in the category to exceed the points assigned to that category.
Example: If you have a Grade Item of 10 points and a student receives 12/10, this feature allows the 12/10 to be calculated in the final grade. Otherwise, if unchecked, the grade will be 10/10 in the final grade calculation. - Exclude from Final Grade Calculation: Allows you to exclude this category from the final grade calculation
- Distribution: Distribute points across all items: All the items in the category will be worth the same amount.
- Points per item: Use this if all the grade items under the category are worth the same amount of points. For example, in the Quizzes category you have 5 quizzes, and each is worth 10 points.
- Number of highest non-bonus items to drop for each user: Allows you to drop the highest grade in the category for each student. Enter the number of items you want dropped.
- Number of lowest non-bonus items to drop for each user: Allows you to drop the lowest grade in the category for each student. Enter the number of items you want dropped.
- Display Options: Allows you to enable certain Statistics options to be viewable to your course.
- Display class average to users: Shows the class average for items in the Category.
- Display grade distribution to users: Shows students and instructor a graph of how grades for this Category were distributed in different percentiles.
- Override display options for this item: Allows you to modify some of the general display options you selected in Step 6 of the Setup Wizard. Select if you want students to view information for this Category differently from others in the Gradebook.
- Restrictions: The Restrictions tab allows you to set up parameters for when the Category is visible for students. You can also establish release conditions. For example, a student may not see the Category until completing a specific task in D2L, such as a quiz.
- Click Save and Close (saves edits and returns user to main page), Save and New (saves edits and opens a new window to create a new grade item or category) or Save (saves edits and keeps user on the same page).
Video Walkthroughs
Creating Grade Items
Item: Grade Items can exist independently in your Gradebook or they can be grouped under a Category. For example, under the category “Essays” you have three Grade Items: Essay 1, Essay 2, and Essay 3. Grade Items can also be associated with course objects such as discussions, quizzes, and dropbox folders.
- Click on Manage Grades > New and select Item from the drop-down menu. Note: If you are building dropbox, discussions and quizzes, then the system will automatically create the grade item for you.
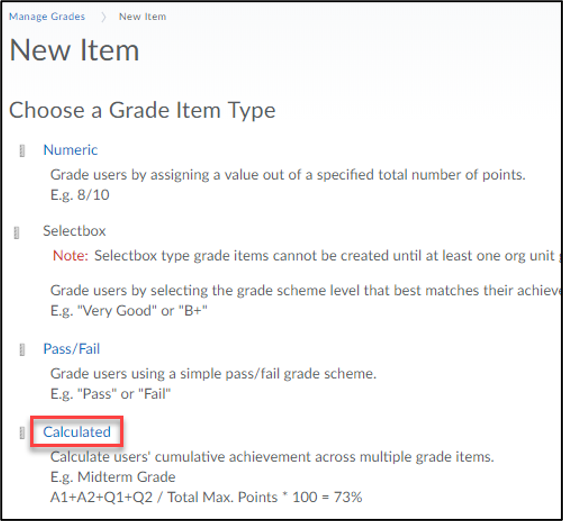
- Choose a grade item type. For this example, Numeric is selected to grade students by assigning a value out of total number of points. This is the most common grade item type. Use this type if you want to associate the item with a course activity.
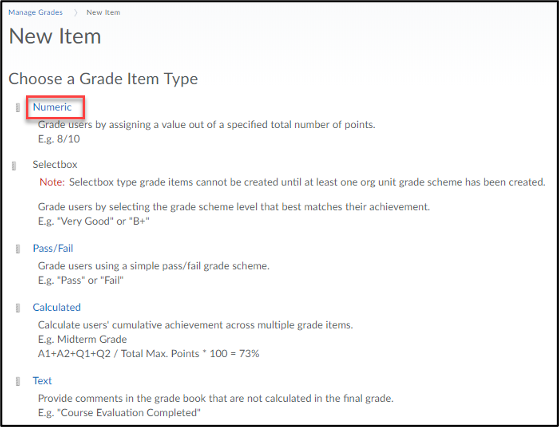
- Other Grade Items:
- Selectbox: Graded by selecting the grade scheme level that best matches their achievement. For example, “Very Good.” Used for formative assessment.
- Pass/Fail: Graded by using a simple pass/fail grade scheme.
- Calculated: Graded by calculating a student’s cumulative achievement across multiple grade items. Calculated grade items cannot belong to a Category and cannot contribute to the calculated final grade. For example, use to calculate midterm grade.
- Text: Allows you to provide comments that are not calculated in students’ final grade. Text grade items cannot be part of a Category. For example, “Course Evaluation Completed.”
- Enter a Grade Item Name and Maximum Points (required) and attach to a Category (if applicable). An optional Short Name can be entered which will show up on the grades spreadsheet (optional). An optional description can be added under Show Description. Select the checkbox to allow users to view grade item description.
- Weight (%): If the Grade Item is grouped under a Category and you’re using a weighted grading system, enter the Weight (%) you want the assignment to contribute to the Category.
Note: If you have selected to make each item of equal weight within the Category, then the Gradebook will automatically figure out the weight of the grade item for you.
If you’re creating a Grade Item that is not part of a Category, you must adjust the Weight value to the weight the item has towards the final course grade. - If you plan to give extra credit points, select Can Exceed to exceed the maximum points. For example, 11/10 points.
- Bonus items are not included in the maximum points for a category of final grade. They are added on top of the calculated grade.
Bonus: Use Bonus if the entire Grade Item is extra credit in the course. For example, if an extra credit assignment is added to grade items, select Bonus.
Edit Grade Item: Properties Tab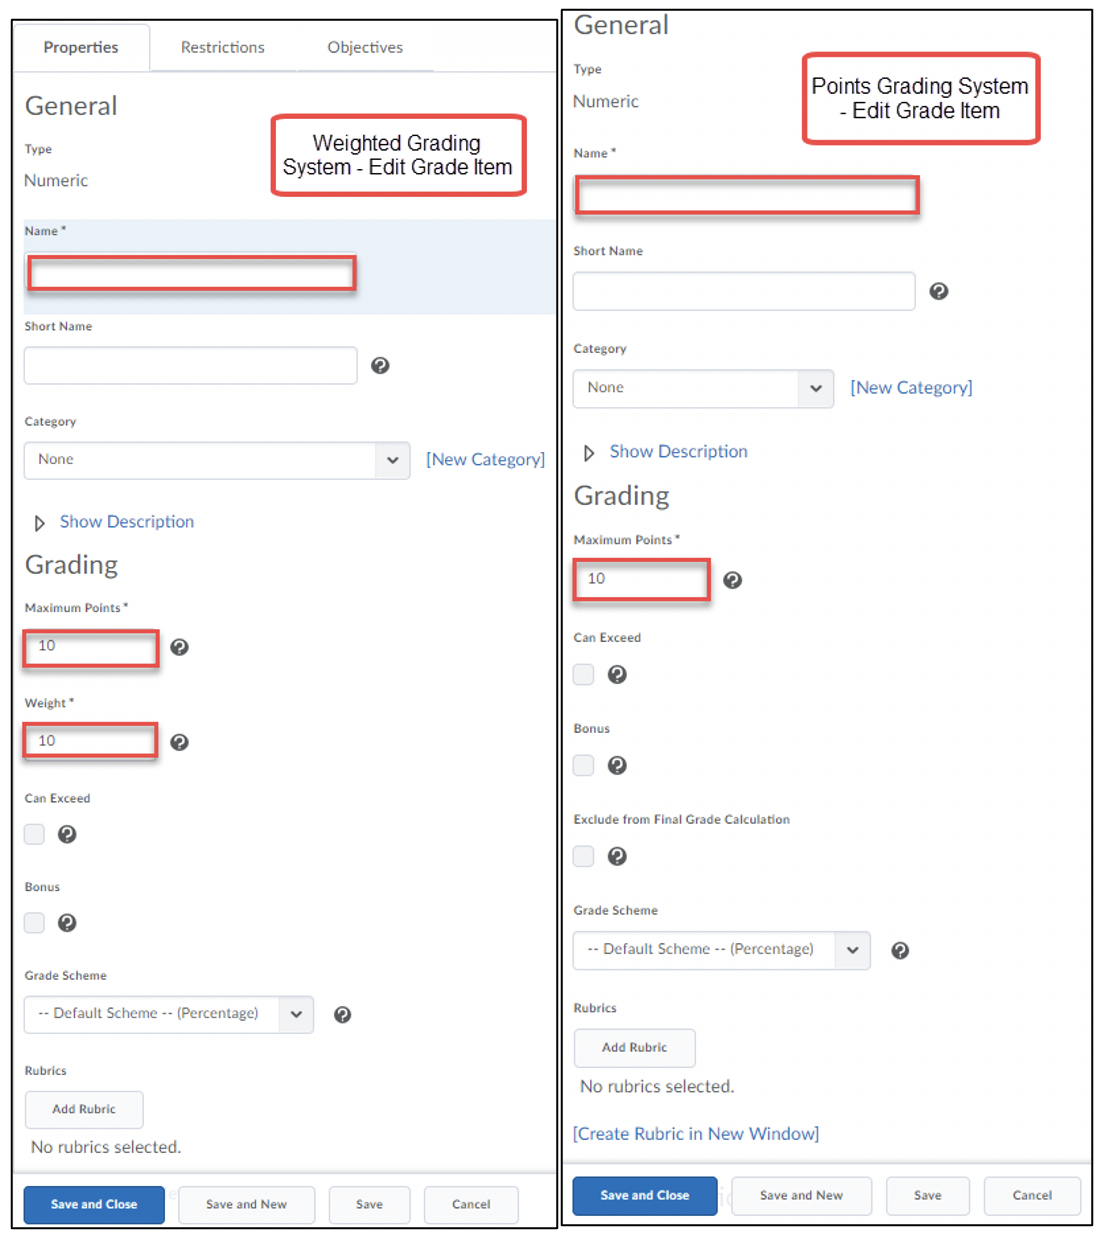
- There is an option to add a rubric. If you do, then do not attach to the discussions or dropbox tool. An error will occur if you try to add the same rubric to more than one D2L tool (e.g., same rubric to both the grade item and dropbox will create an error).
- Click the arrow to Show Display Options. You can also edit the Display Options (just like for Categories).
If you would like to add a restriction to the Grade Item, click the Restrictions tab next to Properties tab on the New Item page. This tab allows you to set up parameters for when the Grade Item is visible for students. You can also establish release conditions.
Video Walkthrough
Edit Grade Items
- Select Manage Grades to access the listing of grade items.
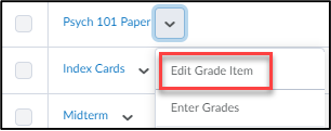
- Click on the drop-down menu next to the item’s name. Select Edit Grade Item.
- The Edit Item page will appear with Properties tab opened by default.
Note: You can always edit a Grade Item after it has been created.
Delete Categories and Grade Items
 Select Manage Grades to access the listing of grade items.
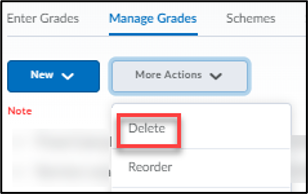
- Click the More Actions drop-down menu to select Delete.
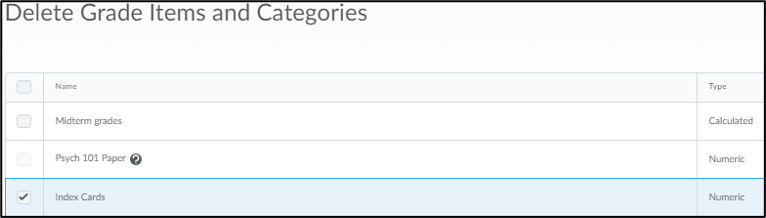
- Select the check box for each Grade Item or Category you want to delete and click Delete.
 A Confirmation pop-up warning will inquire if you would like to delete the selected grade items and/or categories. Click Delete.
Note: Selecting a Category does not select the Grade Items that reside in it. Also, you cannot delete a Grade Item that is associated with a course object (quiz, dropbox assignment or discussion). You must first remove the association and then delete the grade Item. Click on the Information icon (question mark) next to the Grade Item to view the details about the association.
Entering Grades
Grades can automate from dropbox, discussion or quizzes to Grades. However, you can choose to manually enter grades filtering by User or Groups. The Gradebook can be viewed in two ways: Standard View and the Spreadsheet View. The spreadsheet view is the preferred view for entering grades.
- Click on the Grades tool on the main navigation bar.
- Enter Grades should open by default unless you have changed your settings under Personal Display Options tab > Default Grades Area.

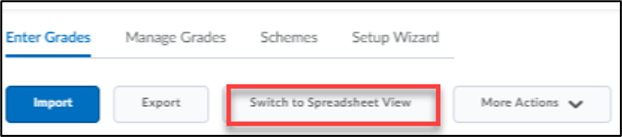
- To switch from Standard to Spreadsheet view, click Switch to Spreadsheet View, located on top of the Gradebook. This will allow for text boxes to appear for manual entry of scores.
S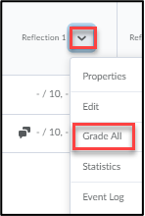 tandard View
- Click on the drop-down menu next to the name of the Grade Item you wish to grade and select Grade All from the drop-down menu.
- Enter the grades in the space provided. You can also add comments as feedback by clicking the pencil.

- Click Save and Close or Save.
- Confirmation pop-up will ask you if you want to save changes and continue. Click Yes.
Spreadsheet View
The spreadsheet view offers the option to tab from cell to cell when entering grades.
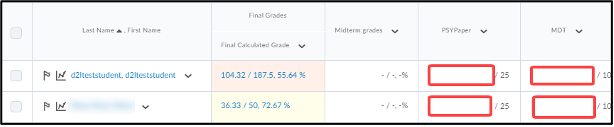
- Click the space provided under each Grade Item and enter the grade for each student.
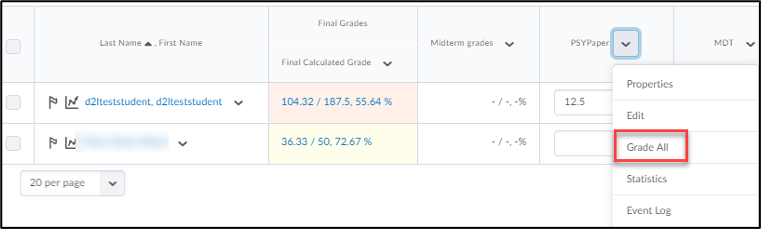
- If you wish to add comments as feedback, click on the drop-down menu next to the name of the Grade Item. Select Grade All from the drop-down menu.
- Click the comment’s icon under the Feedback column.

- Click Save and Close or Save.
Note: Grading a discussion or dropbox assignment in the gradebook will update the grade in the discussion and dropbox tools.
Exempting multiple grade items for one student
Bulk Exemptions allow users to exempt either multiple students from an assignment or exempt multiple assignments for one student. Once an exemption is given, the assignment will appear as “Exempt,” for the student.
- Click student’s name.
- Select drop-down menu next to student’s name and select Bulk edit exemptions.
- Select the grade item(s) the student can exempt.
- Click Save and Close or Save.

Drop the Lowest Grade
Let D2L help you drop the lowest score of a group of assignments in a category. To achieve this, the weight must be equally distributed or points equally distributed across all items.
- Select Grades from the Assessments main navigation bar.
- Select Manage Grades.
- Click on the New blue button and select Category from the drop-down menu.
- Enter a name (e.g., Quizzes).
- Scroll down to Distribution area and check the box to distribute points/weights across all items.
- Enter a number in the text box for the "Number of lowest non-bonus items to drop for each user."
- Click Save and Close.
Calculating Midterm Grade
Steps to create a calculated grade in the Gradebook
- Select Grades from the Assessments main navigation bar.
- Select Manage Grades.
- Click on the New blue button and select Item from the drop-down menu.
- Select Calculated.
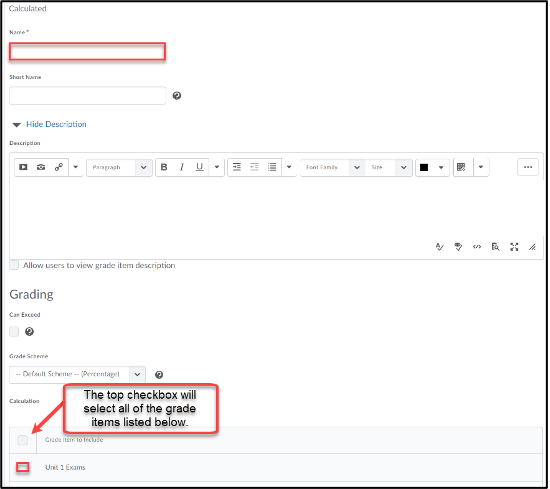
- Enter the Name of the Calculated Grade Item, such as Midterm (which will appear in the Gradebook). Scroll down and select the grade items to include in the calculation. The top checkbox will select all grade items listed below.
- The Calculated Grade Item should appear under Manage Grades.

- To view the Midterm calculated grades, navigate to the Enter Grades tab.

Calculating Final Grades
- Select Grades from the Assessments main navigation bar.
- Select Enter Grades.
- If you chose Automatically to keep final grade updated (Step 3 of the Setup Wizard), grades will show up updated in the Final Calculated Grade column.
Note: Every time you enter a grade for a Grade Item and save it, the Final Calculated Grade gets updated. The Drop ungraded items selection for Grade Calculations will display a current grade based on the student submissions.
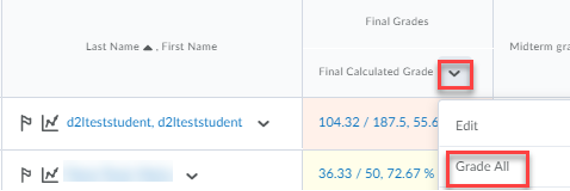
- If you did not choose Automatically to keep final grade upgraded (Step 3 of the Setup Wizard), click on the arrow next to Final Calculated Grade on the Enter Grades page and select Grade All from the drop-down menu.
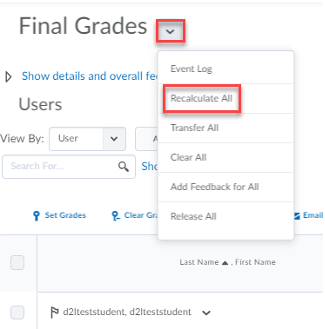 Click on the drop-down menu next to Final Grades on the top of the page and select Recalculate All.
- Choose the grade item(s) you would like updated.
- Click on Calculate at the bottom of the page. This will take you back to the gradebook.

- Click Yes to confirm the action to overwrite the final adjusted grade.
Import Grades
It is possible to enter grades from another application by importing a CSV, TSV or TXT file.
- Select Grades from the Assessments main navigation bar.
- Select Enter Grades
- On the Enter Grades page, click Import.

- Browse your computer to upload the document and select the dropbox to create a new grade item. (Note: Only Numeric, Pass/Fail, Selectbox, and Text grade items can be created.) Select Continue.
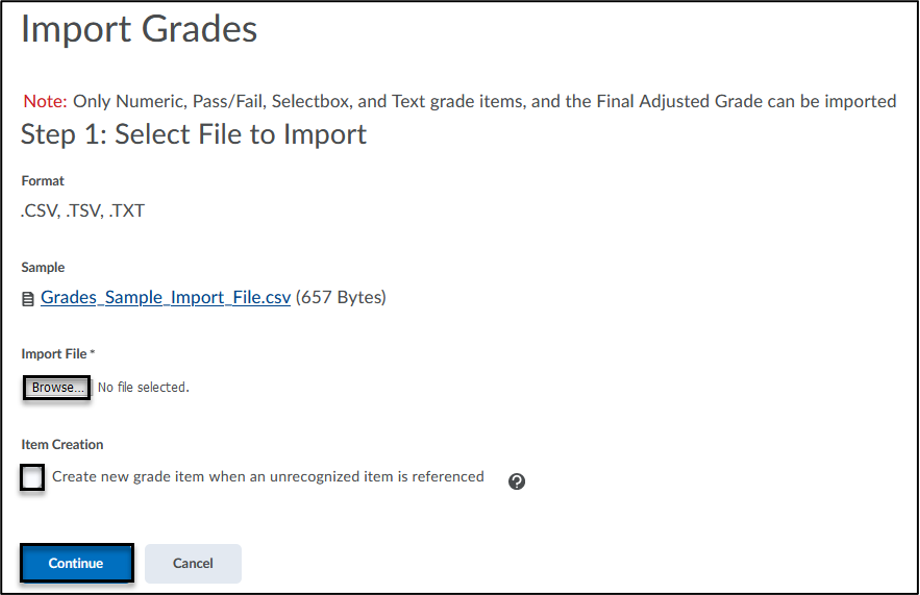
- If found, a listing of unrecognized items may appear with a checkbox selected to Create New Grade Item(s).
- Enter the points value/weights for the grade items listed.
- Fields with errors will not import. Therefore, return back to the file type to fix the errors and reattempt upload.
- Preview import and click Import.

Extra Credit (Bonus) Grade Item
An extra credit or bonus assignment is an optional assignment that has the potential to boost a student's grade if it is completed. The bonus assignment points are not included in the maximum points for the final grade. If completed, it would be added to the calculated final grade.
Release Grades
To make the grade visible to students, you will need to edit the grade book settings found in the gear Settings. (Share this link to students on how to view grades.)
- Navigate to Assessments > Grades.
- Select the Gear Settings (on the far right-hand side of the page).
- Select the Calcuation Options tab.
- Edit the Final Grade Released section to Calculated Final Grade. (The default setting is Adjusted Final Grade.)
- Click Save.
- Click Yes to confirm the changes.
- Click the Close button.
- Select the Enter Grades tab.
- Select Enter Grades from the Final Calculated Grade drop-down menu.
- Select the top check box to select all students. Note: Ensure all students are displayed in the list by increasing the number per page (found in the lower right-hand corner of the page.)
- Select the Release/Unrelease link.
- Click Save and Close.
- Click Yes to confirm the changes.
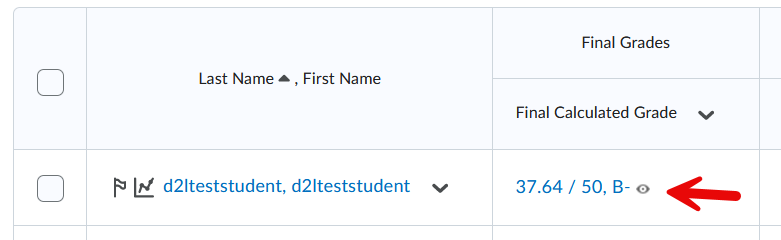
- An eye icon should appear next to the grade in the Final Calculated Grade column to indicate the grades are now visible to students.
Video Walkthrough
Exclude from Final
Instructions for using Bulk Edit to manage all the grade items to exclude from the final grade.