
-
- Online Course Development
- Online Program Development
- Program Guidelines
- Accessible Technology
- Center for Teaching and Learning
- Contact Us
- For faculty and staff questions about online teaching or course design, submit your questions to the Learning Technologies portal.
Walk-in Consultation Hours for Faculty and Staff
Monday-Friday 9 a.m. - 3 p.m.
Room 326 Raynor Library
For more in-depth questions and course consultations, schedule an appointment with one of our Instructional Design and D2L Specialists
PROBLEM WITH THIS WEBPAGE?Report an accessibility problem
To report another problem, please contact emily.newell@marquette.edu.
D2L Dropbox
The dropbox (assignments) tool is used for students to submit individual or group assignments for evaluation.
Instructors can enable the following:
- Plagiarism and grammar checker (Turnitin).
- Anonymous grading to prevent unconscious bias.
- Provide feedback using the annotation tool.
Video Guides
Dropbox Walkthrough
Overview
The Dropbox tool in D2L allows you to see users’ submission times, download submissions, and return submissions with grades and feedback.
Restrict access to Dropbox folders by date and time, group membership, or special access permissions. There is no limit to file size, but the browser and internet speed can affect how fast large files are uploaded. Students needs to upload a supported file type.
What are Folders and Categories?
- Categories: Create categories to group and organize your Dropbox folders. For example, you can create a category called “Assignments” and have ten folders under this category (Assignments 1-10). You can also divide folders by weeks, units, etc., based on your course structure.
- Folders: Create folders to organize assignments that students turn in to you.
To Access the Dropbox tool:
Select Dropbox under Assessments on the main navigation bar. You will be taken to the Dropbox Folders page where you can add and edit new folders and categories.
Creating a dropbox folder
Dropbox Setup
Go to Assessments > Dropbox and Select New Folder at the top of the page.
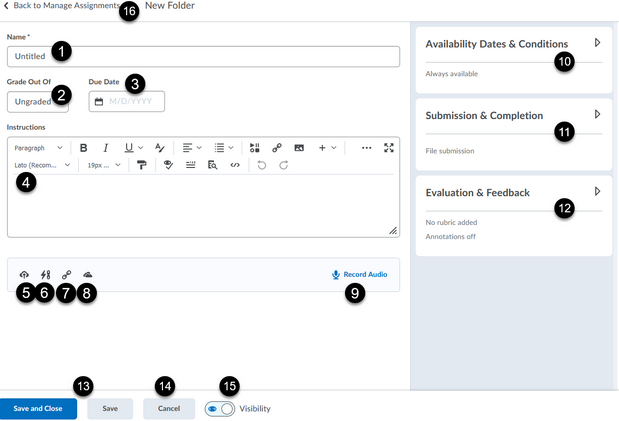
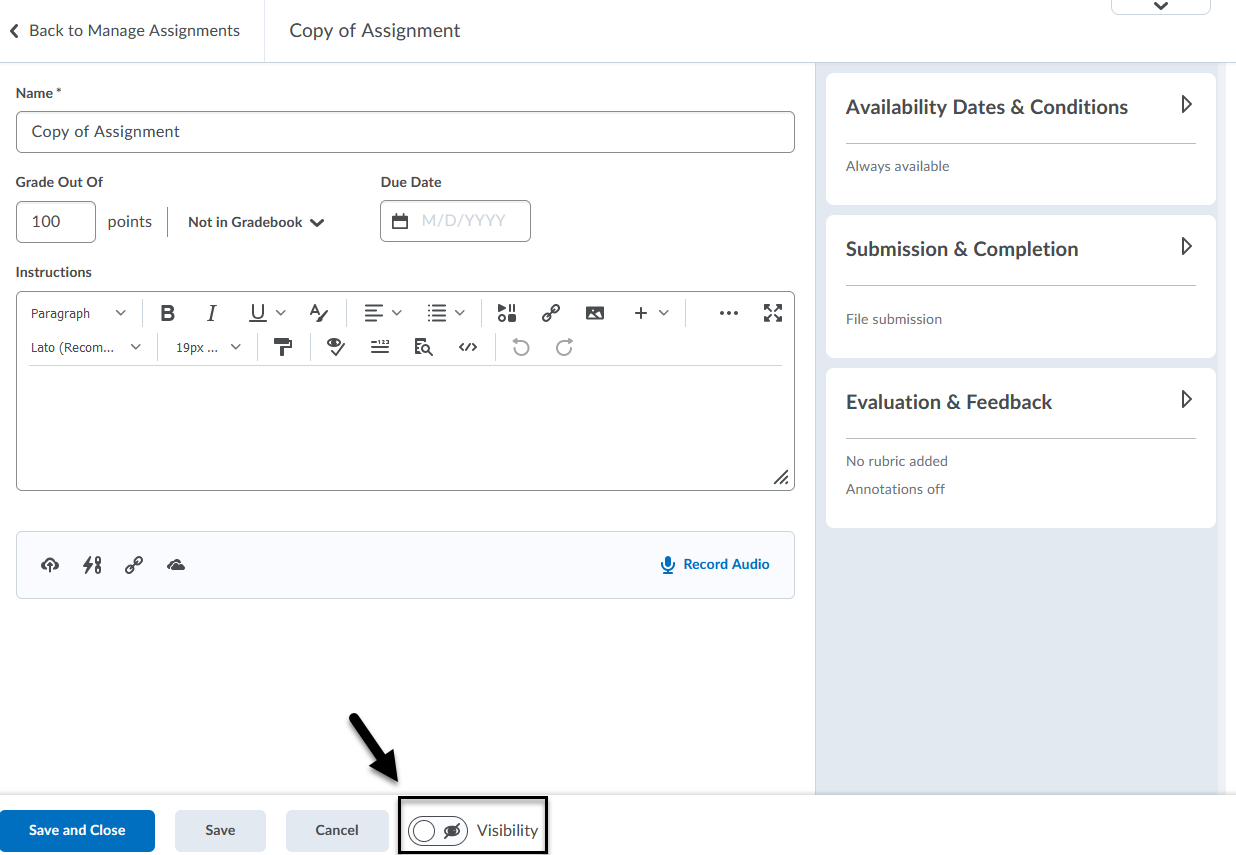
Enter the title of the dropbox folder [1].
Enter a score. If left blank, the dropbox will be ungraded. Once selected, you will then see the ability to link to the gradebook by choosing fr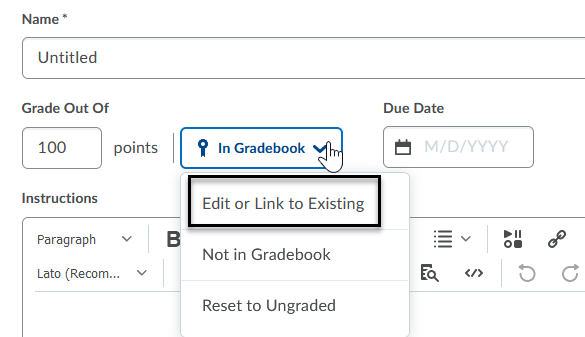 om Grades or to create and link to a new grade item automatically [2].
Enter a due date [3].
Enter instructions in the description text box. The Brightspace Editor replaces the previous HTML Editor to include additional features such as an advanced source code editor, emoticon and symbols menu, word count, and advanced image editing options. It is recommended to use your browser for spell check and browser hot keys/menus for cut/paste functionality [4].

Attach a file [5].
Attach a link to an existing activity (e.g., dropbox, discussion, quiz) or course files [6].
Attach a URL (Weblink) [7].
Attach a document from OneDrive [8].
Record audio (optional) and add a transcript [9].
Availability Dates & Conditions. Expand the right arrow to enter availability dates, release conditions and special access [10]. Restrict access to a dropbox folder.
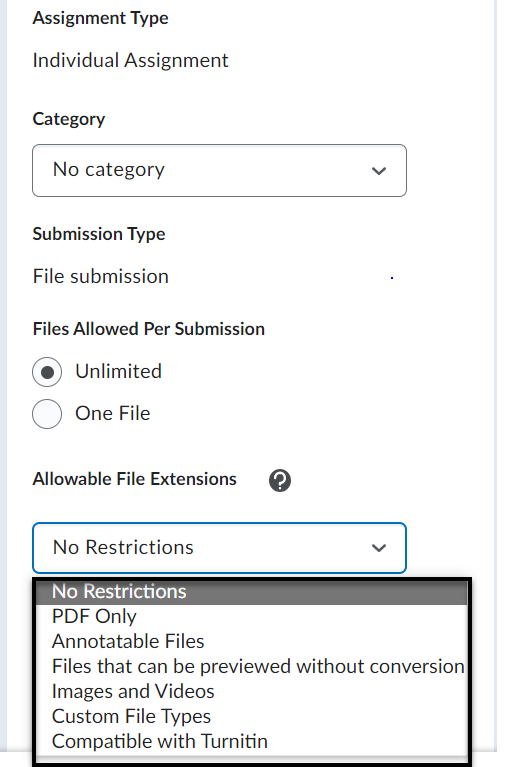
Submission & Completion. Expand the right arrow to enter an email for notification when an assignment is submitted (optional), assign individual versus group assignment type, select submission type (file, file or text, text, on paper, or observed in person), allow a specific file extension, select submissions (all are kept, only one, or only most recent submission) [11].
Evaluation & Feedback. Expand the right arrow to add a rubric, manage learning objectives, enable annotation tools, anonymous marking, evaluator selection, and manage Turnitin [12].
Save and Close to return to the Dropbox folder list or click Save to remain on the same page [13].
Cancel returns user to Dropbox folder list without saving [14].
Use the toggle button to hide or make visible the dropbox folder [15].
Back to Manage Assignments returns user to dropbox folder list [16].
Use the dropdown arrow to toggle back to previous dropbox experience [17].
Allowable File Extensions
It is possible to restrict file types submitted to the dropbox folder.
- Under Assessments > Dropbox, select the drop-down menu next to the dropbox name to select Edit Folder.
- Expand Submission & Completion area to click the drop-down menu for Allowable File Extensions.
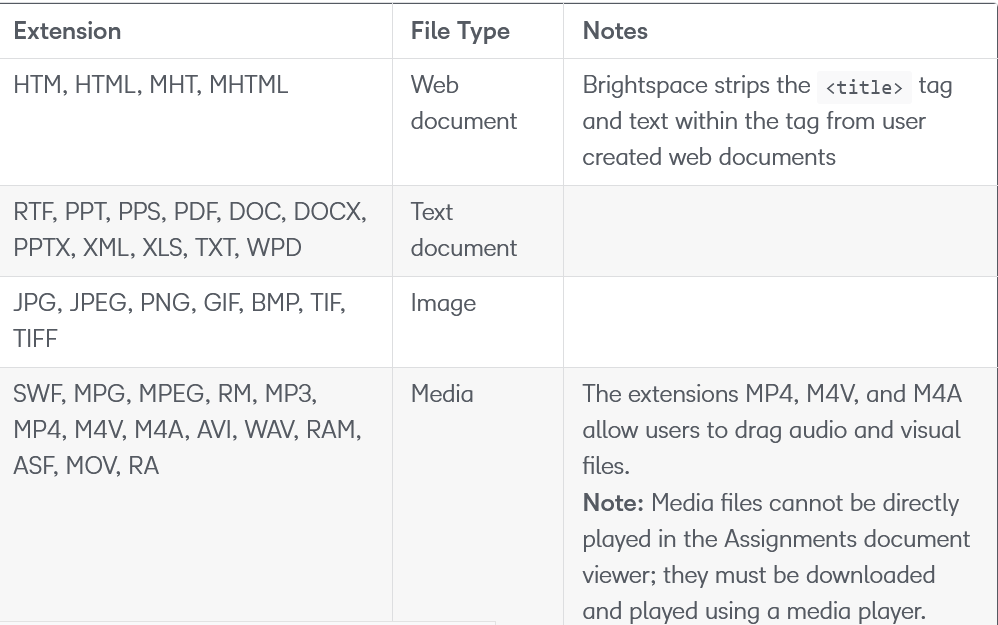
- Allowable File Extensions options: No restrictions, PDF, File types supported by Annotations, Files that can be previewed without conversion (e.g., HTM, .HTML, .MHT, .MHTML, and .BMP), Images and Videos, Custom File Types (e.g., .doc, .docx), and Compatible with Turnitin (e.g., supported file types: HTM; HTML; Doc; Docx; HWP; ODT; RTF; WPD; TXT; PS; PDF; pptx; ppt; ppsx; pps).
Tips and Suggestions for Dropbox Creation
- Individual or group assignment options are available. Once a group assignment is selected, there is no way to revert to individual submission once there are student submissions received.
- Match the point value and name in the dropbox to the grade item.
- The system creates the grade item automatically. Check to see if you have an existing grade item to associate with before having the default create one for you.
- A rubric is optional but will make assessing student performance more efficient. If attached, then ensure the point value matches the dropbox and grade item value.
- File submission type is the most common used selection. (Requires students to upload and submit a file to the dropbox.)
- The default is to allow unlimited files per submission and to keep all submissions.
- Adding a due date in the Restriction tab will populate the calendar.
- Providing special access to submit outside the normal availability dates is possible.
- Release conditions can be set up to open a dropbox after completing an activity (e.g., quiz, discussion, dropbox).
- Grade assignments in the Dropbox tool or find it in the Quick Eval tool (located on the D2L home page or Assessments tab on the main navbar).
- Turnitin plagiarism checker is found in the Evaluation & Feedback section of the new dropbox experience. If enabled, be sure to:
- It is optional to allow students access to view the Turnitin similarity scores found under the Similarity Report (previously named Originality Check).
- More Options available in Manage Turnitin for Optional Settings as to what to check against in the repository.
Select an Evaluator
Select an evaluator to assess student submissions. There are two workflows: One Shared Evaluation and Multiple Individual Evaluations.
Note: After you select an evaluator, the Publishers dropdown menu will appear with these options:
- All evaluators can publish any evaluations
- Evaluators can only publish their evaluation
- Manually select publishers
Important: Once students begin submitting to the dropbox, you cannot change the selected publishing option. To change the publisher, create a new dropbox folder for that assignment and ask students to resubmit. Use start dates or toggle the assignment to hidden while drafting.
Editing a Dropbox
Editing Folders
- From the main toolbar, click the Assessments tab and select Dropbox.
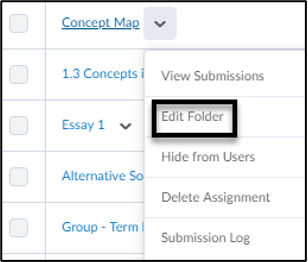 On the Folders Page, click on the drop-down menu next to the name of the Folder you want to edit.
- Select Edit Folder from the drop-down menu.
- Make your changes.
- Click Save.
Copying a Dropbox
Copying a Dropbox folder
- Under Assessments > Dropbox, select the drop-down menu next to the dropbox name to select Copy Assignment.
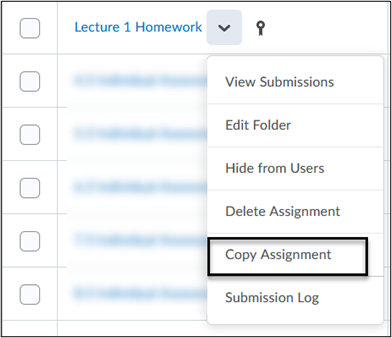
- Edit the dropbox title name and any other items that require a change.
- Toggle the visibility button to hidden if you are not ready to publish for student view. Note: This step is important because the default is set to visible.
- Click Save and Close.
Deleting a Dropbox
Deleting Folders and Categories
 From the main toolbar, click on the Assessments tab and select Dropbox.
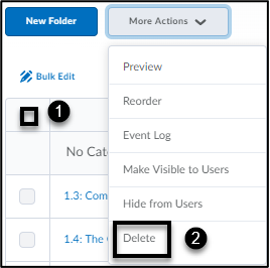
- Select the dropbox(es) that you would like to delete from the list or select all by clicking the top checkbox. [1]
- On the Folders Page, click on More Actions and select Delete from the drop-down menu.
- Click on the Delete button again to confirm the selection. [2]
Note: When you delete all the folders in a category, the category will be deleted as well.
Organizing Dropbox folders
Organizing Dropbox folders
Add a Dropbox in a module via Content
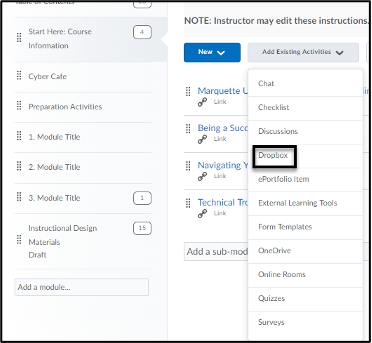
Add Existing Activities > Dropbox
If restriction dates are added to the dropbox folder, the dropbox folder instructions will not be visible. If the preference is to allow visibility on the restricted dropbox folder, then follow these instructions.
- Click on Content on the main navigation bar.
 Click on the module where you would like to add your Dropbox.
- Click on New and select New Dropbox from the drop-down menu.
- Enter all the information in the Create a Dropbox Folder page.
Note: The dropbox is published automatically after clicking the Save button. - Add an existing dropbox to your module by clicking Add Existing Activities. Then, find and select the Dropbox folder that was already created.
Group Assignment
Viewing and Evaluating Submissions
 Viewing Submissions
- Under Assessments > Dropbox, select the title of the dropbox folder or View Submissions under the drop-down menu.
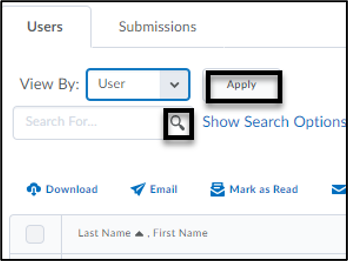
- View by User or Groups by clicking drop-down menu and then click Apply.
- Search for a submission by student name by entering name in the search bar and clicking the magnifying glass.
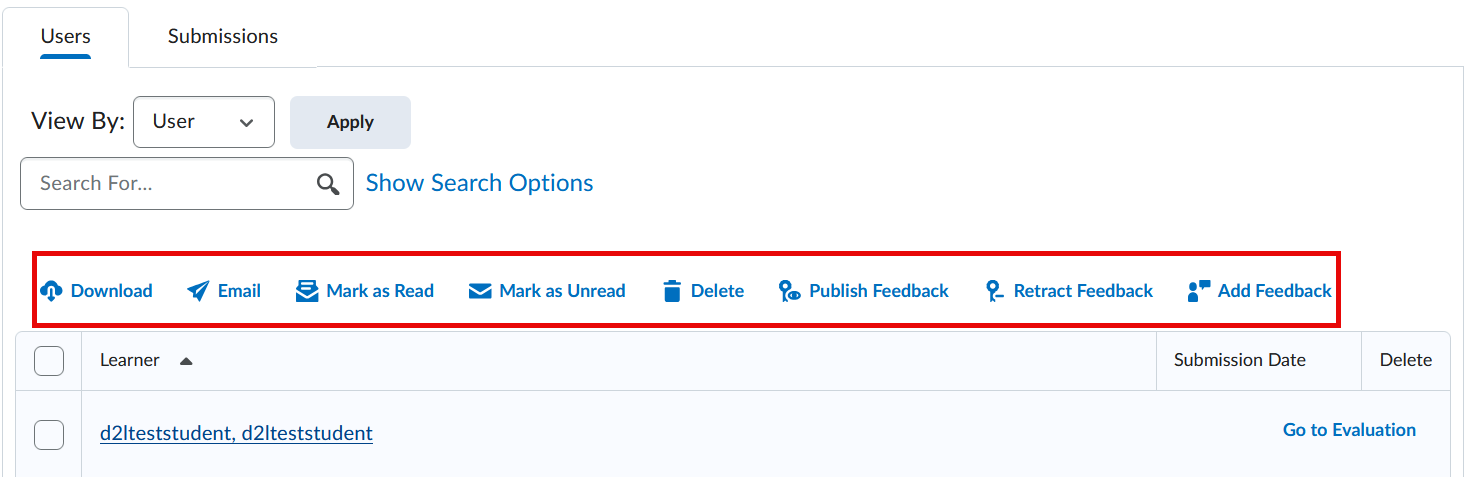
- The toolbar selected below allows for download of submission, student email, marking submission as read, marking submission as unread, deletion of submission, publishing feedback, retracting feedback and adding feedback (once the checkbox has been selected next to the dropbox folder).
Evaluating Submissions
- On the Folders Page, select the folder you want to evaluate. You can either click the student’s name, Group name, or click on Go to Evaluation.

- Once in the Submissions Page for the Folder, click on the assignment link for the student you wish to evaluate.
- You will be taken to the Evaluate Submission page where you can view the assignment online with the document viewer or download it to work offline.
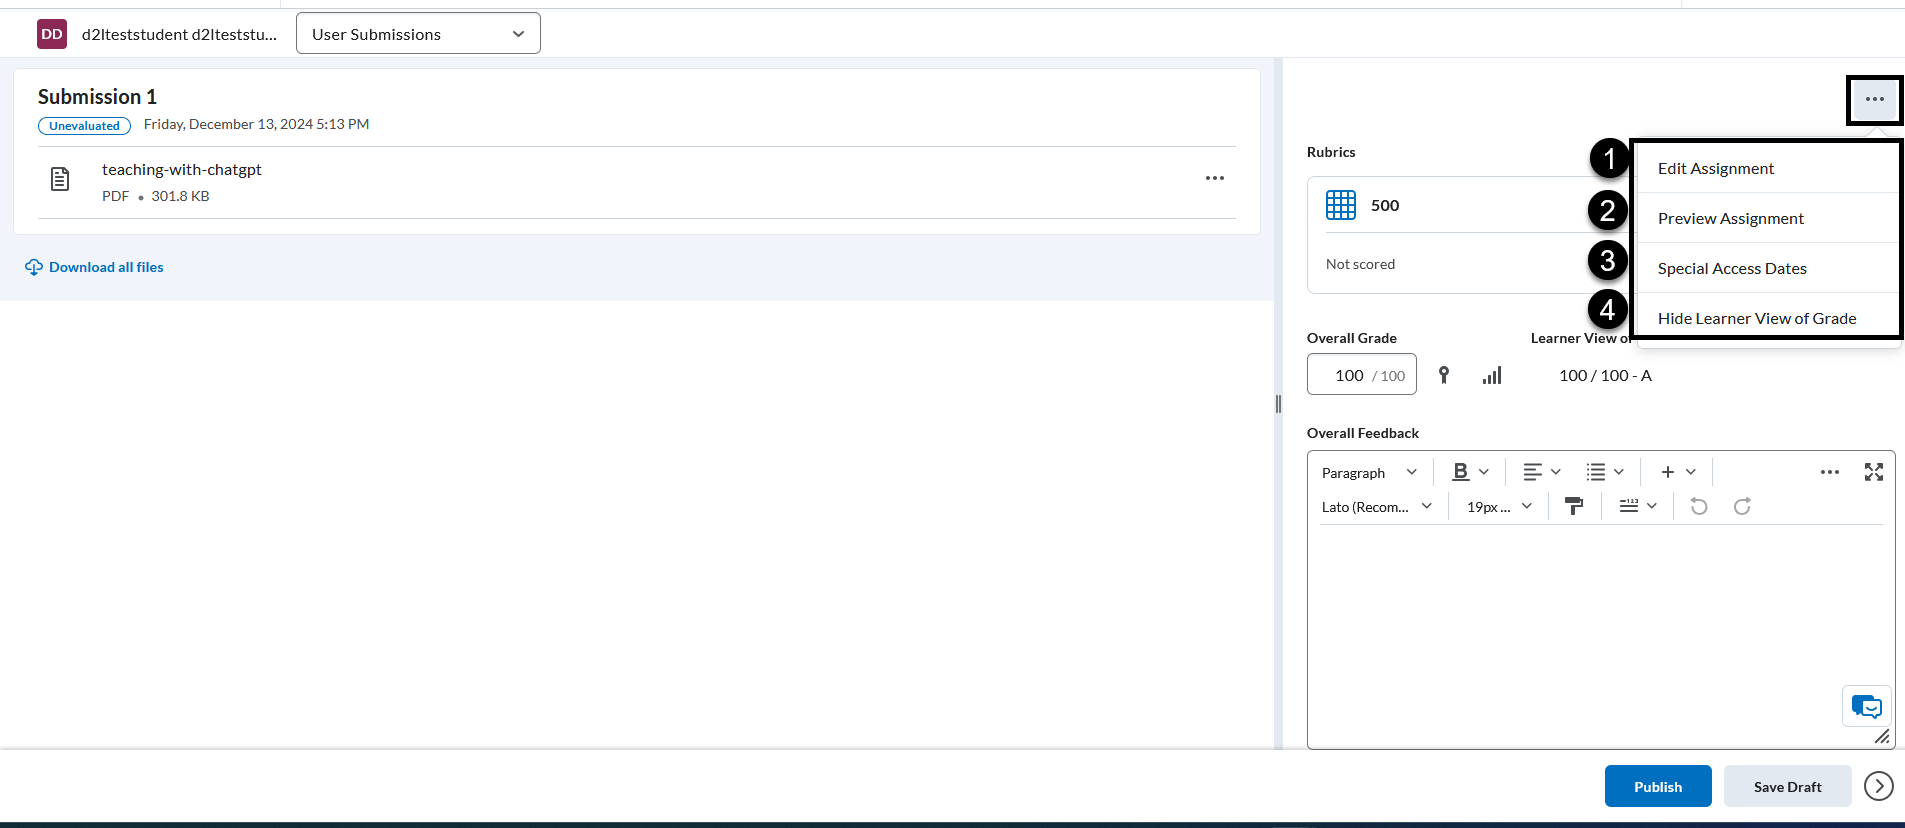
On the right-hand side, click the ellipsis to view a menu of options:
- Edit Assignment [1] - Takes the user to the dropbox creation experience.
- Preview Assignment [2] - Provides a preview of the student's perspective including assignment instructions and due date. It is not possible to edit in the Preview window.
- Special Access Dates [3] - Provides ability to edit due date and availability dates for that specific student.
- Show Learner View of Grade [4] - Choose to Hide Learner View of Grade or Show Learner View of Grade allows the instructor to see the student perspective of the grade from the evaluation page. Note: Hide Learner View of Grade does not hide the grade from the student. This is only an instructor preview. If the grade scheme is a letter grade, instructors can view the letter grade.
- The Evaluate Submission page has a moveable divider to increase the real estate of the evaluation area (Rubrics, Overall Grade, Overall feedback) or the student's submission depending on which way it is dragged.
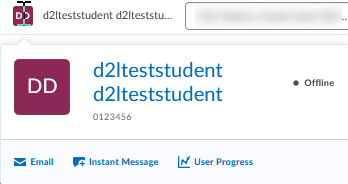
- In the upper left-hand page, student information (e.g., user progress) is available via the student profile card.
- A profile card appears when hovering over the student's picture. The student's online and offline status is available along with links to student profile (click on student picture), email, instant message, and user progress.
- Once the evaluation is completed for each student, click on Save Draft. Note: If rubric is used to score, it is not necessary to enter a score in the field. Click the arrow in the upper right-hand corner to evaluate next student. Click Back to Folder Submissions to Publish All once grading is complete. It is possible to add the same feedback to all students by selecting Add Feedback to All. If the submission was already published, the feedback would be overwritten with the new feedback. To retract all feedback, select Retract All from the More Actions menu.

- The instructor view of the dropbox folder list shows the number of assignments completed, evaluated and feedback published as well as the due date for each assignment. The icon to the right of the submission name shows it is tied to the gradebook.

Note: Grades entered in the gradebook will update the score in the dropbox. The Updates widget will only clear dropbox submissions if evaluation has been Published or Draft Saved.
Evaluating Submissions with Annotations Tool
Overview
The annotations feature is a visually based grading feedback tool. Instructors will be able to highlight, add sticky notes, free-hand drawings, etc. to students' submissions. This type of feedback is is available for the following file types: .doc, .docx, .rtf, .odt, .ppt, .pptx, .ppsx, .odp, .xls, .xlsx, .jpg, .jpeg, .png, .tif, .tiff, .gif, .txt.
Annotations will need to be enabled under the Evaluation & Feedback section to be able to access the toolbar. To delete an annotation, click on the icon in the document and select delete button on the keyboard. Note: Assistive technologies may have difficulty reading annotations. Students will see the following message upon submitting:
Submit Assignment - Feedback for this assignment may include visually based in-text and handwritten annotations. Students must be able to use this visual tool, with or without reasonable accommodations. If you require an alternative form of feedback, please contact the Office of Disability Services or your instructor to discuss possible accommodations.
Annotations Toolbar
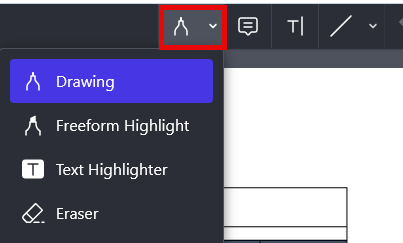
- Drawing/Highlighter (freeform and text) and Eraser are located under the Marker icon.
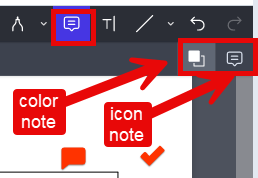
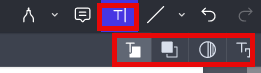
Colored comments (sticky notes), right pointer, comment with checkmark, comment with circle (ellipse), comment with x (cross), comment with insert text, comment with new paragraph left pointer, comment with text note, comment with paragraph, comment with question mark (help), comment with star, comment with key are located under the Note icon.
Color options for text and background in text box along with options for font style and size and left, right, center justification are located under Text box icon.
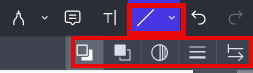
Line, arrow, rectangle options found under the Line icon.
The annotations (i.e., icons selected) will appear on the document, but the student will need to hover or click on it to view the comments.
Student View
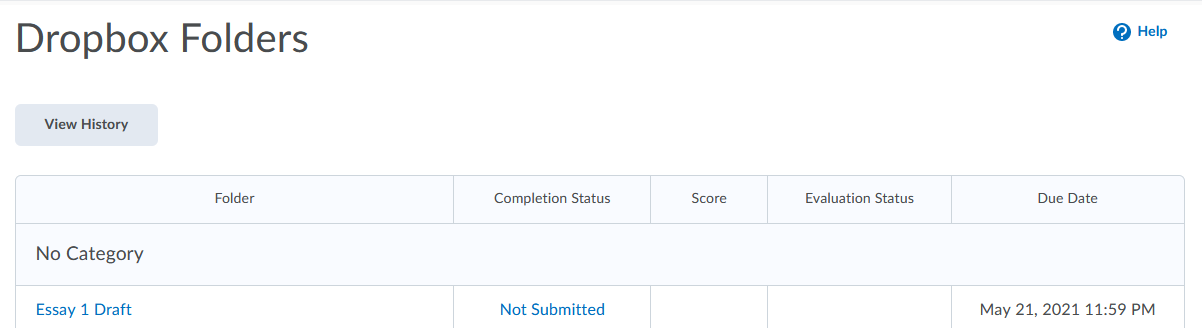
- The student view of the dropbox folder shows the due date, whether an assignment was submitted, scored, and feedback has been read or unread.
- The student has access to view all submissions under View History and clicking the drop-down menu to select the folder to view individual assignments.
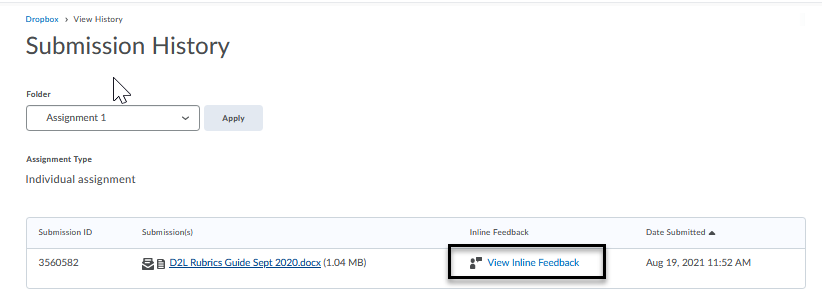
Student view of annotations
The student will click Unread link under Evaluation Status in Dropbox Folder list and select View Inline Feedback.
Anonymous Grading
Anonyymous grading allows you to evaluate student work without seeing their names reducing potential bias and maintaining fairness when grading. An anonymized identifier is assigned instead of personal information. The anonymous setting cannot be undone once student submission have been received.
After you publish grades and feedback, student names will become visible again. Be sure to disable the Automatic Zero for Missing Submissions in the Grades setting so names are not revealed prematurely. If the system posts a zero automatically when a student misses a deadline, the submission will no longer remain anonymous.
Once you're done using Anonymous Marking, feel free to re-enable Automatic Zero for Missing Submissions. Otherwise, you will need to manually enter zeros for students who did not submit an assignment.
Dropbox submission Anonymous Marking setup
- Go to Assessments > Dropbox and select New Folder.
- Expand 'Evaluation & Feedback' section to check the box for Hide student names during assessment under 'Anonymous Marking'.
- Select Save & Close.
- The dropbox folder list should have an Anonymous Grading enabled icon next to dropbox folder name.

Evaluate Dropbox submission with Anonymous Marking
- The Evaluate page should only display Anonymous User Number in place of the student’s name. Select either 'Go to Evaluation' or 'Anonymous User' or the student's document to begin evaluation.
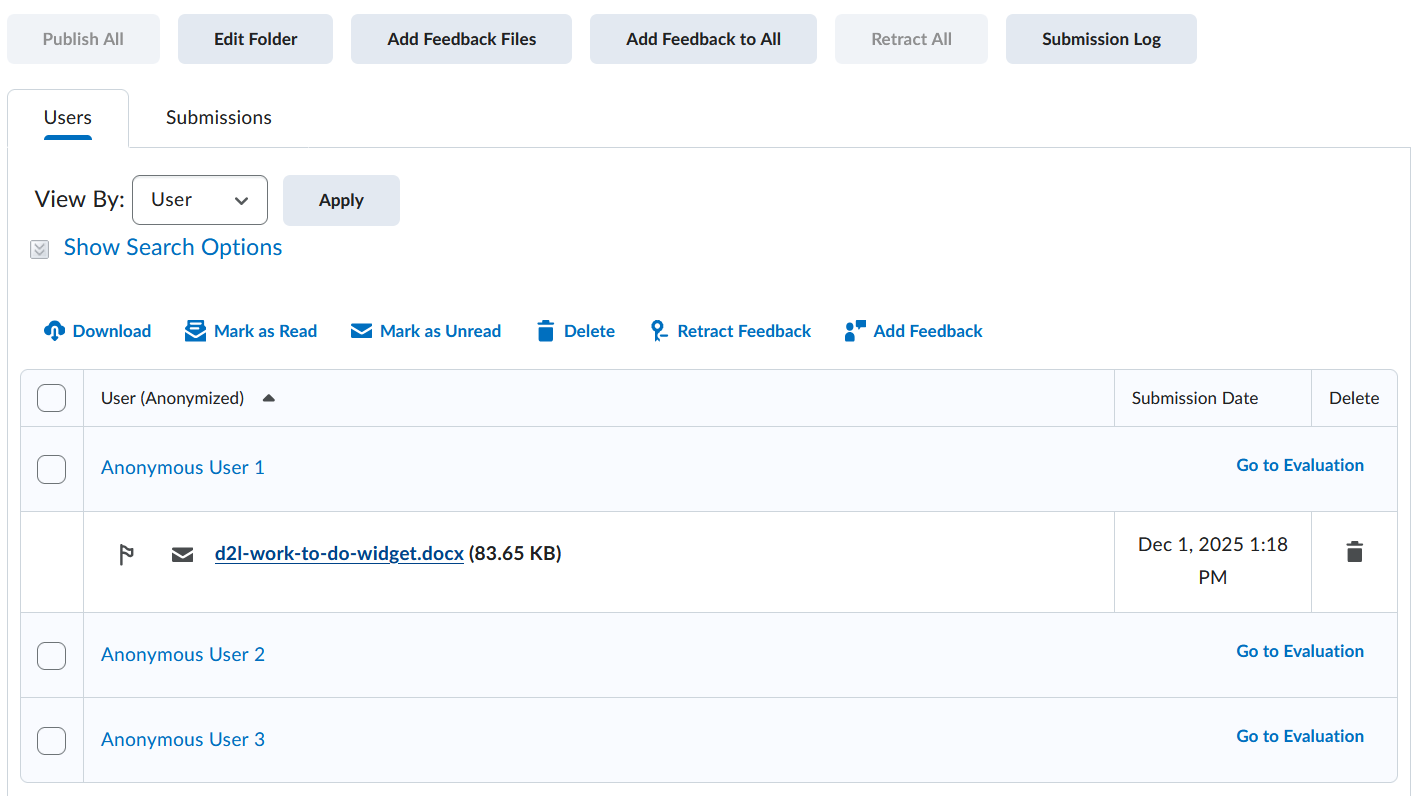
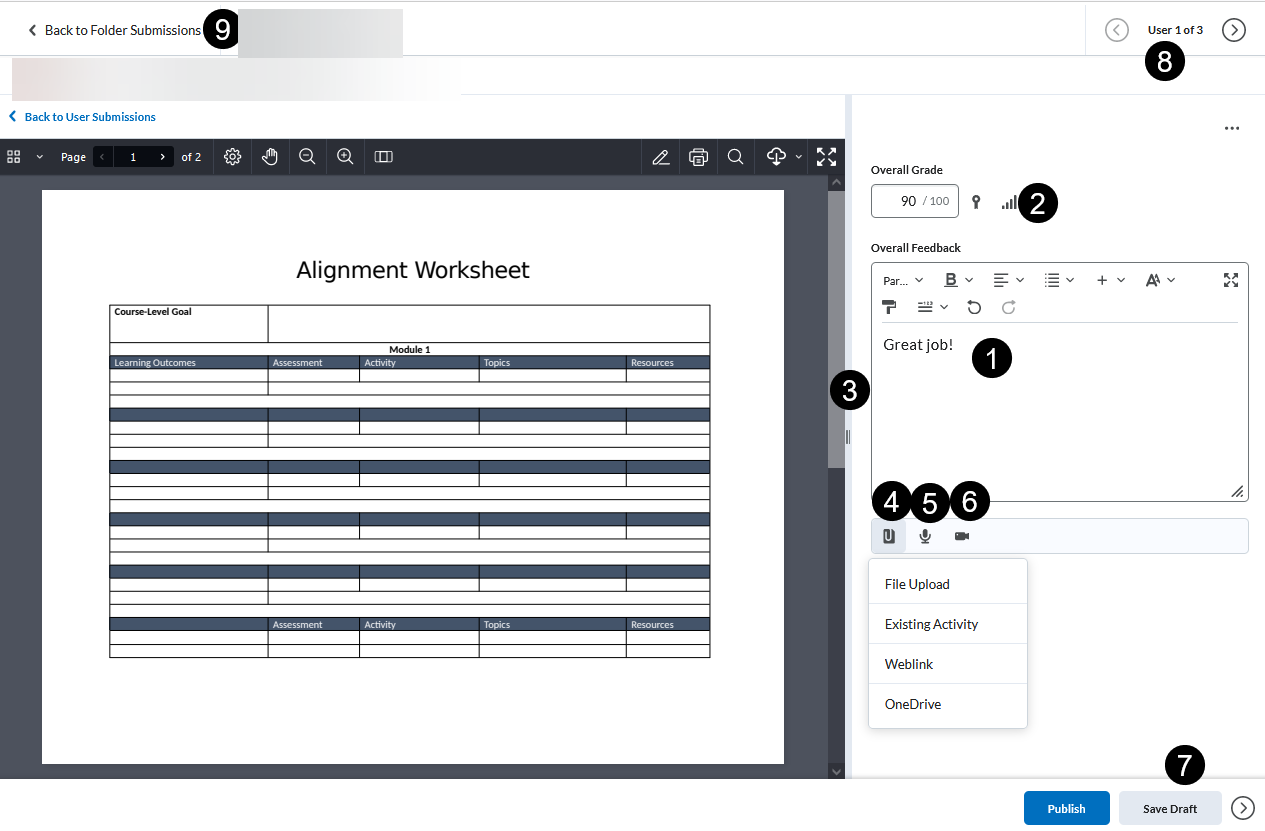
- Provide feedback [1] and score [2]. Use the draggable divider to resize your panels [3]. Upload file [4]. Record audio [5]. Record video [6]. Save draft [7] and continue to grade each student [8]. Click Back to Folder Submissions [9].
 Once all the submissions are graded, click Publish All. The student names will become visible once the grades are published. Click Yes to confirm publishing. The student’s name appears along with published status.
Downloading Submissions
To view submissions offline, you can download all or individual submissions to a zip file.
Download All
- Navigate to Assessments (course navbar) > Dropbox to view the dropbox list of submissions.
- Click on the name of the dropbox (link) or select View Submissions from the drop-down menu.
- Select the Submissions tab.
- Select the top checkbox to select all of the submissions. Note: You may need to increase the number per page (lower right-hand of page) to display all students.
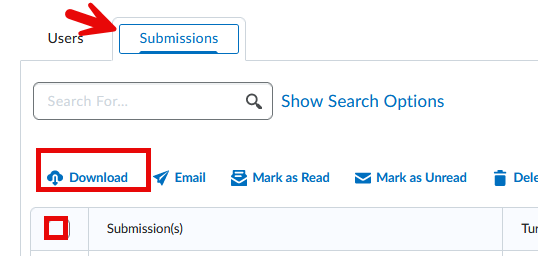
- Select the Download link.
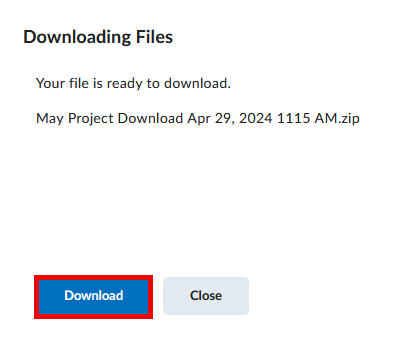
- A message will appear: 'Your file is ready to download.' Click on the zip file link.
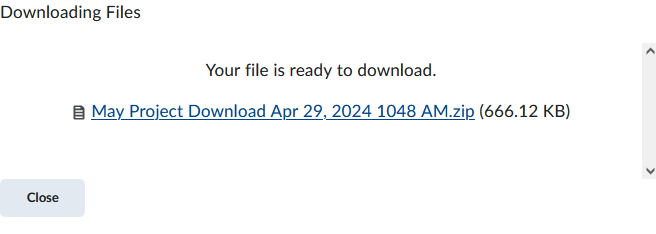
- Navigate to your browser's download area to find and save your zip folder to your preferred location.
Downloading Individual Submissions
- Navigate to Assessments (course navbar) > Dropbox to view the dropbox list of submissions.
- Click on the name of the dropbox (link) or select View Submissions from the drop-down menu.
- Check the box next to the student's submission.
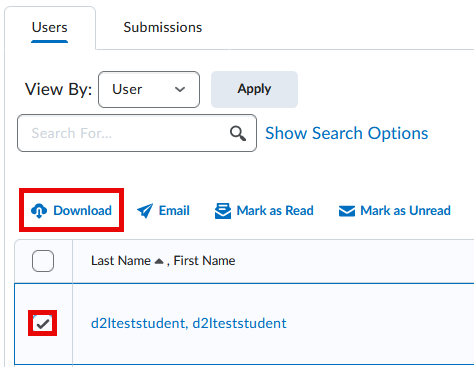
- Click the Download link.
- A message will appear: 'Your file is ready to download.' Click the Download button.

- Navigate to your browser's download area to find and save your zip folder to your preferred location.