
-
- Online Course Development
- Online Program Development
- Program Guidelines
- Accessible Technology
- Center for Teaching and Learning
- Contact Us
- For faculty and staff questions about online teaching or course design, submit your questions to the Learning Technologies portal.
Walk-in Consultation Hours for Faculty and Staff
Monday-Friday 9 a.m. - 3 p.m.
Room 326 Raynor Library
For more in-depth questions and course consultations, schedule an appointment with one of our Instructional Design and D2L Specialists
PROBLEM WITH THIS WEBPAGE?Report an accessibility problem
To report another problem, please contact emily.newell@marquette.edu.
D2L Quizzes
Create a Quiz or Exam
Create formative and summative assessments using Quizzes. For example, low stakes practice quizzes can be helpful for students to master content and prepare for the next assessment. Best practice is to build the questions in the question library first to import to any quiz. Grades can be set up to automatically export to the grade book. For details on the Quizzes tool, review the Quizzes Walkthrough below.
Quiz Accommodations
- Students with accommodations through the Office of Disability Services (ODS) may request additional time on quizzes. Instructors can provide this access using the Edit Accommodations feature in the Classlist.
Quiz Proctoring
The Quizzes tool provides the option of using a proctoring solution called Respondus LockDown Browser and Monitor. You can choose to lock down the student's browser to prevent browsing on the internet as well as record them while they take the test.
- Enabling Respondus LockDown Browser and Monitor in D2L Quizzes
- Student guide to working with Excel sheets in a Written Response question with LockDown enabled.
- Student guide to adding audio in a Written Response question with LockDown enabled.
Quizzes Walkthrough
Build Your Question Library
Useful Terms
Useful Terms:
- Question Library: The Question Library works as a question bank from which you can select questions when you’re creating a quiz. It is the central space to keep questions organized by topic, question type, etc. It is recommended that you build your questions directly into the Library so it can be imported to a quiz.
- Section (in the Question Library and Quizzes): These work like folders which allow you to organize your questions by topic, unit, or type of questions, etc. You can set specific parameters to a section in your quizzes, such as question randomization.
- Question Pool: Set a given number of questions randomly selected from a section in the Question Library.
- Categories: Allow you to group quizzes under a Category in the Quizzes Page. For example, Unit 1 Quizzes.
- Quizzes Page: Once in your course, click on Quizzes under Assessments on the Main Navigation Bar. You will be taken to the Quizzes Page where you can manage quizzes, access the Question Library, review quiz statistics and enable LockDown Browser.

- Asynchronous Quiz: Timer starts when the learner launches quiz or exam.
- Synchronous Quiz: Timers starts on the start date. A due date is not applicable and an end date is not necessary.
The Question Library and Creating Sections
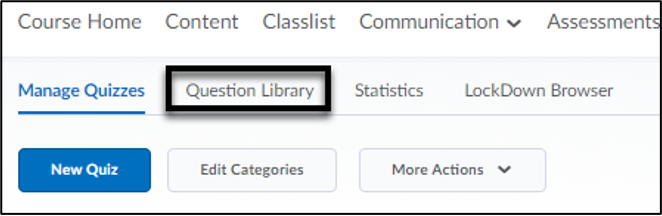
Accessing the Question Library
- Click on Assessments > Quizzes on the Main Navigation Bar.
- Click on Question Library on the top menu of the Quizzes Page.
Organizing Questions: Creating Sections
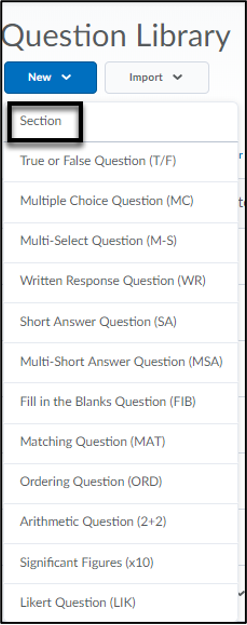 In the Question Library, click on New and choose Section (folder) from the dropdown menu.
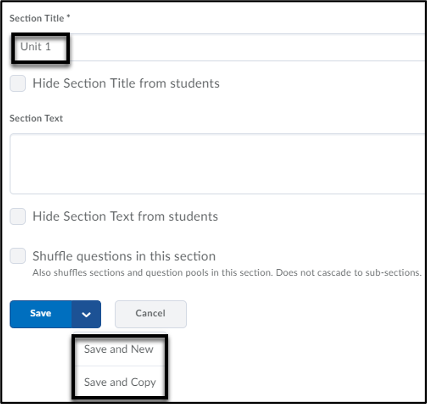
- Enter a name for the section.
-
Click Save (if you want to add other types of questions) or the option to Save and New (create a new question of the same type) / Save and Copy (create a new question with the current question as a template) by clicking the dropdown menu.
-
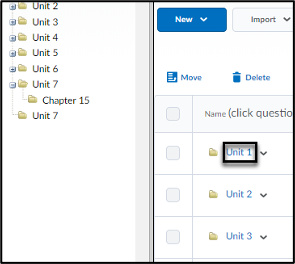
The section will show up in the Question Library and in the menu to the left.
Types of Questions
Types of Questions
There are 12 different question types. It is best practice to use the Preview button for each individual question as well as the entire quiz to test for accuracy before a quiz is released.
Many quiz question types give the option to insert an image via rich text editor in the question text box. All question types allow you to include Feedback and Hints under the Options menu. Other options may be available depending on the question type (e.g., short description, add enumeration).
If you choose to enable LockDown Browser and Monitor for Written Response, Arithmetic or Significant Features type questions, do not check the option to Enable inserted images and attachments or Allow attachments to support answers. It may cause a security risk.
Click Save (if you want to add other types of questions) or Save and Copy (create a new question with the current question as a template) or Save and New (to create another question of the same type).
Adding Questions to Question Library
Add Questions to Library
 In the Question Library, click on the Section where you want to add questions.
Note: The sections can be accessed by clicking on the folders in the “tree” on the left side of the library.- Click New and choose the type of question that you want. There are 12 question types, and the process for creating each question is slightly different. You can also add text or image information.
 Note: Import button can only accept CSV formatted text files. D2L provides a download template of question type structures for a CSV file. IMS QTI compliant course package (ZIP) file is acceptable. D2L accepts the import of files from Respondus 4.0. It is also possible to import existing questions from other course quiz folders.
 - In the Question Text field enter the question.
Note: If you copy and paste text into the question text box, clear formatting. For example, if clearing formatting on a Word document, highlight the text and under Styles, click Clear Formatting.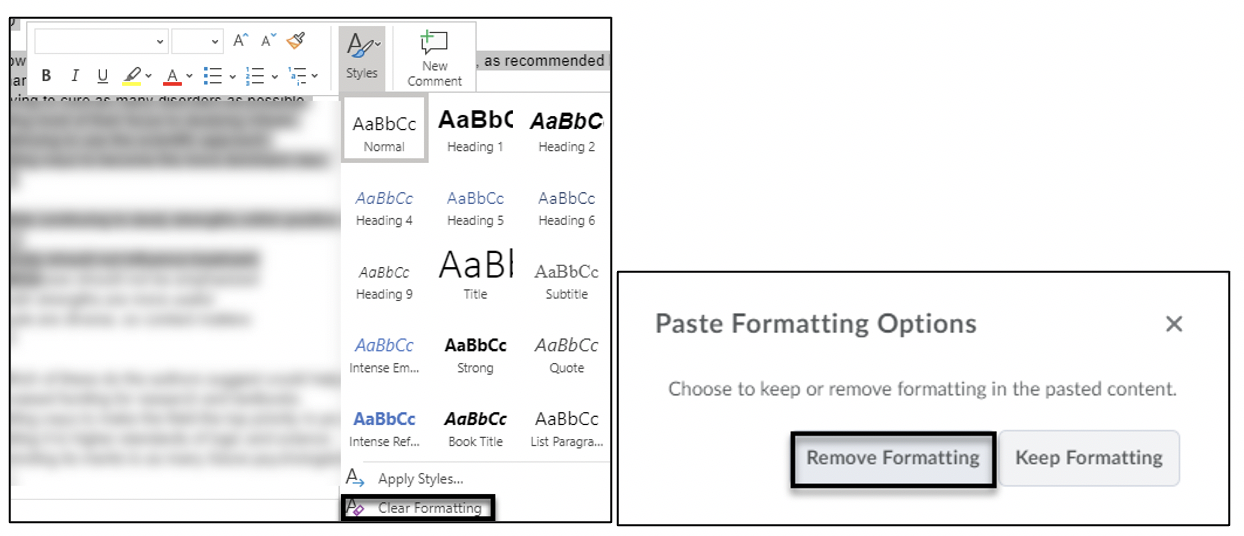
If clear formatting of text is not completed, then select Remove Formatting when text is pasted in a text box in D2L.
Enter the points and click Save (if you want to add other types of questions) or Save and New (to create another question of the same type) or Save and Copy (create a new question with the current question as a template).
Create & Build
Create an asynchronous Quiz or Exam
Create a quiz that students can take anywhere and within the availability dates/times you set.
Create a synchronous Quiz or Exam
A synchronous quiz allows the test to be taken at the same time for everyone. If the student logs in late, the time will be reduced accordingly because the clock is always running until the time limit is reached. Due date is not applicable. If enabled, the start date will only be visible in the calendar. Learn more about creating a synchronous quiz.
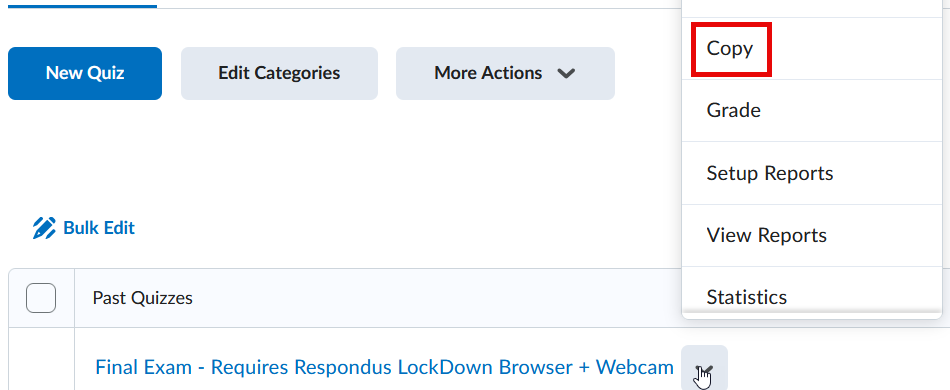
Make a Copy of a Quiz
To copy an already existing quiz, select Copy from the dropdown menu. The Properties tab of the Edit Quiz page will appear. Edit the title of the quiz name and edit the questions via the Add Existing or Create New buttons.
A newly created quiz is hidden to students by default. Make the quiz visible by using the toggle feature in order for students to take the quiz. Be sure to edit the start date under Availability Dates and Conditions section before making visible to students.
Note: If you are seeking instructions on how to a copy a quiz to another course site, click here.
Editing and Deleting Quizzes
Edits will impact future attempts.
Editing
- Click Quizzes from the Assessments (main navbar) dropdown menu.
- Click Edit from the dropdown menu next to the quiz name.
- Expand and collapse the panes located on the right-hand side to makes changes to: Availability Dates & Conditions, Timing & Display, Attempts & Completion, Evaluation & Feedback.
Moving Questions
If you would like to move questions to the top, bottom or a section in the quiz, select the checkbox(es) for those questions and select the dropdown menu for Move To.
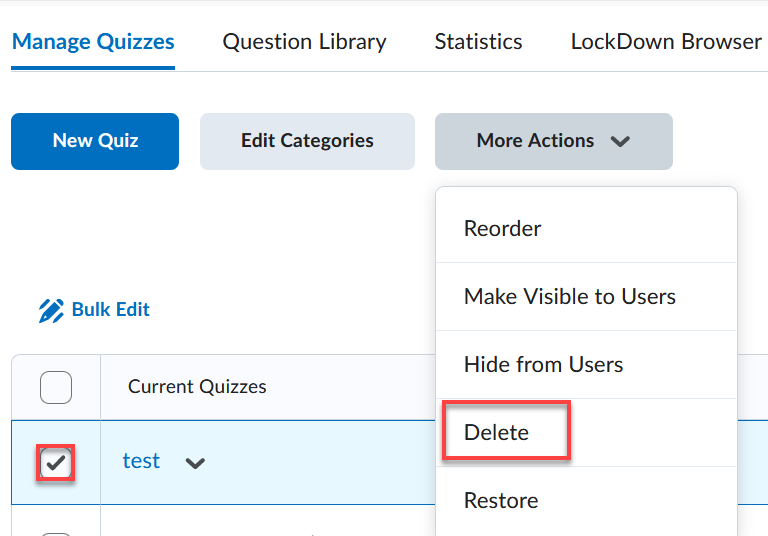
Deleting Quizzes
- Click Quizzes from the Assessments (navbar) dropdown menu.
- Check the box next to the quiz you wish to delete.
- Click on More Actions at the top of the Quizzes Page and select Delete.
- Confirm the quiz deletion by clicking the Delete.
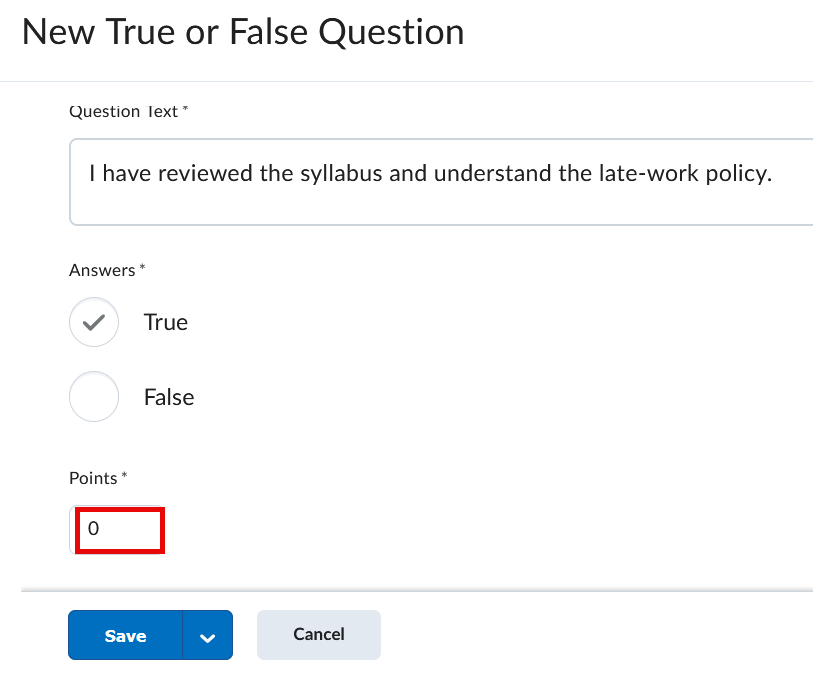
Zero point quiz questions
Instructors can assign zero points to any quiz question to collect feedback or non-graded information. For example, you can use it to make students accountable for reading the syllabus.
Hide Quiz Questions
If you want students to focus on answering questions rather than on scoring, you can hide the point values during the test. When point values are hidden, students will treat all questions equally.
Add a Rubric to Written Response Question (Long Answer) Type
If you would like to streamline grading of an essay or long answer type question, then add a rubric to a written response question type that will measure the student's performance against a set of criteria. Note: It is important to match the points of the rubric to the total points of the quiz question.
Moving Questions from a Quiz to the Question Library
- Select Question Library tab in Assessments > Quizzes.
- Click Import > Browse Existing Questions and find your quiz name in the dropdown list.
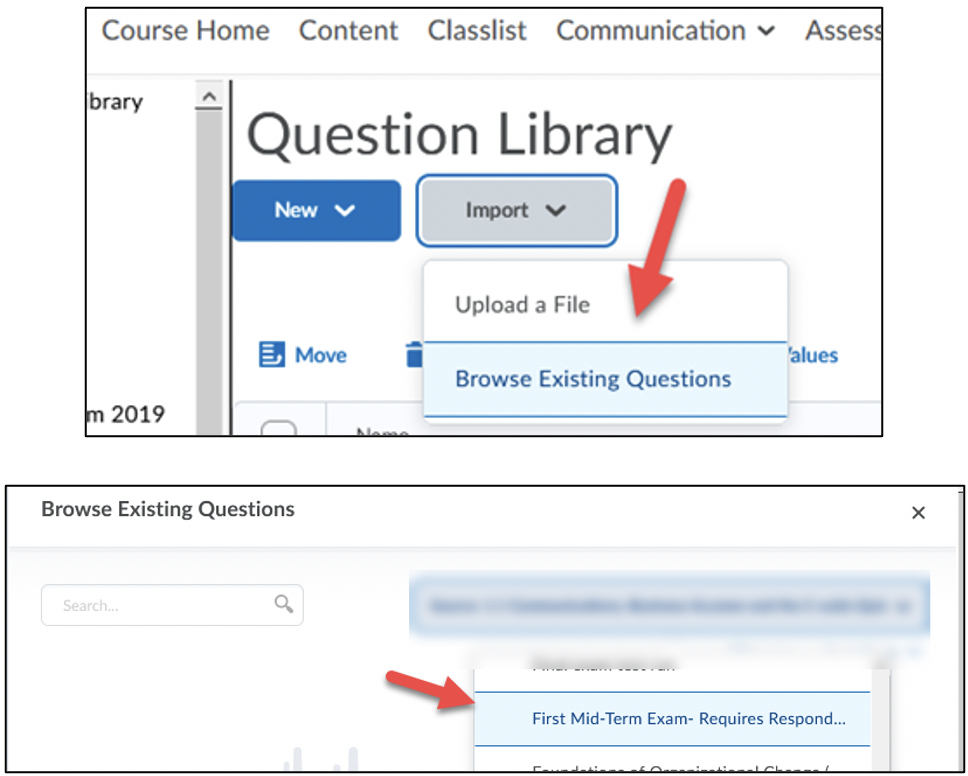
- Check the checkbox for all items and select Add.
Note: If you don't create or select a folder (section) first, then the questions will import directly into the question library.
Manage Access
Special Access
Special Access - Allow selected users
Students may be granted access to a quiz for various reasons (e.g., additional time, alternative date and/or time). If this is more than one occurrence, then consider setting the special access in the Classlist under the Edit Accommodations option. You set it up once for the entire semester.
- Click Quizzes from the Assessments (main navbar) dropdown menu.
- Click Edit from the dropdown menu next to the quiz name.
- Expand Availability Dates & Conditions to select Manage Special Access. Use the default selection to Allow selected users special access to this quiz. This selection allows you to create an alternative time restriction for specific students. The second option restricts access to the quiz to specified students. (Only those students selected would be able to see the quiz.)
- Click Add Users to Special Access button. Under the Special Access Properties, complete the following (if applicable):
- Enter a new due date.
- Enter new availability start and end dates.
- Check to Override time limit (if applicable). If selected, set the multiplier or no time limit.
- Check to override behavior when time limit is exceeded (if applicable). Selections include:
- Automatically submit the quiz attempt
- Flag as "exceeded time limit" and allow the learner to continue working
- Do nothing: the time limit is not enforced.
- Check to override attempts allowed (if applicable).
- Check the student(s) to which the new access applies.
- Click Save button to save the settings. (Note: Once saved, the student’s name will appear along with the summary of the settings.)
- Click Save and Close.
Special Access - Allow only users
- Click Quizzes from the Assessments (main navbar) dropdown menu.
- Click Edit from the dropdown menu next to the quiz name.
- Expand Availability Dates & Conditions to select Manage Special Access.
- Select the second radio butto to Allow only users special access to see this quiz. This selection allows you to create a separate test for specific students. Only those students selected would be able to see the quiz.
Video Walkthroughs
Quiz Accommodations
There is a shortcut to setting quiz accommodations. Instead of navigating to the Availability Dates & Conditions section of the Edit Quiz page, use the Classlist. This will allow you to set up the accommodations only once for the entire semester. This eliminates the need to set up accommodations in each quiz or exam.
Single Session Quiz
Instructors can require students to complete a quiz within a single Brightspace login session. Once enabled, students will not have the means to continue a quiz on a different device or browser. Learn how to set up a single session.
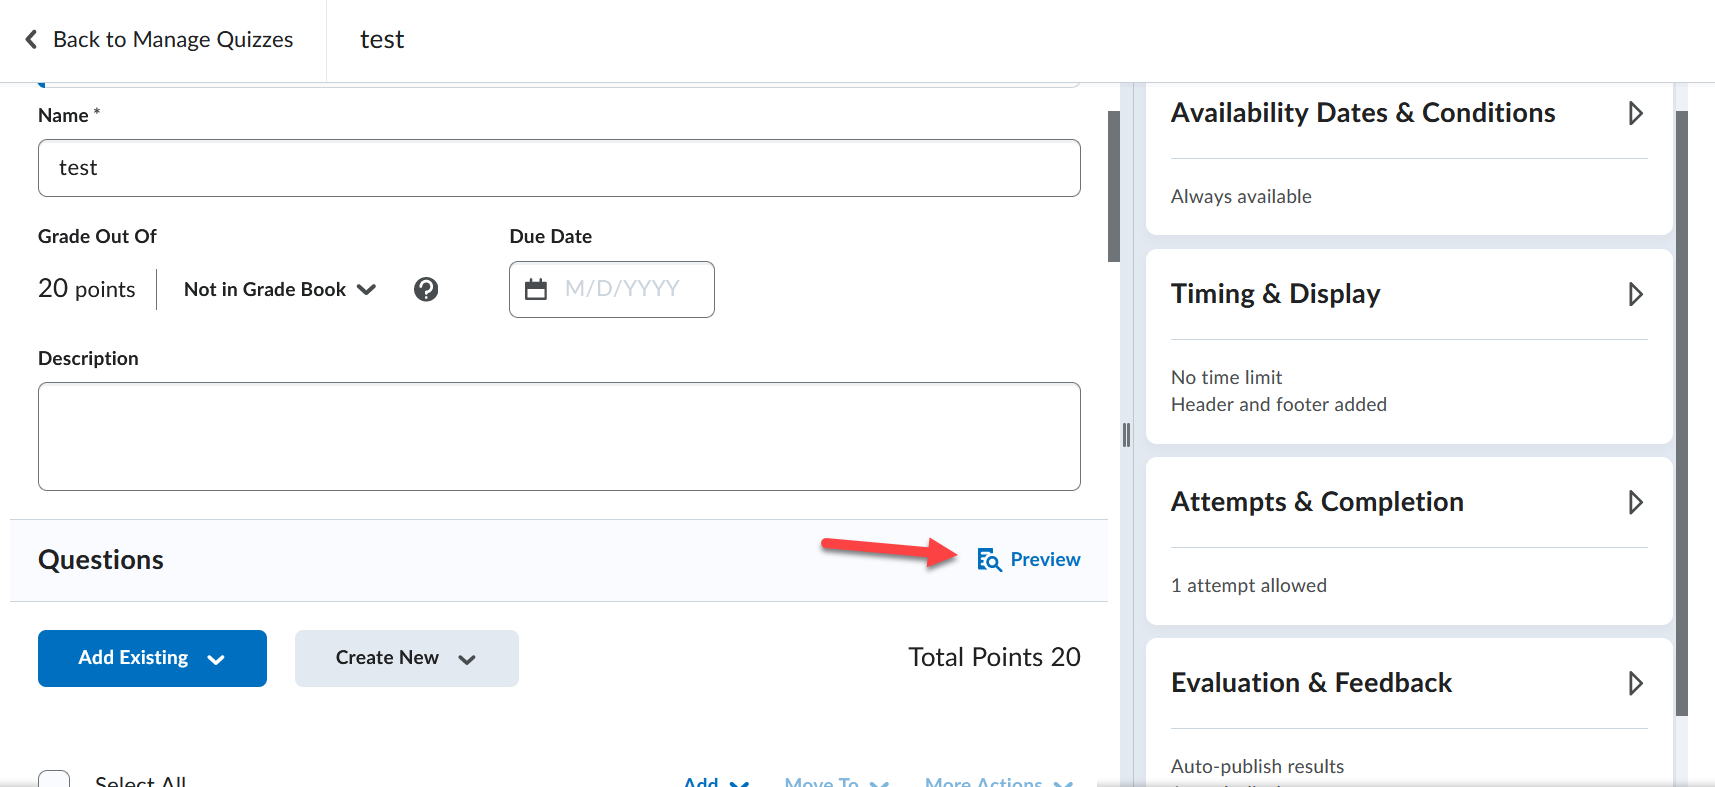
Preview & Administer
Preview a Quiz
Preview a Quiz on main quiz page
- Click Quizzes from the Assessments (main navbar) dropdown menu.
- Click the dropdown caret next to the quiz or exam title and select Preview.
Preview a Quiz while adding/editing questions
- Click Quizzes from the Assessments (main navbar) dropdown menu.
- Click Edit from the dropdown menu next to the quiz name.
- Select Preview (in Questions sections, above Total Points, of the Quiz.
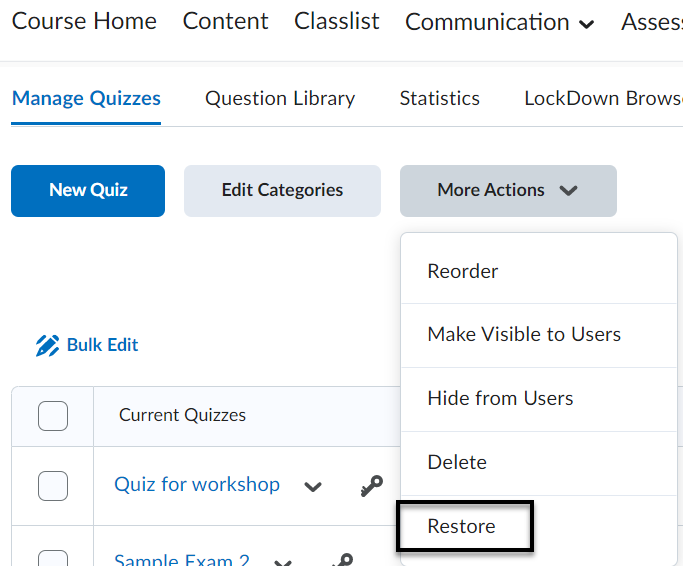
Restore a Deleted Quiz
If you would like to recover a deleted quiz, navigate to More Actions dropdown menu to select Restore. Click the Restore button next to the item(s) you would like restored.
Retake Incorrect Questions Only
It is possible for students to retake a quiz or exam with only incorrect questions available to answer. When grading, the instructor can only provide a score for the questions answered on that attempt. Correctly answered questions add to the student’s score. The overall grade calculation (e.g., highest attempt, lowest, first, last and average) is applied. Average calculated grade allows for assigning partial credit for questions not answered correctly on the first attempt.
In order for students to be able to complete the subsequent attempts, the previous attempts must be published.
- Expand Attempts & Completion section of Edit Quiz page, to select Manage Attempts.
- Select the number of attempts under Attempts Allowed dropdown menu. This must be assigned as 2 or more for the checkbox to be available for Retake Incorrect Questions Only.
- Check the box for On new attempts, only allow answers for previously incorrect questions.
- If a student attempts a quiz more than once, the student can only answer questions that were incorrect on the previous attempt.
- Attempt Conditions (optional): Allows for setting a minimum and maximum percentage value that must be achieved on the previous attempt to allow for the retake or additional attempt.
- Click OK.
Note: If you are using Automatic grading, Written Response questions will be marked as 0 and included in future attempts until graded manually.
Assessing Quizzes with Retake Incorrect Questions Only:
The retaken attempt 2, and any subsequent attempts will display under the student’s name in the Users tab area of the Grade Quiz page.
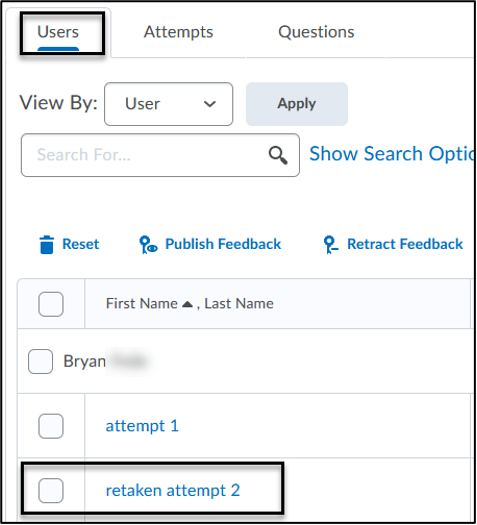
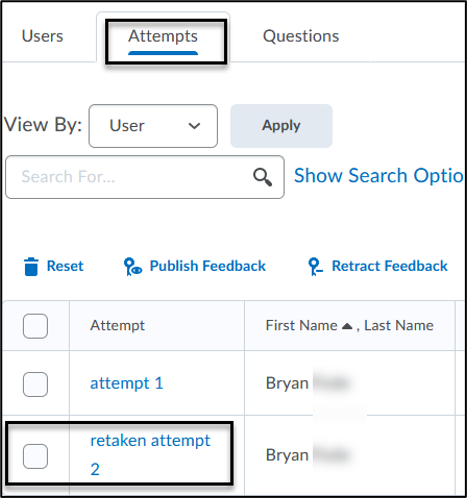
The Attempts tab (of the Grade Quiz page) will also list the retaken attempts for the students along with date/time stamp of completion along with score and grade and date/time published.
Filter Quiz Status
Filter by Users
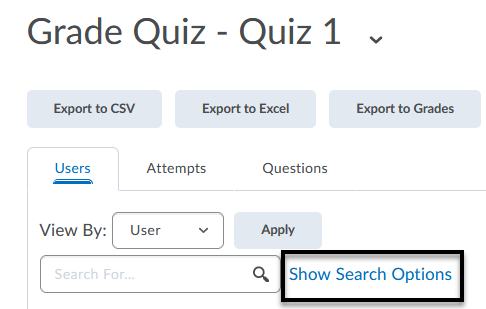
- Click Quizzes from the Assessments (main navbar) dropdown menu.
- Select Grade from the dropdown menu of the quiz you want to grade.
- Click Show Search Options link.
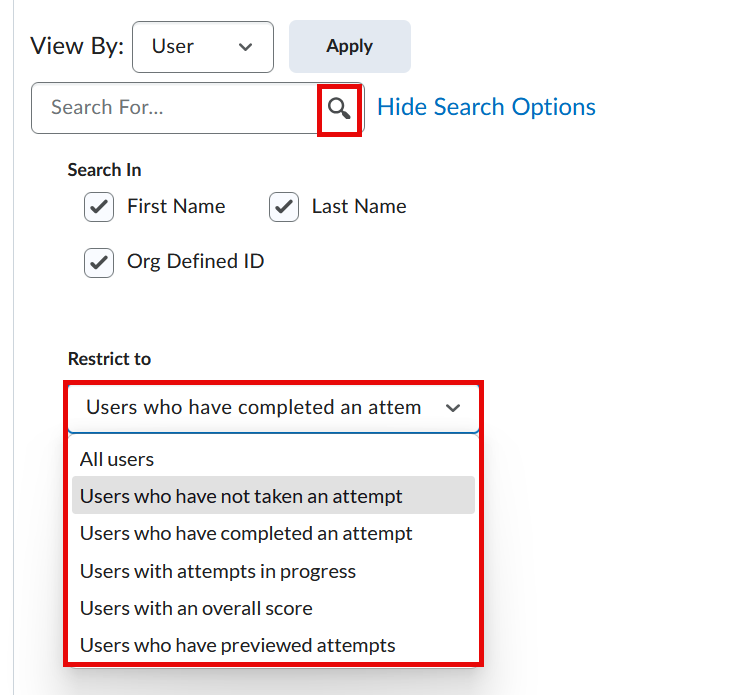
- Scroll down the page to find the options under the Restrict to dropdown menu.
- All Users
- Users who have not taken an attempt
- Users who have completed an attempt
- Users with attempts in progress
- Users with an overall score
- Users who have previewed attempts
- Click the magnifying bar to activate the search for the particular status selection.
Grade & Provide Feedback
Grading Quizzes
- Go to Quizzes on the Main Navigation Bar.
- Select Grade from the dropdown menu of the quiz you want to grade.
- From the quiz attempt list page, you can filter submissions by student, attempts or questions.
- Click on the attempt link under the student’s name to evaluate the quiz. The student’s entire quiz will display for grading.
- Correct student answers appear as a green checkmark, incorrect answers appear as a red X with the correct answer marked with a green arrow. Written responses (long answers) will need to be manually graded. (A rubric can be attached to written response question types. It is important to match the total points of the rubric with the total points given to the question.)
- You can provide feedback in multiple ways:
- Individual feedback for a question: Type your feedback in the Feedback description textbox found below the question and score box.
- Overall Quiz Feedback: Type your feedback in the Attempt Feedback box. The score is either entered directly in the Attempt Grade found above it or use a rubric to automatically update the score.
- Written Response Question Rubric Feedback: Add feedback within the rubric and select the level of performance to automatically update the score.
- Individual feedback for a question: Type your feedback in the Feedback description textbox found below the question and score box.
- After grading a quiz, click Save Draft and click the right arrow in the upper right-hand of the page to grade the next student.
- When you are done grading everyone, click Back to Grade Quiz button at the upper left-hand of the page to return to the quiz attempt listing.
- Select all students from the list by checking the top checkbox next to Learner. (Note: Increase number of students per page by scrolling to the bottom of the page and adjusting the number to the max allowed.)
- Click the Publish link at the top of the quiz attempt list page to publish the quiz scores.
Troubleshooting Tips for Quiz Scores not Publishing to grade book
Allow Export to Grades
- Check to ensure a grade item is associated to the quiz either select Edit or Link to Existing or Add to Grade Book. The latter option will automatically create a grade item with the same name as the quiz name. (Note: The default is set to Not in Grade Book.)
- Check the box to Synchronize to grade book on publish under Evaluation & Feedback section
- If there are questions that require manual grading, deselect Auto-publish attempt results immediately upon completion.
- Click Save and Close.
Publish Feedback
- Select Grade option of the Quiz dropdown menu to find the listing of the quiz attempt links.
- Ensure all student names are displayed by scrolling to the bottom of the page to ensure the number per page is set to 200 per page.
- Scroll to the top of the page to check the box next to Learner to select all students in the list.
- Click Publish.
Anonymous Grading
Note: Once anonymous grading is enabled, visibility of student names cannot be modified after submissions exist.
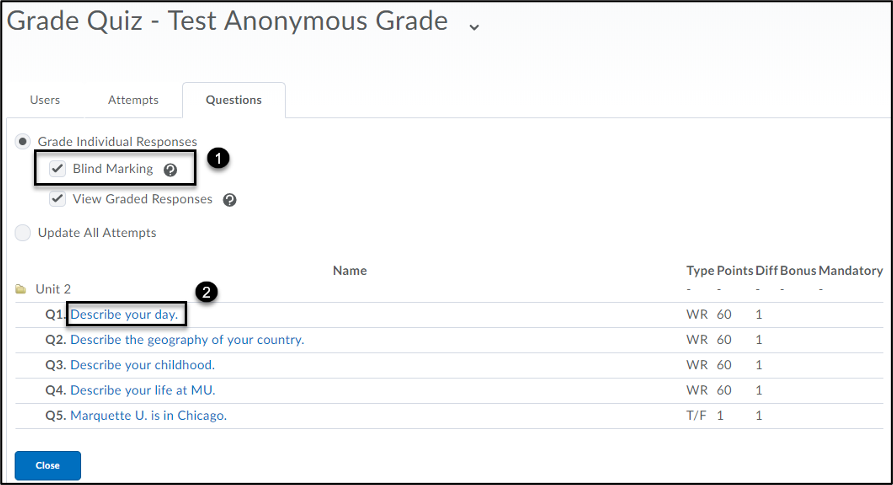
- Click Quizzes from the Assessments (main navbar) dropdown menu.
- Select Grade from the dropdown menu of the quiz you want to grade.
- Click on the Questions tab, to select Blind Marking [1] and click the first question to start grading [2].
- Enter the score [3] and feedback [4]. Click Save and Continue [5]. Select the next student by clicking the number or arrow [6].

- Click Go Back to Questions to grade the next question.
- To publish grades for all students to the gradebook, select the checkbox at the top to select all and click the publish icon. Click Save and Close.
Quiz Results Display
After submitting a quiz or exam, students can view their quiz or exam results if it is configured under the Evaluation & Feedback section of the Edit Quiz page. When published, the students will be able to view all questions or incorrect questions with or without correct answers displayed.
Instructions on how students can view quiz feedback.
Regrade a Quiz Attempt
If your quiz question was set up incorrectly after a quiz was submitted, D2L allows the ability to regrade the attempts. The instructor has the option to manually update each student’s quiz attempt or update all attempts at once.
Update individual quiz attempt
- Under Assessments > Quizzes > Manage Quizzes, click the dropdown menu next to the quiz name and select Grade.
- Click the attempt link to access the quiz results for each student. Enter the correct score for each quiz question accordingly.
- Click Save and Close.
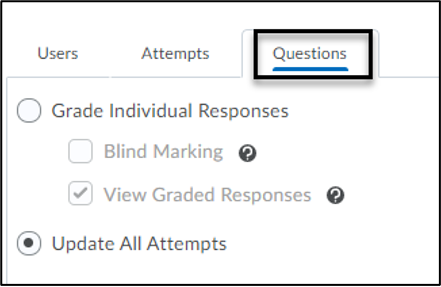 Update all attempts
- Under Assessments > Quizzes > Manage Quizzes, click the dropdown menu next to the quiz name and select Grade.
- Select the Questions tab and select Update All Attempts radio button.
- Select the question that you plan to give points back to. By default, the grading type is set to Give to all attempts ( ) points. Otherwise, specify which answer requires the points. Enter the number of points in the text box along with an option to comment. Click Save.
- Modifications Log will date stamp the action at the bottom of the page.
- Click Go Back to Questions.
Manage Quiz Attempts and Results
Reset or Restore a Quiz Attempt
Reset Quiz Attempt
An instructor can reset (delete) the quiz attempt to allow the student to restart the quiz.
- Under Assessments > Quizzes > Manage Quizzes, select the dropdown menu next to the quiz name and select Grade.
- Check the box next to the attempt you would like to reset and select the trash can icon (reset). Click Save and Close.
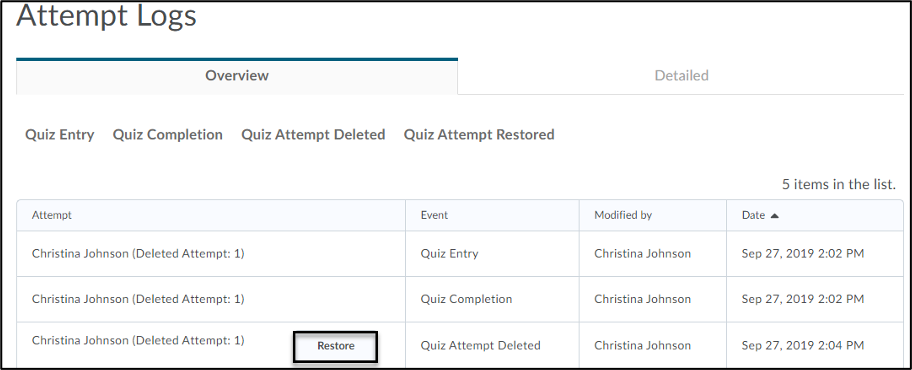
Restore Quiz Attempt
If a quiz attempt was deleted, the instructor can restore it by accessing the attempt log.
- Under Assessments > Quizzes > Manage Quizzes, select the dropdown menu next to the quiz name and select Attempt Logs.
- Select the Restore button next to the attempt that was deleted in error.
Reopen a Quiz Attempt
Regrade a Quiz Attempt
If your quiz question was set up incorrectly after a quiz was submitted, D2L allows the ability to regrade the attempts. The instructor has the option to manually update each student’s quiz attempt or update all attempts at once.
Update individual quiz attempt
- Under Assessments > Quizzes > Manage Quizzes, click the dropdown menu next to the quiz name and select Grade.
- Click the attempt link to access the quiz results for each student. Enter the correct score for each quiz question accordingly.
- Click Save and Close.
Update all attempts
- Go to Assessments > Quizzes > Manage Quizzes, click the dropdown menu next to the quiz name and select Grade.
- Select the Questions tab and select Update All Attempts radio button.
- Select the question that you plan to give points back to. By default, the grading type is set to Give to all attempts ( ) points. Otherwise, specify which answer requires the points. Enter the number of points in the text box along with an option to comment. Click Save.
- Modifications Log will date stamp the action at the bottom of the page.
- Click Go Back to Questions.
Note: Editing a quiz question after a student submits the quiz will not fix the student’s grades. A dialog box appears when an instructor attempts to edit a grade with student attempts. If you try to make an edit, another dialog box will inform you that those edits will only impact future attempts.
Quiz Statistics
Viewing Statistics
View or export a detailed analysis of a student's performance on a quiz or an exam. Filter data by individual, quiz question, and question details. Note: Quiz statistics are not available for questions in a Question Pool and only are based on the first quiz attempt.
- Select Quizzes from the Assessments (main navbar).
- Select the Statistics tab.
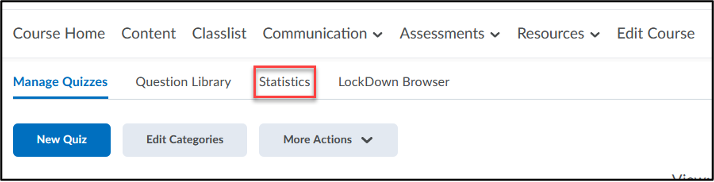
- View by Category or Availability.
- Quiz Averages for each Quiz is listed on the main page of Statistics.
- Click on the Quiz name hyperlink to view User Stats, Question Stats, and Question Details tabs.
- Filter by Groups and Sections (if groups or sections exist in the course)
-
User Stats tab
- Export to CSV or Excel is available.
- Displays Score Distribution and Class Average
- Student listing and overall quiz grade.
- Search by student name or ID.
-
Question Stats tab
- Export to CSV or Excel is available.
- Lists average grade along with standard deviation, discrimination index, point biserial for each question.
-
Question Details tab
- Export to CSV or Excel is available.
- Filter by date, first attempt and all attempts.
- Each question is viewable including average grade, standard deviation, point biserial and discrimination index.
Video Guides
Quizzes: Manage Quizzes
- Quiz Setup - asynchronous
- Quiz Setup - synchronous
- Share the Quiz link - synchronous
- Build a Question Library
- Grading a Quiz