
-
- Online Course Development
- Online Program Development
- Program Guidelines
- Accessible Technology
- Center for Teaching and Learning
- Contact Us
- For faculty and staff questions about online teaching or course design, submit your questions to the Learning Technologies portal.
Walk-in Consultation Hours for Faculty and Staff
Monday-Friday 9 a.m. - 3 p.m.
Room 326 Raynor Library
For more in-depth questions and course consultations, schedule an appointment with one of our Instructional Design and D2L Specialists
PROBLEM WITH THIS WEBPAGE?Report an accessibility problem
To report another problem, please contact emily.newell@marquette.edu.
Create a Quiz in D2L
Create formative and summative assessments using the Quizzes tool. For example, low stakes practice quizzes can be helpful for students to master content and prepare for the next assessment. Best practice is to build the questions in the question library first to import to any quiz or exam. Grades can be set up to automatically export to the grade book.
Creating a synchronous quiz follows the same steps as an asynchronous one except for a couple of differences in setup. The first difference is there only needs to be a start date entered. Secondly, the timer settings require editing to change the default of asynchronous to synchronous.
It is best practice to preview the quiz or exam before it is made visible to students. Use the preview option to make changes to the test. You can preview the test as many times as you need to in order to gain a better understanding of the student experience. There are additional features available to students during the test.
Quiz Accommodations
- Students with accommodations through the Office of Disability Services (ODS) may request additional time on quizzes. Instructors can provide this access through the Edit Accommodations feature in the Classlist.
Build a Quiz
Navigate to Assessments (main navbar) and select Quizzes from the drop-down menu. Select the New Quiz button to create a quiz or exam.
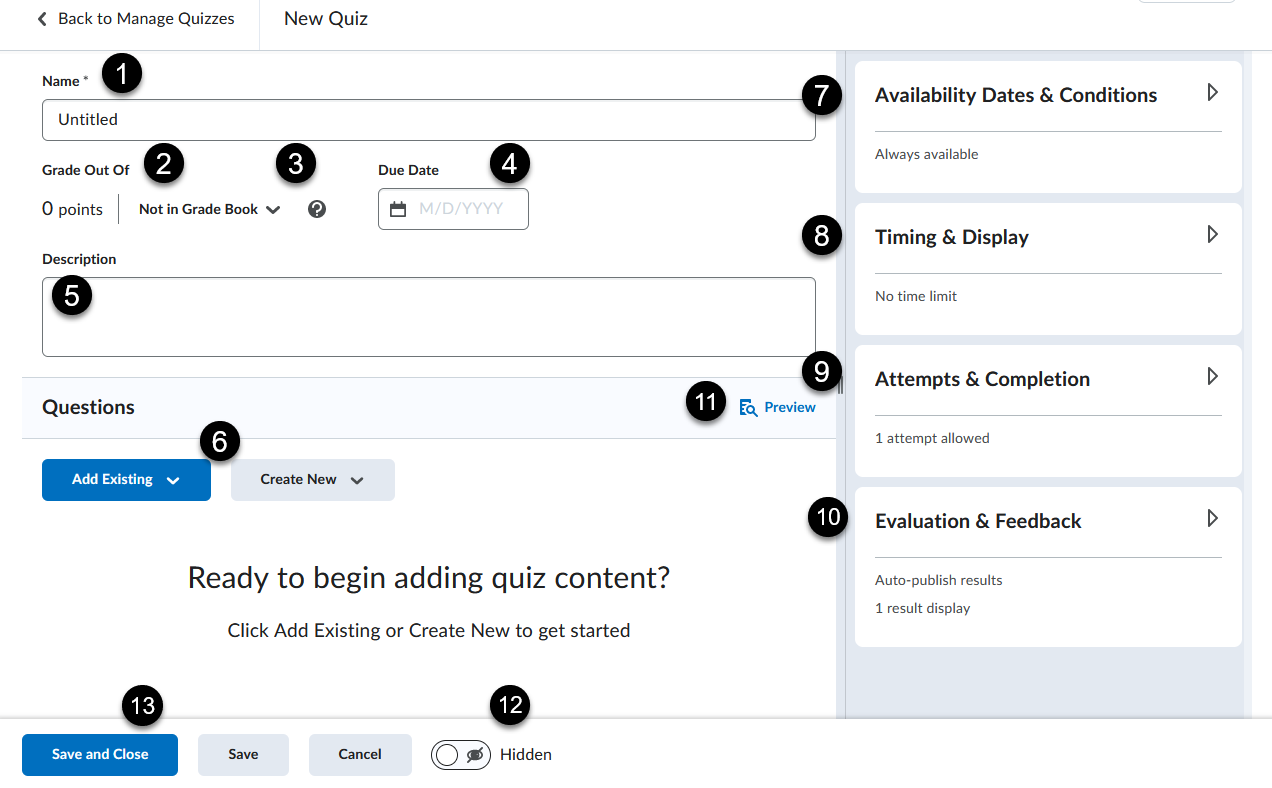
- Enter a title.
- Enter a point value in the Grade Out Of field.
- The default is to automatically create a grade item in the grade book indicated by In Grade Book. However, you can change this setting by clicking the drop-down menu to select an already existing grade item to associate with or select Not in Grade Book if the quiz is not contributing to the final grade.
- Enter a Due Date. This populates the D2L calendar which makes this visible to students on the home page under upcoming events and in Content under Course Schedule.
- Enter details (e.g., time limit of quiz, reminder of academic integrity) for the quiz in the description text box.
- Add new or existing questions. If you built questions in the question library then select Add Existing button to browse the question library. To add new questions directly to the test, select Create New. Question pool setup is found under the Create New button. This way you can access questions from a larger set of questions in a folder located in the question library. Note: If you create a quiz or exam with more than 200 questions, you will see a Load More button at the bottom of the page to see the updated list of questions. It is possible to move multiple questions at a time by checking the questions and dragging and dropping to the new location within the quiz or exam.
- Expand Availability Dates and Conditions to find settings to restrict when the student can access the quiz or exam. The other settings include: release conditions, special access, password, and IP restrictions.
- Expand Timing & Display to set an enforced time limit. The other settings include: paging, shuffle quiz, display, header and footer.
- Expand Attempts & Completion to edit the default of 1 attempt allowed.
- Expand Evaluation & Feedback to auto-publish attempts immediately upon completion and synchronize to grade book on publish. Set up what displays to students upon publishing. The default view is set to show the grade but not any questions. Customize Quiz Results Displays link will allow you to edit the default view and add an additional view to release the questions for viewing at a specific time frame.
- Preview the quiz or exam as a student. It's best practice to preview before making it available to students.
- Toggle to make the quiz or exam visible to students. It is recommended to have the availability start and end dates set before making visible.
- Save and close to exit the quiz and return to the Manage Quizzes page. Click Save to remain on the same page. Click Cancel to not save any changes or edits made.