Reserving rooms for meetings or events
External partners: rent our space
Event space: Michels Family Forum
Surface Hub device instructions
Address:
Dr. E.J. and Margaret O’Brien Hall
1530 W. Wisconsin Avenue
Milwaukee, WI 53233
Click image to enlarge in new tab
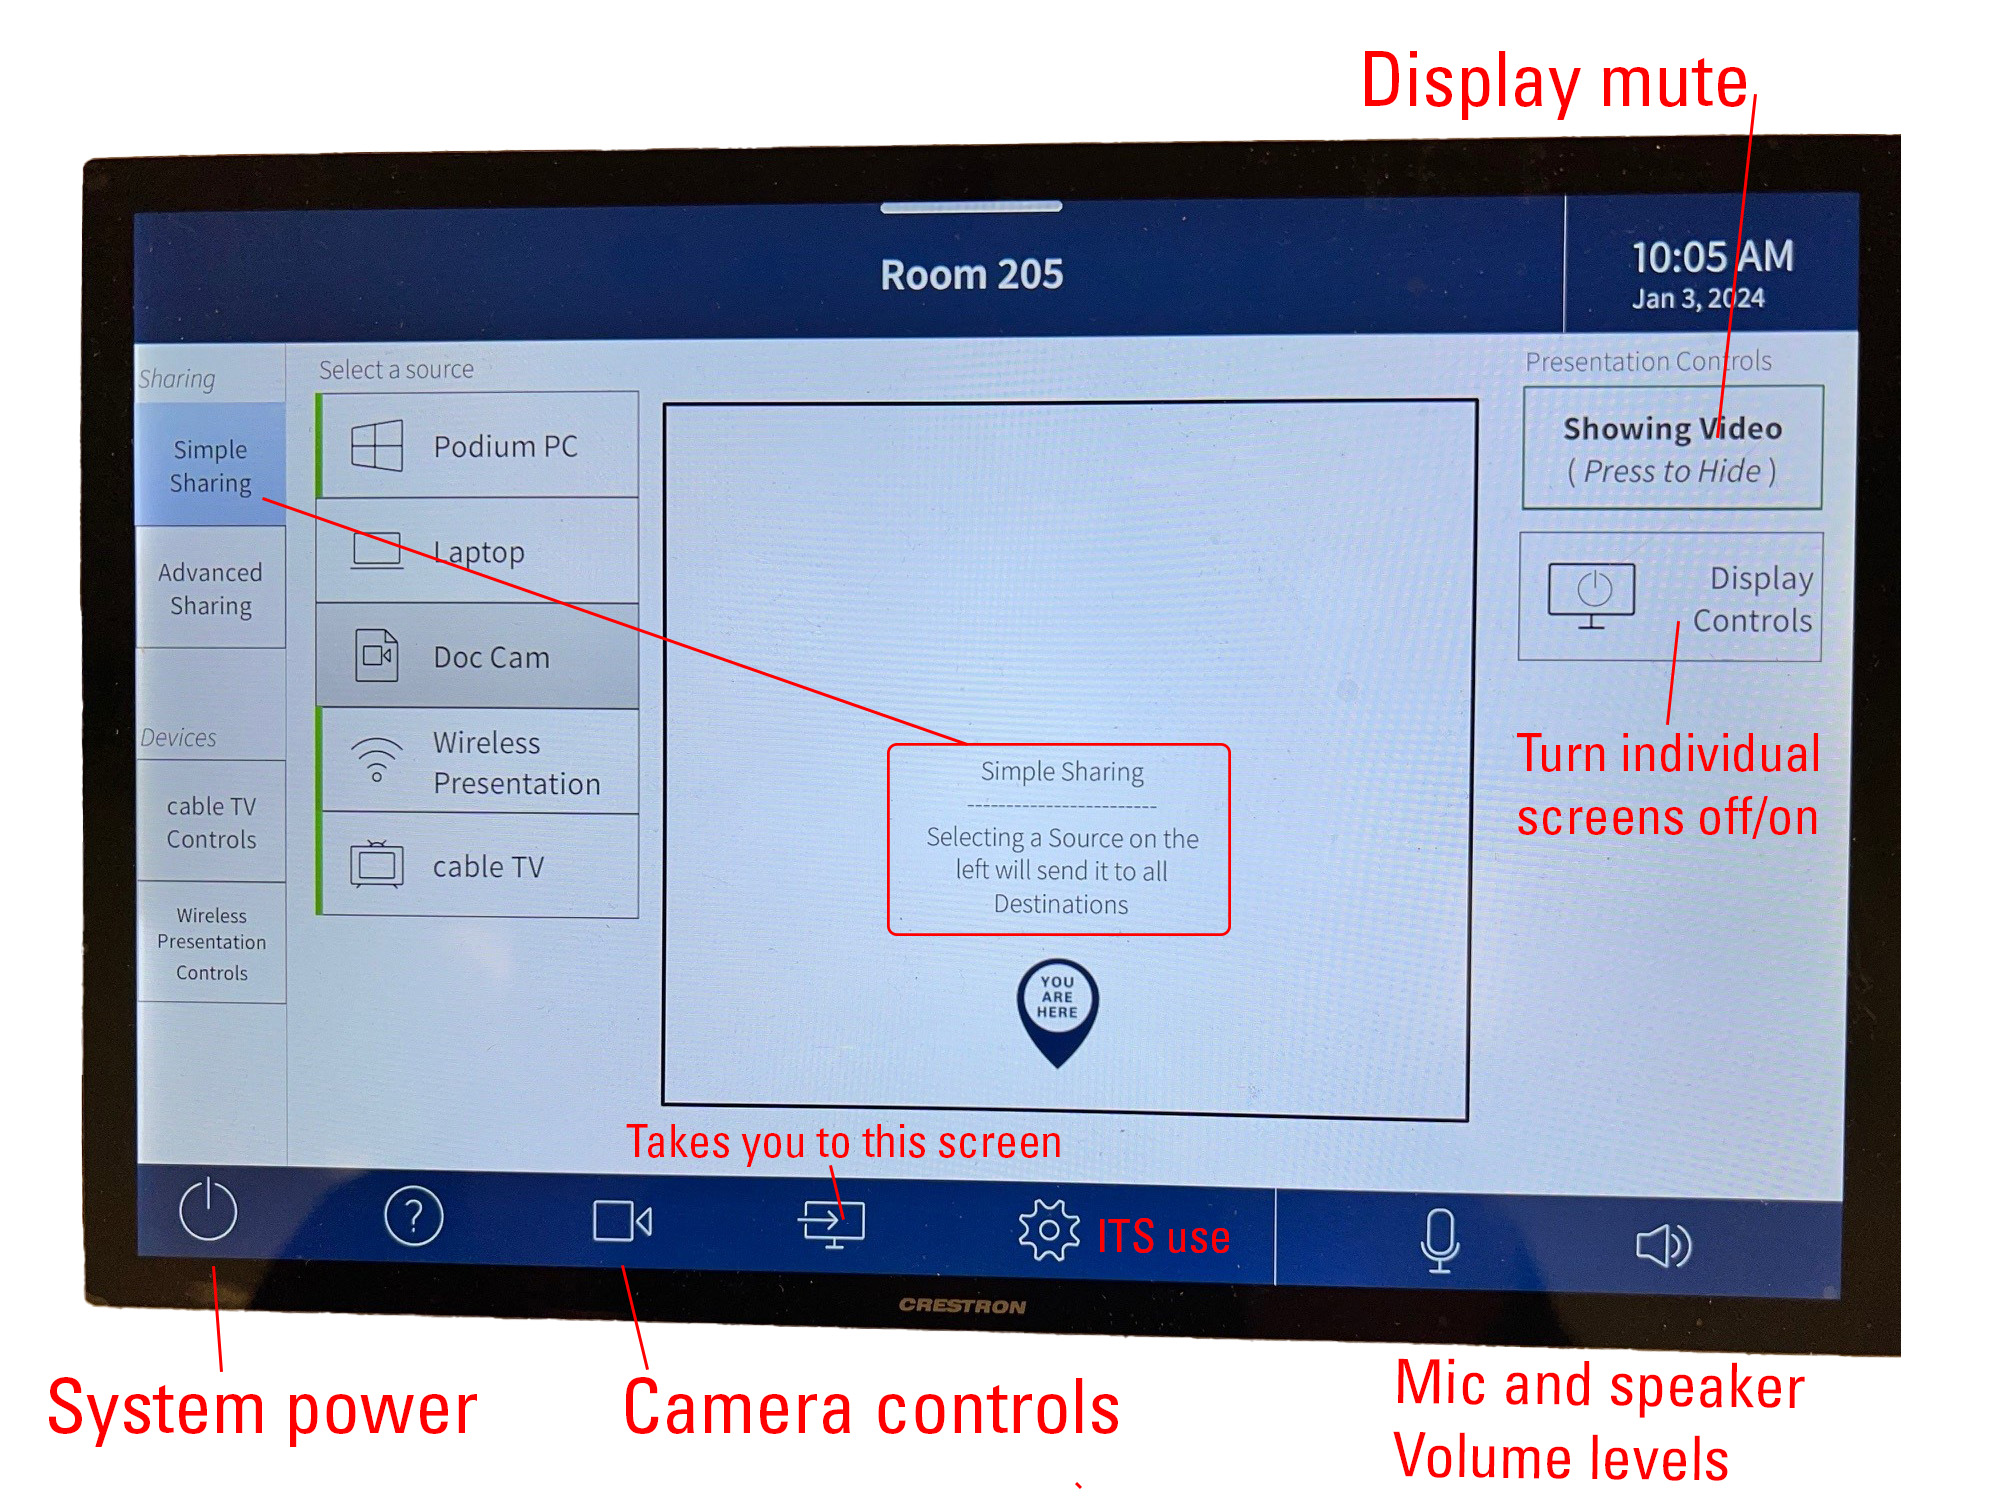
This is the screen that shows on system startup. To project the PC or laptop, simply select either under "select a source" and it will be displayed on all room screens. Mic and speaker volumes will be red if muted. See more info on sources below.

This tab allows you to map different sources to different destination screens.
First tap the source you want to show on certain screens, then tap the blue text on the destination screens on the room diagram. Repeat until you have the room configured as you like.
The X button turns that screen off, providing a convenient duplication of the display controls tab.
You will need to specify which source the audio is coming from by mapping the source to the Room Audio square
The sources are described below.
The LEFT podium PC monitor. This may not be the monitor with the desktop icons as that can be changed in Windows settings. You can drag windows from the left or right (primary or secondary) screens just as you can with a dual-monitor setup in your office.
The RIGHT podium PC screen. With Advanced Sharing, you can control what is shown on which screen by dragging windows between the screens. For instance you may want to show an Excel sheet on some screens, while keeping your PowerPoint displayed on others, and you can map the classroom screens accordingly.
The HDMI laptop input. It is possible to send your laptop to some screens, and the podium PC to others. The HDMI cable must be connected to your laptop to project. The USB cable is only for the purposes of connecting the room cameras to your laptop.
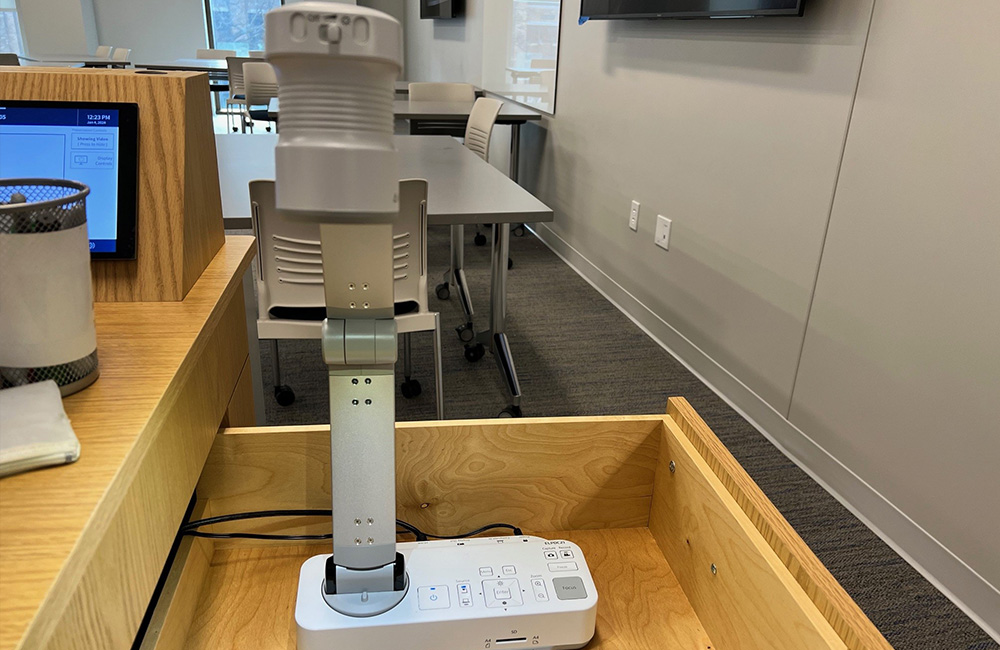
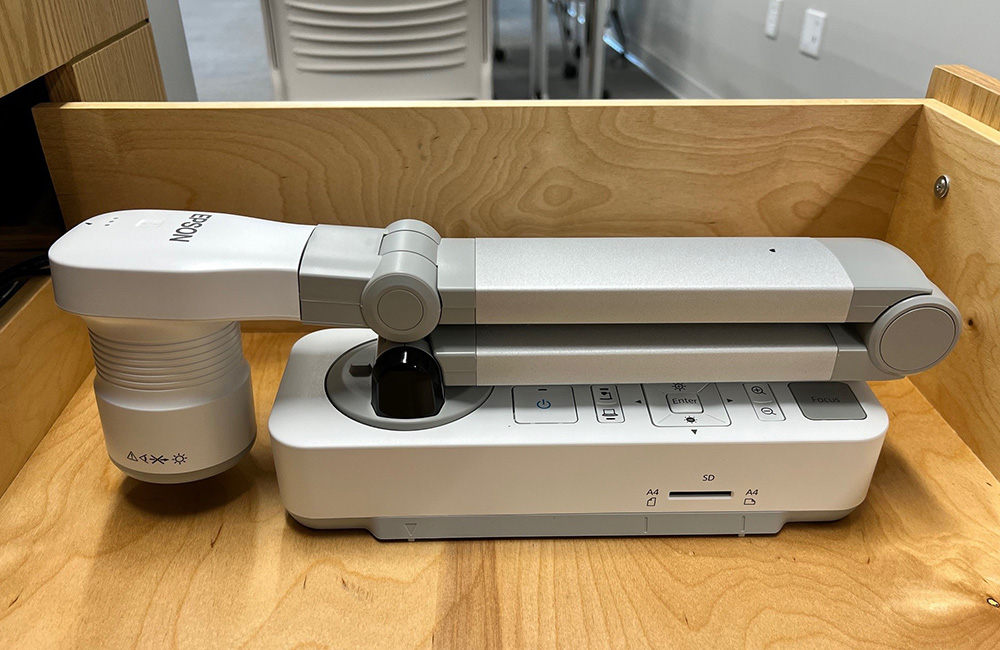
The EPSON document camera is located in a drawer on the right of the podium. Use the controls on the document camera itself to turn it on or off, to zoom, or focus etc. See the document camera section below for more info.
This is the Crestron AirMedia feature, now available in all classrooms. You or your students can wirelessly connect a laptop by typing in the IP address or connection shown on the screen. There are also Crestron AirMedia apps available for iOS or Android devices. More info on wireless presentation below.
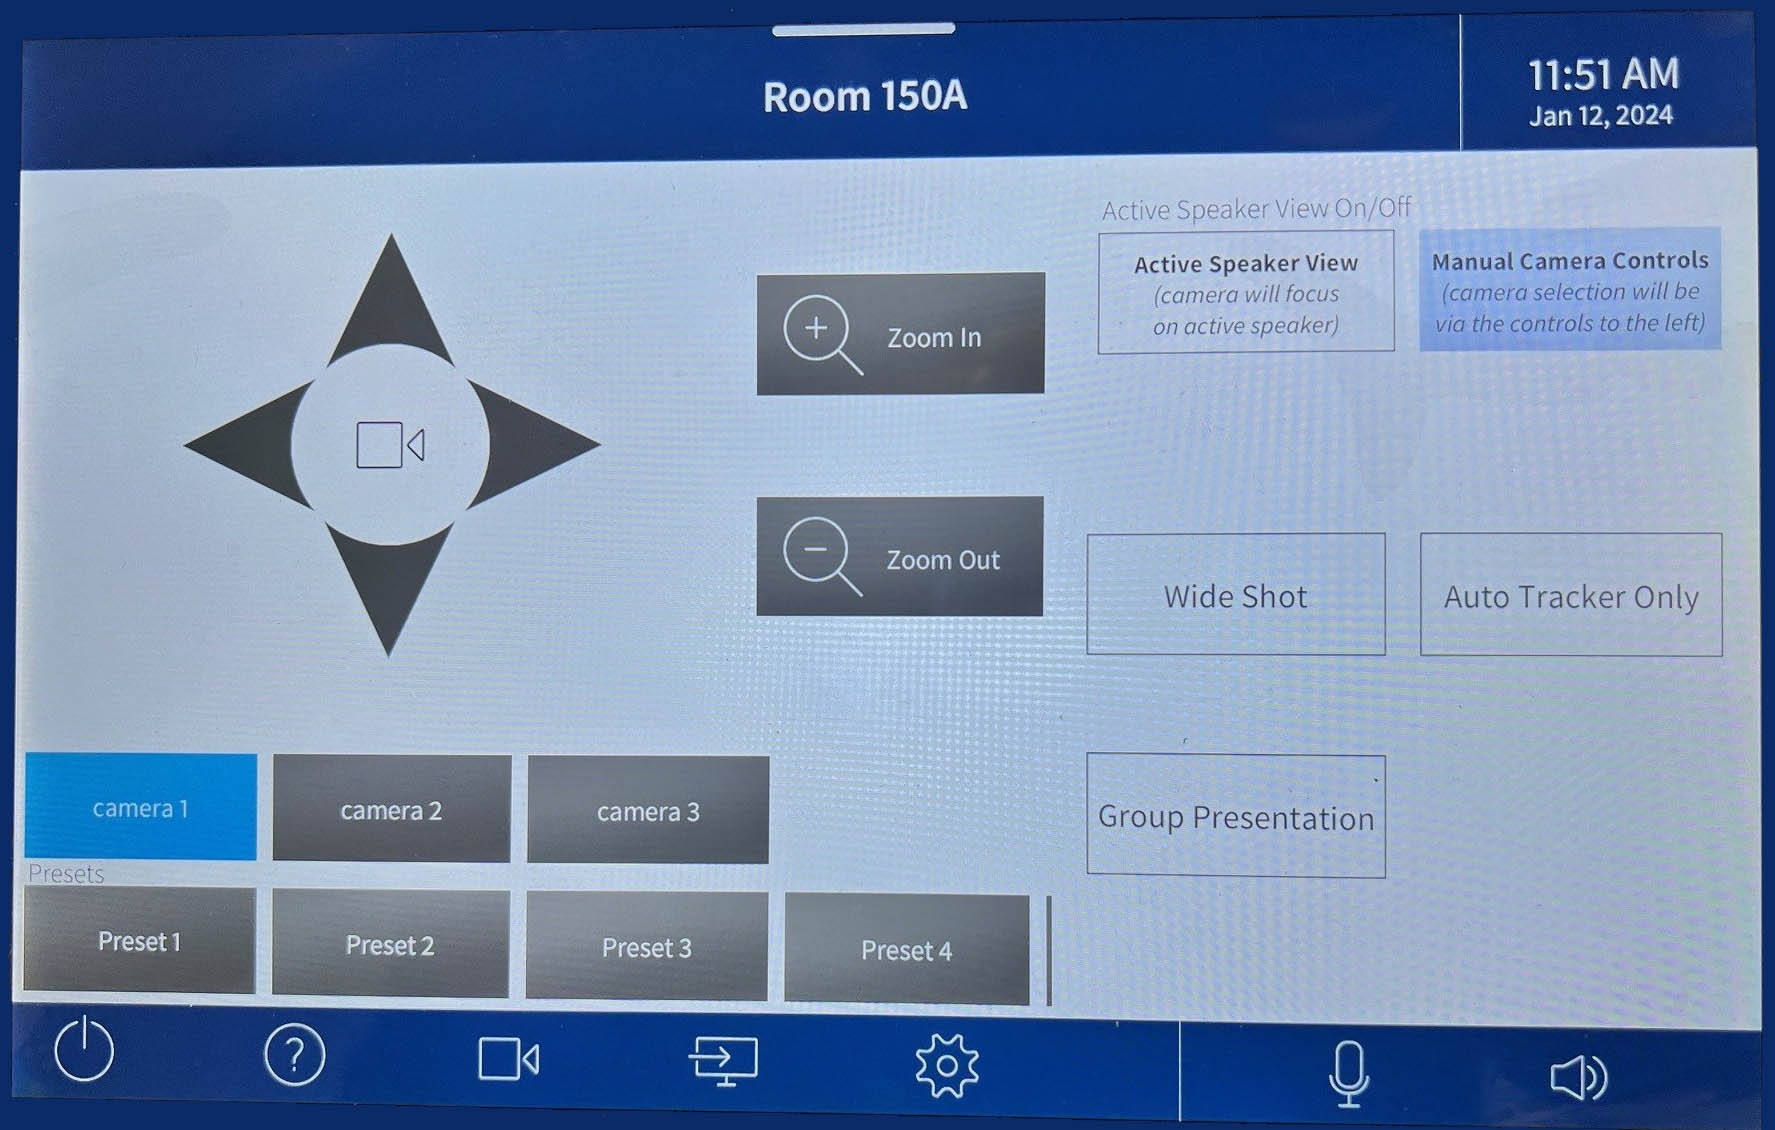
You can map the presenter-tracking camera to certain screens as well, this may be useful in larger rooms so everyone can clearly see the speaker. More info on cameras below.
There is a cable TV feed to every classroom. You can map cable broadcasts to individual screens here as well, then use the Cable TV controls tab to select the channel.
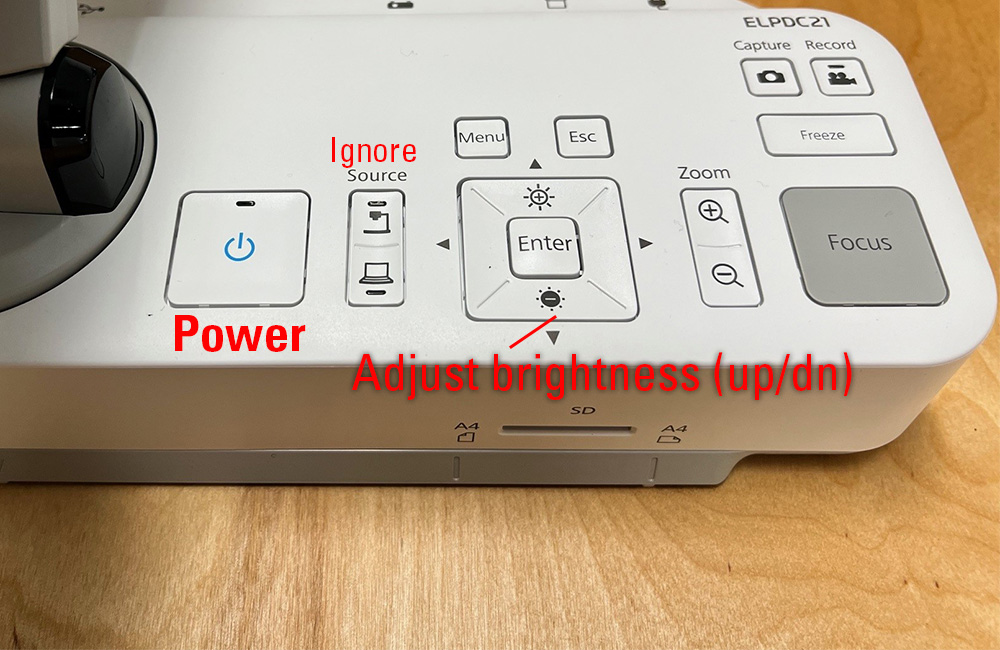
There are no document camera controls on the Crestron control panel.
Here is the control panel, most buttons are self-explanatory:
click to enlarge in a new tab
Holding the base, extend the head as high as possible in order to have the largest area captured:
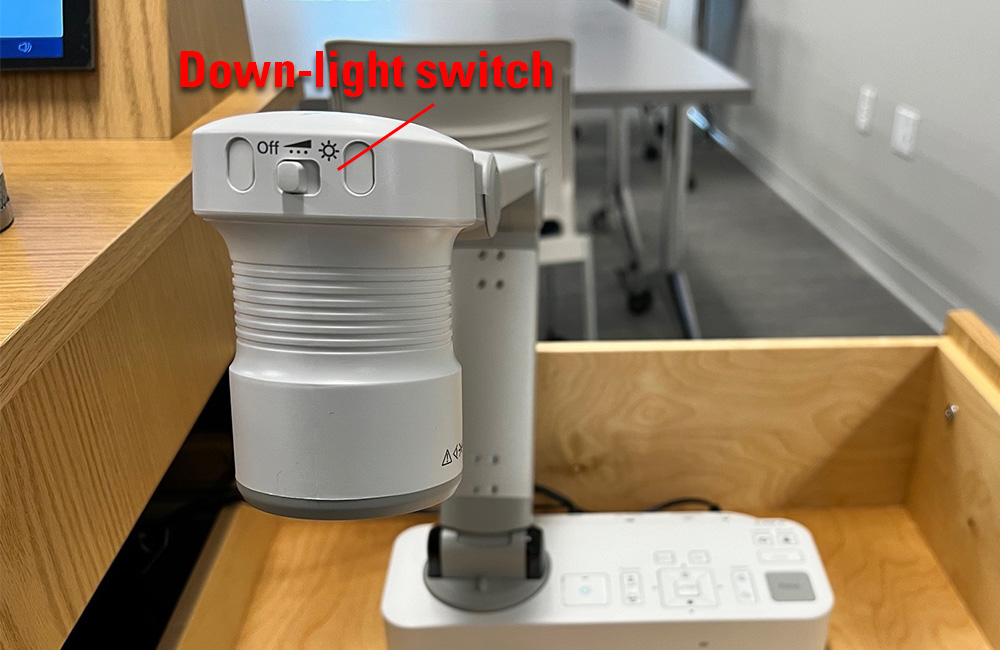
Note the switch to turn on a down-light if necessary:
When finished, please fold the doc cam into this configuration, holding the base while moving the head:
The wireless presentation button selects the Crestron AirMedia system for a wireless connection to the classroom displays from laptops, tablets or mobile phones. AirMedia requires an app running on your device.
Get ready: Download AirMedia for Windows or Mac (the deployable or guest apps both work). For iOS or Android search the App Store for AirMedia.
Entering the displayed IP address in your browser will also download the client.
After launching the app enter the IP address shown on the screen to start the connection, then the 4 digit code. If you have connected before it may detect the address and just ask you for a code.
 <-- These controls will appear on your PC or Mac.
Dock = stop projecting momentarily but stay connected and ready to resume
Pause = freezes the screen
Volume = audio is routed to the room speakers from Mac or PC, click to mute.
Disconnect = end your connection when you're done for the day.
Tip: consider using this to allow your students to share their screens if appropriate for your classroom activity!
The wall-mounted cameras are connected to the podium PC or laptop as a USB connection. If you connect the USB cable to your laptop, the camera system is no longer available to the podium PC.
Any app such as Teams or Zoom will recognize the camera system as an available camera and microphone. When using a laptop you will need to change the device settings in Teams or zoom to tell it to use the room system rather than the internal camera and mic.
You can also display the camera feed on one or all classroom screens under Advanced Sharing, this may be handy in larger rooms.
There are two separate systems that are similar but have a few minor differences.
You can choose automatic presenter tracking, a preset scene, or set the camera angle and zoom manually. If you find a camera angle you like, you can save it by holding one of the open Preset # buttons for a few seconds, but be aware this may be over-written by other users.
Presenter tracking works via the camera itself making its best guest at who the presenter is, and following them. It works best when your students are seated and you are walking around the room; within certain limits it will try to follow you. The camera may not be physically able to reach all corners of the room.
If student groups are presenting or others are standing or moving around the room, it is best to select "tracking off" and set the camera angle with a preset or manually with the pan and zoom controls.
Audio is picked up automatically through ceiling-mounted microphones that are capable of hearing the entire room.

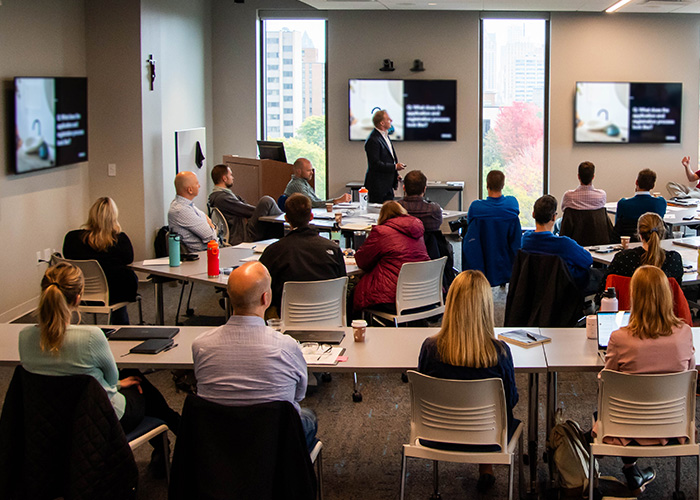
This is an example of a larger room with multiple cameras. The multiple cameras are used together automatically when presenter tracking is enabled. Audience-facing cameras may be preferred when having a remote guest speaker for instance, in which case you would disable presenter tracking. You will also find a few presets on the right for common configurations.
Every room is now equipped with a lavaliere microphone for voice amplification within the room. Place the microphone pack tightly back into the charger so it recharges, a light will come on showing it is charging.
The lavaliere microphones are mixed in to the audio for the camera system as well, however it is not necessary to use them for remote guests to hear you. The ceiling mounted mics work great for most cases.
Microphone volume / sensitivity is controlled through the mic button / slider on the blue bar on the Crestron display.
The "combine rooms" button under advanced sharing will be found in our three rooms with divider walls. Normally the sides operate separately. When using the entire large space you can combine to control all screens from one podium.
One side is permanently set as the "master" podium in combined mode, as listed below:
150: B side, east. | 226: A side, west | 436: A side, east
When in combined mode, the podium on the other non-master side is not usable, nor are the cameras on that side of the room. The Crestron panel will display a message telling you to use the other side.
When finished in Combined mode, on the master side you must set it back to Divided mode. This will shut down both systems and release the other podium to normal operation.
The device that connects the cameras to the PC or laptop also has the ability to capture the computer's screen. The Picture in Picture (PIP) buttons in Conference Controls allow you to turn this on or off, to choose from a few arrangements and to swap the images. You can also do screen sharing like normal via Teams or Zoom, in which case you would want to turn the PIP off here. However it may be nice to use this feature if teaching in a hybrid setting with some students online, or if you are recording outside of Teams.
Logitech Scribe cameras provide a video input into the podium PC much like a webcam. You can select this camera in Teams, or if you just want to display it over the projector, you can launch the Camera app, press the switch camera button if the camera is showing the classroom view, and the maximize the window. Please be aware the cameras are not able to capture the entire whiteboard width in some rooms. Use a fresh, black marker for best results. The whiteboard cameras cannot be accessed directly via the Crestron panel, they need to work through the PC.
Privacy Policy Legal Disclaimer Non-Discrimination Policy Accessible Technology
© 2026 Marquette University